Peking Duck Recipe (北京烤鸭)
The first batch I made at home came out with greasy, chewy skin. Not rubbery exactly, the colour was right, mahogany and lacquered-looking, but the skin had no crispness. It compressed rather than shattered when bitten. I had done the 24-hour refrigerator dry, applied the maltose glaze in three coats, and roasted it correctly. The problem was one step I had done carelessly: separating the skin from the fat layer.
Duck has a thick layer of subcutaneous fat between the skin and the meat. During roasting this fat must render and drain away from the skin for the skin to crisp. If the skin is still attached to the fat layer, the rendered fat has nowhere to go, it pools beneath the skin, keeps it greasy, and sits between the skin surface and the dry oven heat. The fat is the insulator that prevents crisping. Every preparation step in this recipe, the blanch, the drying, the glaze, the two-temperature roast, exists to get that fat out from under the skin before the oven heat sets the skin. When I understood that, the rest of the recipe made sense.
What is Peking duck and what makes it different from other roast duck?
Peking duck (北京烤鸭, Běijīng kǎoyā) is the imperial roast duck of Beijing, one of China’s most documented dishes and one of its most technically demanding. The dish dates to the Yuan dynasty (13th-14th century) and was refined under the Ming emperors at the imperial court. The two great Beijing restaurants that codified its modern form, Quanjude (1864) and Bianyifang (1416), developed different approaches: Quanjude uses a hung open oven with fruit wood, Bianyifang uses a closed oven. Both produce the same defining result: skin so thin and crisp it shatters like lacquered glass, with juicy meat beneath.
The home oven version cannot replicate the professional result exactly. A wood-fired hung oven at 270°C with the duck rotating in radiant heat is a different environment from a domestic oven. What the home version can produce is the same preparation logic applied to different equipment: properly separated skin, fully dried surface, maltose glaze, and a two-stage temperature roast that mimics the fat-rendering and skin-setting sequence of the professional method.
Peking duck is distinct from Cantonese roast duck (char siu duck), which uses different seasoning, a different preparation method, and is not served with mandarin pancakes. Peking duck is also distinct from general Chinese roast duck, the specific preparation steps are what define it.
Why do you separate the skin from the fat layer?
This is the most important step in the entire recipe. Everything else builds on it.
Duck skin sits over a layer of subcutaneous fat approximately 5-10mm thick, depending on the breed and diet of the duck. During roasting, this fat must render and flow away from the skin surface for the skin to crisp. The rendered fat needs a path downward and away from the skin, if the skin remains attached to the fat by connective tissue threads, the fat cannot flow efficiently and it pools beneath the skin.
The separation creates the drainage gap. Work your fingers gently under the skin starting at the neck cavity opening. Move in small circles, feeling for the connective tissue threads and breaking them with consistent gentle pressure. Work across the breast, over the thighs, down the legs as far as your fingers can reach. The skin should feel loose and pliable against the meat after proper separation, you should be able to see the gap when you hold the duck up and look into the neck cavity.
Do not tear the skin. Torn skin creates openings where fat can leak through and pool on the surface during roasting, which burns and prevents even crisping. Work slowly and consistently rather than forcing the separation.
What does the boiling water blanch do?
After separating the skin, bring a kettle or large pot of water to a full boil. Pour it evenly over the entire duck surface, turning the duck to ensure every area receives the water. Work quickly and completely.
The boiling water causes the collagen fibres in the duck skin to contract rapidly. Collagen is the structural protein of skin, at boiling temperature it shrinks and tightens. The skin visibly pulls tighter across the duck after blanching, creating a more even, taut surface.
Two things happen simultaneously: the tightened skin provides a more uniform surface for the maltose glaze to adhere to evenly, and the heat begins rendering the outermost layer of subcutaneous fat. The fat closest to the skin surface starts to liquefy, which makes it easier for the subsequent drying process to complete its work.
After blanching, pat the duck completely dry inside and out with kitchen paper. Every drop of surface moisture removed now is moisture that does not need to evaporate during the 24-hour refrigerator dry.
Why is maltose better than honey for the glaze?
Maltose (麦芽糖, mài yá táng) is a disaccharide made of two glucose molecules. Its key property for Peking duck is low hygroscopicity, it does not absorb moisture from the surrounding air readily.
When maltose glaze is applied to duck skin and allowed to dry, the maltose forms a hard, dry, glassy surface layer. This is the lacquer. During roasting, this dry layer caramelises and Maillard-reacts into the deep mahogany colour and shatteringly hard texture that defines properly made Peking duck skin.
Honey contains approximately 38-40% fructose, one of the most hygroscopic natural sugars. Honey glaze absorbs ambient moisture from the air during the drying process and remains slightly tacky even after 24 hours. A tacky surface does not produce the same lacquered result. It produces a glaze that is glossy and dark but soft rather than hard, sticky rather than shatteringly crisp.
Honey is an acceptable substitute if maltose is unavailable. The result is still good. But the texture difference is real and noticeable. Maltose is available at Chinese and Asian grocery stores, usually in a plastic tub in the confectionery or baking section.
Dissolve the maltose in a small amount of hot water and rice vinegar before applying. Maltose is too thick and sticky to apply directly, the water and vinegar thin it to a brushable consistency and the vinegar’s acidity helps the glaze penetrate the skin surface slightly.
Why does the duck need 24-48 hours in the refrigerator specifically?
The refrigerator is not just cold storage. It is the drying environment.
A domestic refrigerator maintains approximately 30-40% relative humidity, significantly drier than most room environments, which typically run at 50-70% humidity. At low humidity, moisture evaporates from the duck skin surface into the surrounding air without immediate replacement. The skin desiccates progressively over 24-48 hours.
The cool temperature serves a second purpose: it prevents the subcutaneous fat from softening during the drying process. Duck fat begins to soften at approximately 20-25°C. In a warm kitchen, the fat would start to migrate into the skin during the long drying period, counteracting the dehydration. At refrigerator temperature (3-5°C), the fat stays solid and the skin dries cleanly.
After 24 hours the skin will feel noticeably drier and slightly stiff. After 48 hours it should feel like parchment, completely desiccated, with almost no give when pressed. The 48-hour result produces noticeably crispier finished skin than the 24-hour result.
Place the duck uncovered on a rack set over a tray. Uncovered is critical, any wrapping traps the moisture you are trying to remove.
Why do you roast at lower temperature first then increase?
The sequence matters as much as the temperatures.
Duck subcutaneous fat renders at approximately 35-40°C inside the fat layer. Duck skin proteins, primarily collagen and keratin, begin to set and harden at approximately 65-70°C. At full roasting temperature these thresholds are crossed almost simultaneously. The sequence of events determines whether fat drains before or after the skin sets.
Starting at lower temperature (160-170°C): the fat inside the duck heats gradually. It reaches rendering temperature first and begins liquefying and flowing downward through the skin-separation gap, away from the skin. This drainage takes approximately 20-30 minutes. During this time the outer skin is warming but has not yet reached the temperature at which its proteins fully set.
Increasing to 200-210°C after the fat has rendered: the outer skin now crisps rapidly in direct oven heat with minimal fat remaining beneath it. The skin proteins set in a dry, fat-free state and produce the crispy result.
Starting at high temperature immediately: the outer skin proteins set before the fat has had time to drain. The fat becomes trapped beneath the set skin. The skin looks dark and roasted from the outside but is greasy and chewy on the underside. This is the most common failure mode for home Peking duck.
Why does the duck need to come to room temperature before roasting?
One hour at room temperature before going into the oven. This is not about flavour. It is about temperature differential.
A duck taken directly from a 4°C refrigerator and placed in a 200°C oven has an extreme temperature gradient from surface to centre. The surface reaches cooking temperature rapidly while the interior is still very cold. The outer breast meat begins overcooking while the inner thigh is still raw. The skin can char before the thickest parts of the bird are properly cooked through.
An hour at room temperature brings the duck to approximately 15-18°C throughout. The temperature gradient into the hot oven is much smaller. The surface and interior reach their target temperatures within a more similar timeframe, producing more even cooking and reducing the risk of overcooked breast and undercooked thigh.
Ingredients
Serves 4
The duck:
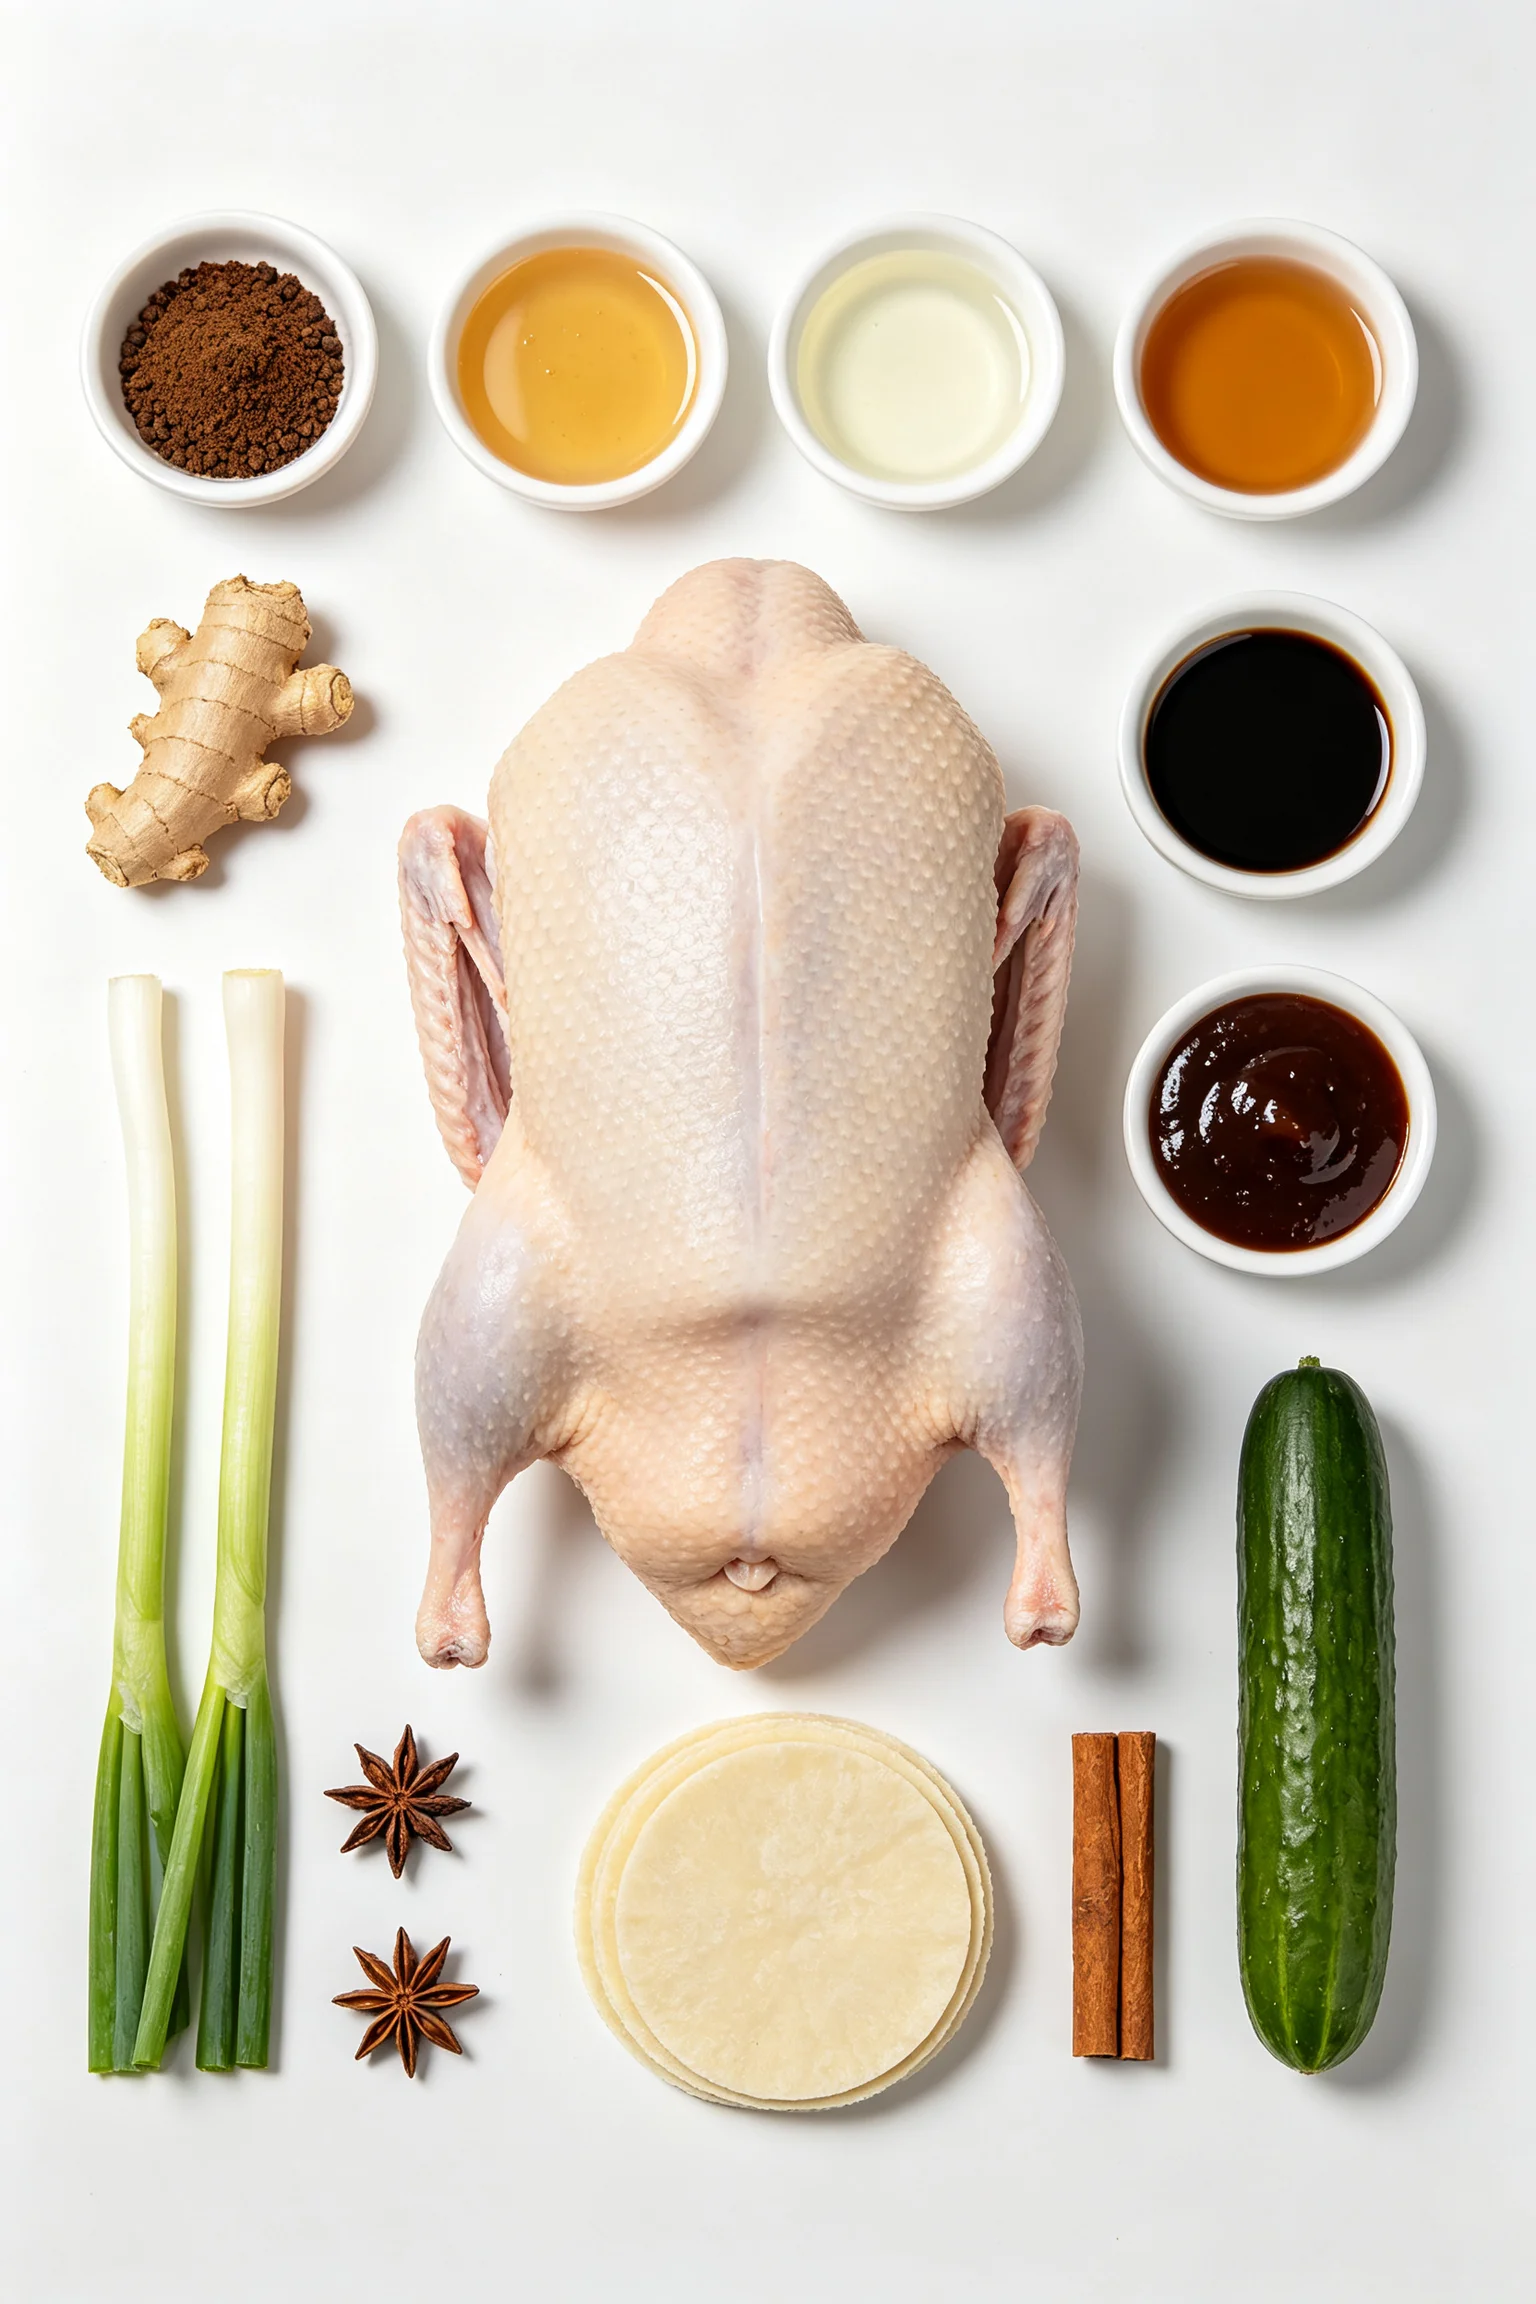
- 1 whole duck, approximately 2-2.3kg (4.4-5lb), fresh or fully thawed
- 2 tsp salt for the cavity
- 1 tsp five-spice powder
Aromatics for the cavity:
- 3 spring onions, tied in a knot
- 4cm fresh ginger, bruised
- 2 star anise
- 1 cinnamon stick
Maltose glaze (make 3 applications):
- 80g (3oz) maltose, or honey as substitute
- 3 tbsp hot water
- 2 tbsp rice vinegar
- 1 tbsp soy sauce
For serving:
- 16-20 thin mandarin pancakes (store-bought)
- 4 tbsp hoisin sauce
- 1 cucumber, julienned
- 4-6 spring onions, julienned
- Additional hoisin for dipping
Instructions
This is a 2-day process. Day 1: prep and dry. Day 2: roast and serve.
Day 1, Step 1: Separate the skin
Remove the duck from packaging. Remove any giblets from the cavity. Pat completely dry inside and out with kitchen paper.
Working from the neck cavity opening, gently insert your fingers under the skin. Move in small circles, breaking the connective tissue threads between skin and fat with consistent gentle pressure. Work across the breast, over the thighs, and as far down the legs as your fingers can reach. Do not tear the skin. Take 5-10 minutes on this step.
Day 1, Step 2: Season the cavity
Mix salt and five-spice powder. Rub the mixture inside the cavity. Place the spring onions, ginger, star anise, and cinnamon stick inside the cavity. These perfume the meat from within during roasting. Secure the cavity opening with a small skewer or toothpick to keep the aromatics inside.
Day 1, Step 3: Blanch with boiling water
Bring a full kettle of water to a rolling boil. Set the duck on a rack over the sink or over a deep tray. Pour the boiling water slowly and evenly over the entire duck, turning it to cover all surfaces. The skin will visibly tighten. Pat dry immediately and thoroughly with kitchen paper.
Day 1, Step 4: Apply the maltose glaze
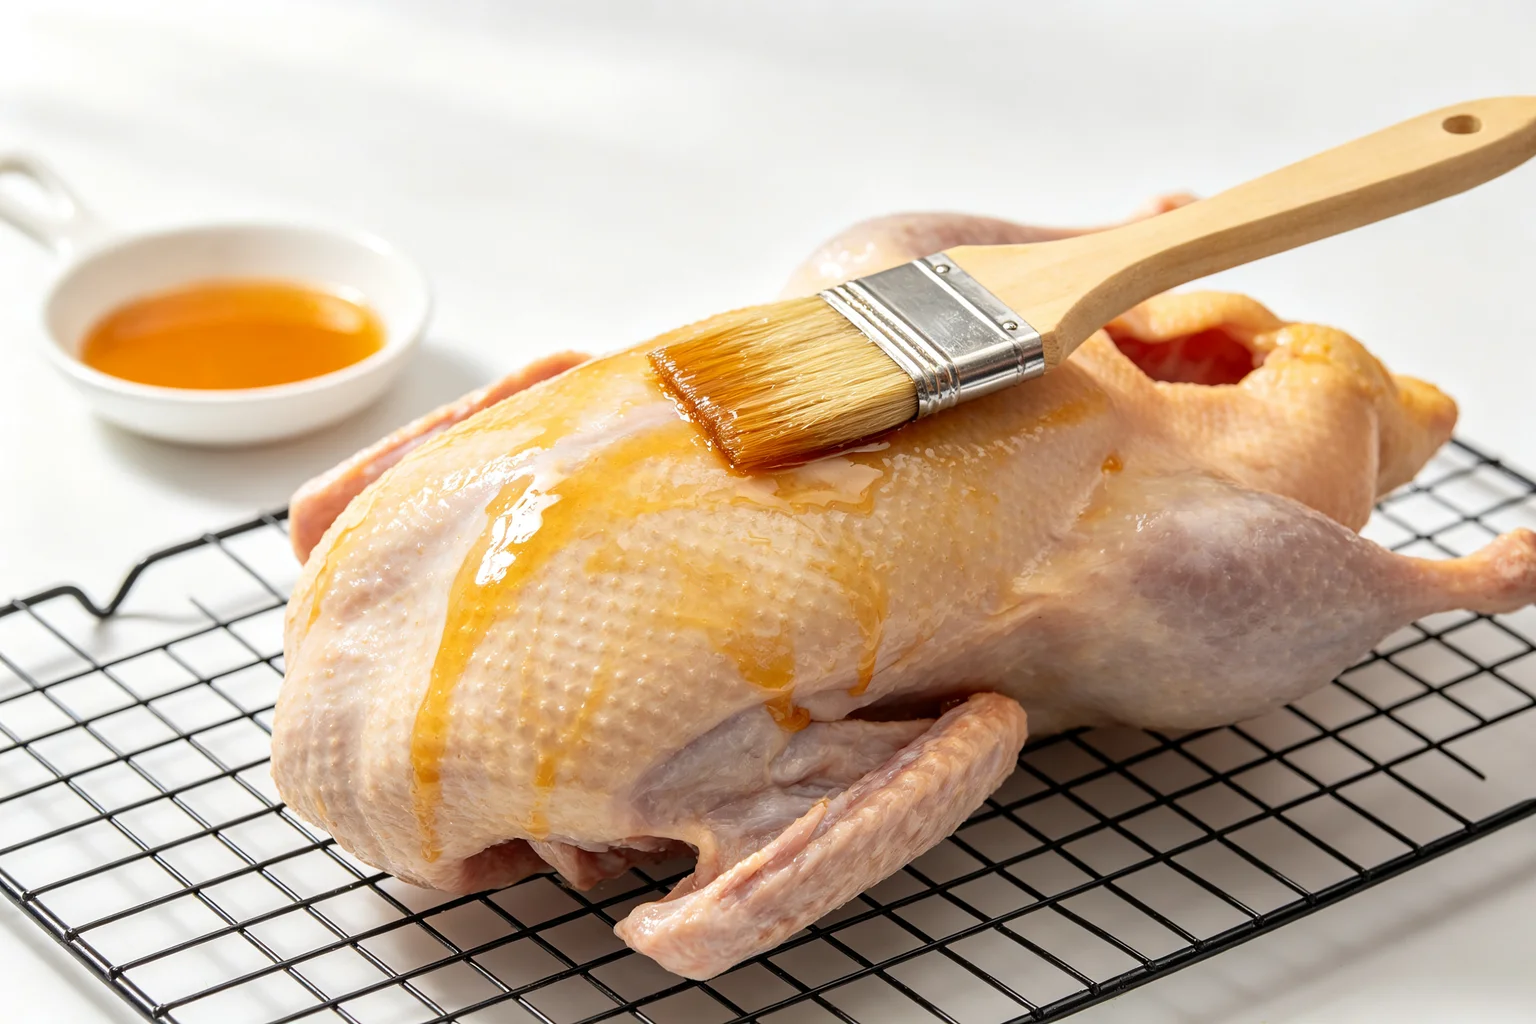
Combine maltose, hot water, rice vinegar, and soy sauce in a small bowl. Stir until the maltose dissolves completely into a thin, even liquid.
Using a pastry brush, apply the glaze evenly over the entire duck skin. Work into every crease. Allow to dry 30 minutes. Apply a second coat. Allow to dry 30 minutes. Apply a third coat.
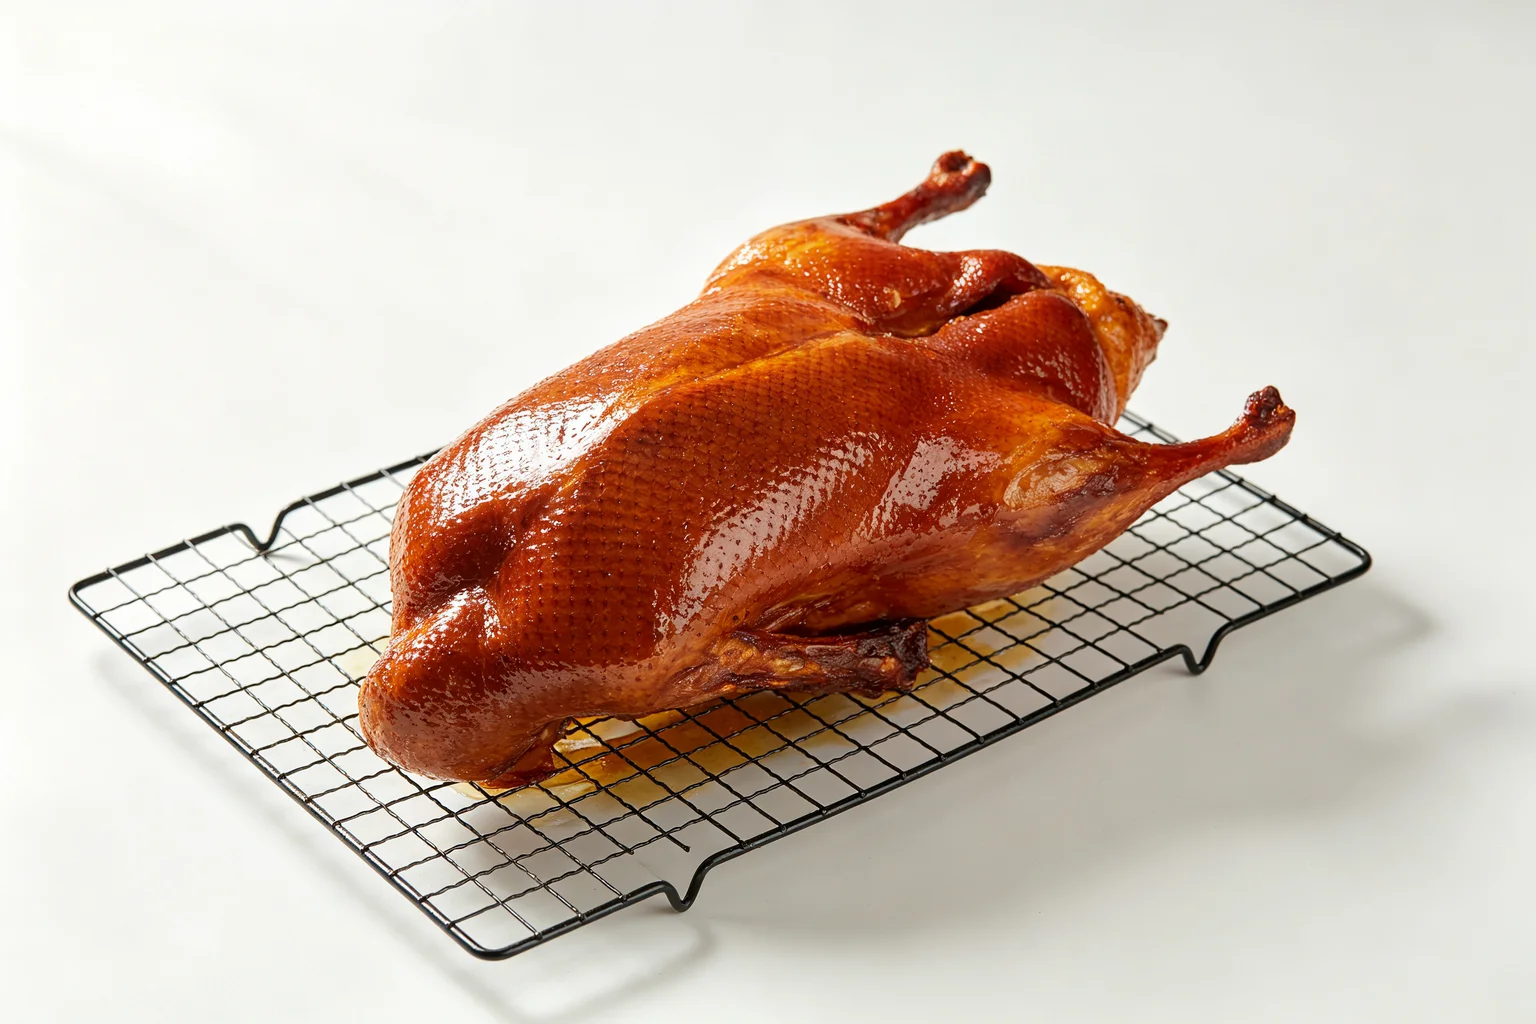
Day 1, Step 5: Refrigerator dry

Place the glazed duck breast-side up on a rack set over a tray. Place uncovered in the refrigerator. Leave for 24 hours minimum, 48 hours for maximum crispness. The skin will look dark and feel like parchment after the full drying period. This is correct.
Day 2, Step 6: Bring to room temperature
Remove the duck from the refrigerator 1 hour before roasting. Leave at room temperature uncovered on the rack.
Day 2, Step 7: Two-temperature roast
Preheat the oven to 160°C (320°F). Place the duck breast-side up on a rack set over a deep roasting tray, the tray catches the rendered fat. Roast at 160°C for 30 minutes. During this time the fat renders and drains away from the skin.
Increase temperature to 200°C (390°F). Continue roasting for 45-55 minutes until the skin is deep mahogany and the internal temperature at the thickest part of the thigh reads 75°C (165°F).
If the wings or neck tip are browning too fast, cover those areas with small pieces of foil. The breast and thighs should take most of the heat.
Day 2, Step 8: Rest before carving
Remove from the oven. Rest on the rack for 15 minutes. The resting allows the juices to redistribute and the skin to finish setting to maximum crispness. Do not cover with foil, covering traps steam and softens the skin.
Day 2, Step 9: Carve and serve
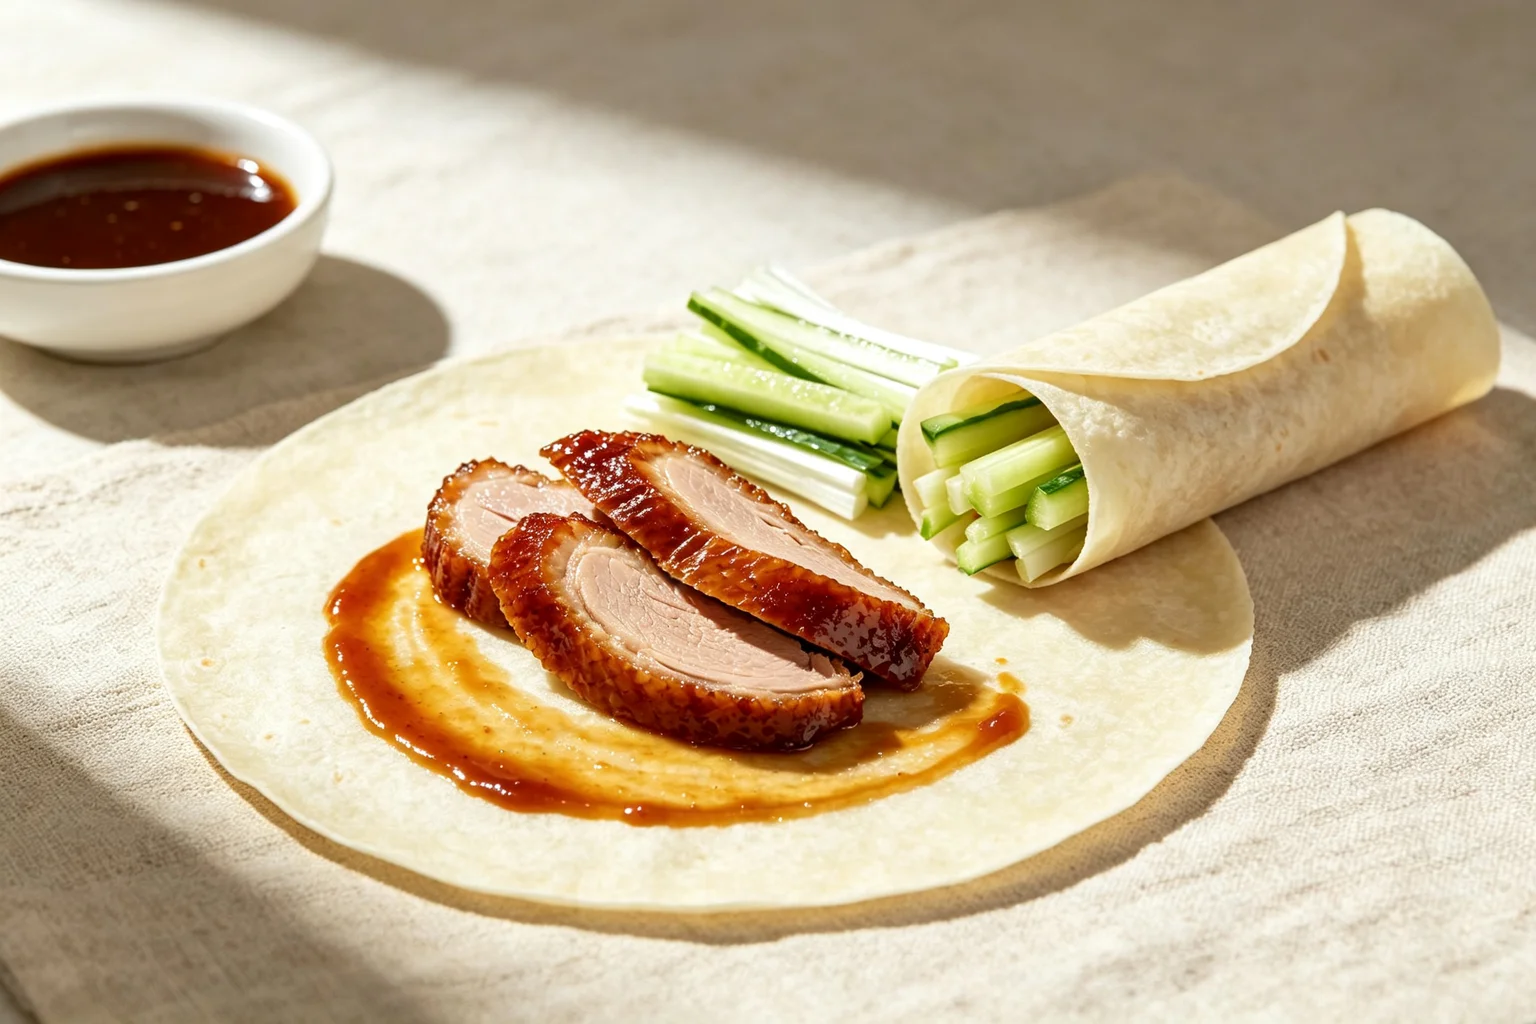
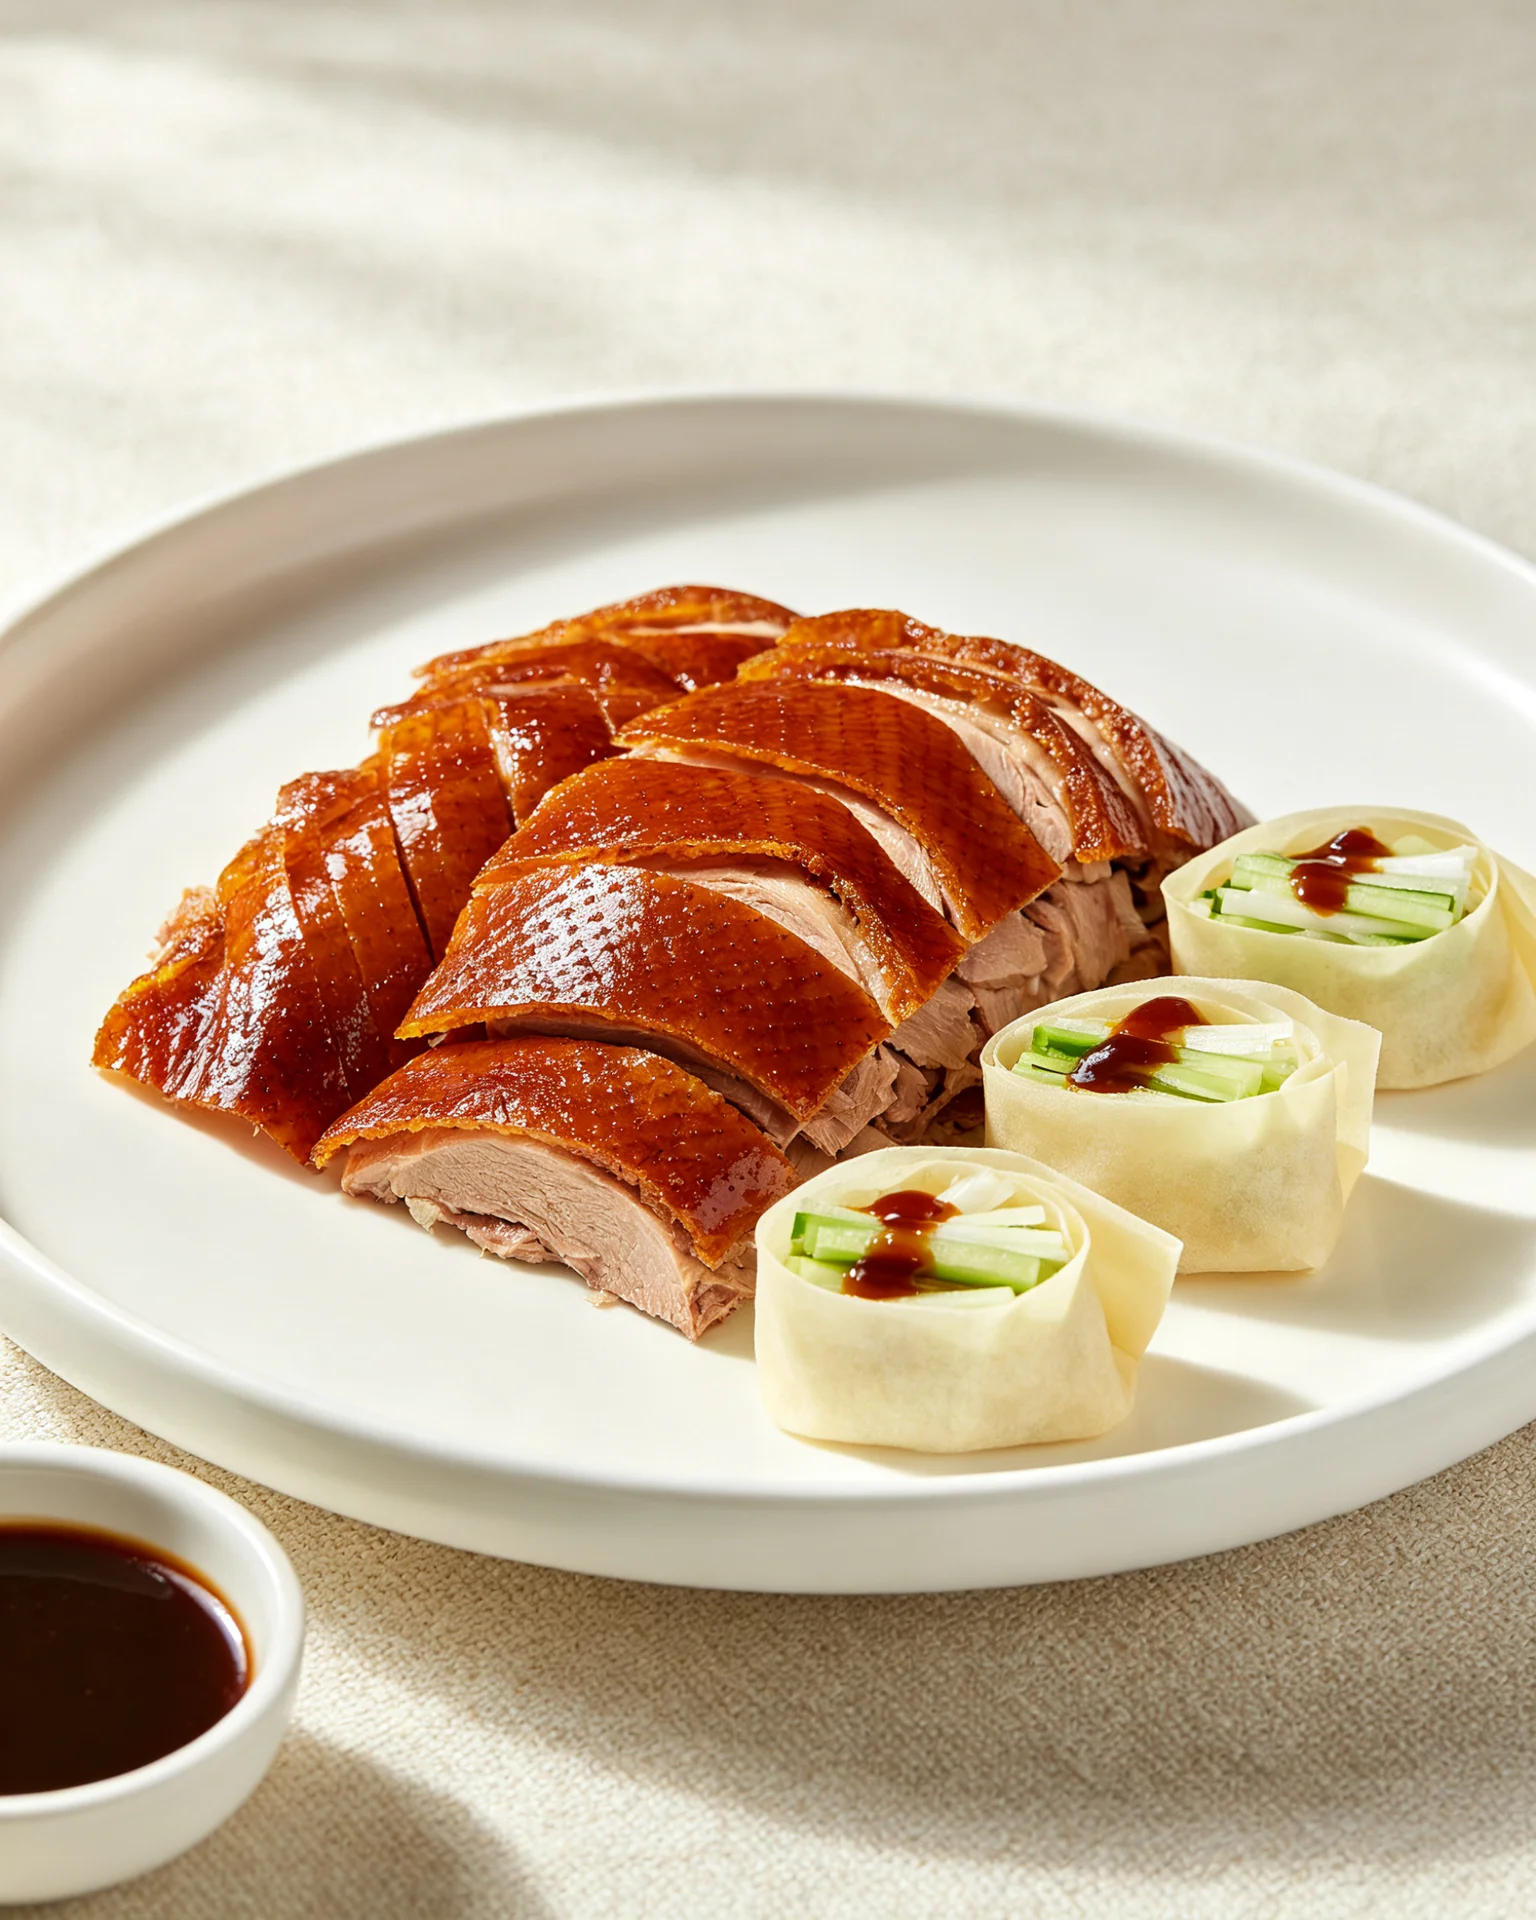
Traditional service: remove the crispy skin first and serve it separately as the first course, this is the primary reason the dish exists. Slice thin pieces of skin and place on mandarin pancakes with hoisin sauce, cucumber, and scallion. Then slice the meat and serve as the second course.
Home version: slice the duck into pieces combining skin and meat. Serve immediately with warm mandarin pancakes, hoisin sauce, julienned cucumber, and spring onion alongside.
How do you serve Peking duck correctly?
The correct assembly of a Peking duck pancake is specific and the balance matters.
Take one mandarin pancake. Spread a thin layer of hoisin sauce across the centre, not to the edges. Place 2-3 pieces of duck with skin attached. Add a small bundle of julienned spring onion and cucumber. Roll the pancake from the bottom up, tucking the sides in as you roll. Eat in one or two bites, a Peking duck pancake should not require a knife.
The cucumber and scallion are not garnish. The cucumber’s water content and fresh crunch cut through the richness of the duck fat and hoisin. The scallion’s sharpness provides contrast against the sweet sauce. Without them the pancake tastes heavy after two bites.
Hoisin sauce at the table in a small dish for extra dipping is standard. Plum sauce is a common alternative. Both work. Sriracha and chilli sauce are Western additions not traditional to the dish.
How do you store leftover Peking duck?
The skin loses its crispness within 2 hours of carving regardless of storage. Plan to eat the skin immediately at the meal.
The meat keeps in the refrigerator for 3 days. Use leftover duck meat for fried rice, noodle dishes, or duck bao. The rendered duck fat collected in the roasting tray keeps in the refrigerator for 2 weeks and is excellent for roasting potatoes or frying eggs.
To reheat and partially restore skin crispness: place skin-side up on a wire rack in a 220°C oven for 5-8 minutes. The skin will re-crisp somewhat but will not return to the just-roasted state. The meat reheats well in the same process.
Love Chinese food?
Check out my complete guide to Chinese home cooking, pantry essentials, and techniques.
FAQ
Why is my Peking duck skin greasy and chewy instead of crispy? The fat was not properly drained before the skin set. Two causes. First, the skin-to-fat separation was incomplete, if the skin remains attached to the fat layer in places, the rendered fat pools beneath the skin and prevents crisping. Second, the oven started too hot, if the duck goes into a very hot oven immediately, the outer skin proteins set before the subcutaneous fat has had time to render and drain. Use the two-temperature sequence: 160°C for 30 minutes to render the fat, then 200°C to crisp the skin.
Can I shorten the 24-hour refrigerator drying time? You can reduce it to 8-12 hours with a fan pointed at the duck to accelerate moisture evaporation from the skin surface. The fan compensates for the shorter time by increasing the airflow across the skin. 8 hours with fan-assisted drying produces approximately the same result as 18-20 hours without. Anything less than 8 hours produces incompletely dried skin that will not achieve full crispness regardless of roasting technique.
What is the best duck for Peking duck at home? A Pekin (Long Island) duck at 2-2.3kg is the standard. This breed has the right ratio of subcutaneous fat to meat and produces the correct skin texture after the preparation process. Muscovy duck is leaner with thicker skin, acceptable but requires longer rendering time. Wild duck is too lean and the skin is too thin for this preparation. Avoid pre-seasoned ducks, the existing seasoning and any added salt will affect the glaze application.
Do I need to use mandarin pancakes or can I substitute? Mandarin pancakes are made from a simple hot water dough and are thin, slightly chewy, and steam-flexible. They are available at Chinese grocery stores fresh or frozen. Flour tortillas warmed in a dry pan are the most common substitute and work adequately, they are thicker but flexible. Rice paper is too brittle. Lettuce cups work for the flavour combination but change the eating experience significantly. If making mandarin pancakes from scratch they take approximately 45 minutes and are well worth making for a special occasion.
You might also like: Check out our complete Chinese cooking guide for more essential ingredients and techniques.
Peking Duck Recipe (北京烤鸭)
Peking Duck, Chinese Recipes, Duck Recipes
PT1H30M (includes 1 hour blanch/glaze prep)
: PT1H30M
PT26H (includes 24-hour refrigerator dry)
Nutrition Facts
Ingredients
- 1 whole duck, approximately 2-2.3kg (4.4-5lb), fresh or fully thawed
- 2 tsp salt for the cavity
- 1 tsp five-spice powder
- 3 spring onions, tied in a knot
- 4cm fresh ginger, bruised
- 2 star anise
- 1 cinnamon stick
- 80g (3oz) maltose, or honey as substitute
- 3 tbsp hot water
- 2 tbsp rice vinegar
- 1 tbsp soy sauce
- 16-20 thin mandarin pancakes (store-bought)
- 4 tbsp hoisin sauce
- 1 cucumber, julienned
- 4-6 spring onions, julienned
- Additional hoisin for dipping
Instructions
Did you make this recipe?
Tag @asianfoodsdaily on Instagram or leave a comment below!
About Asha
Half Asian, half African cook raised between two food-obsessed cultures. I've spent 10 years learning Asian cooking traditions through family, friends, and thousands of hours at the stove — testing every dish until it works in a standard home kitchen.
Read my full story


Loading comments...