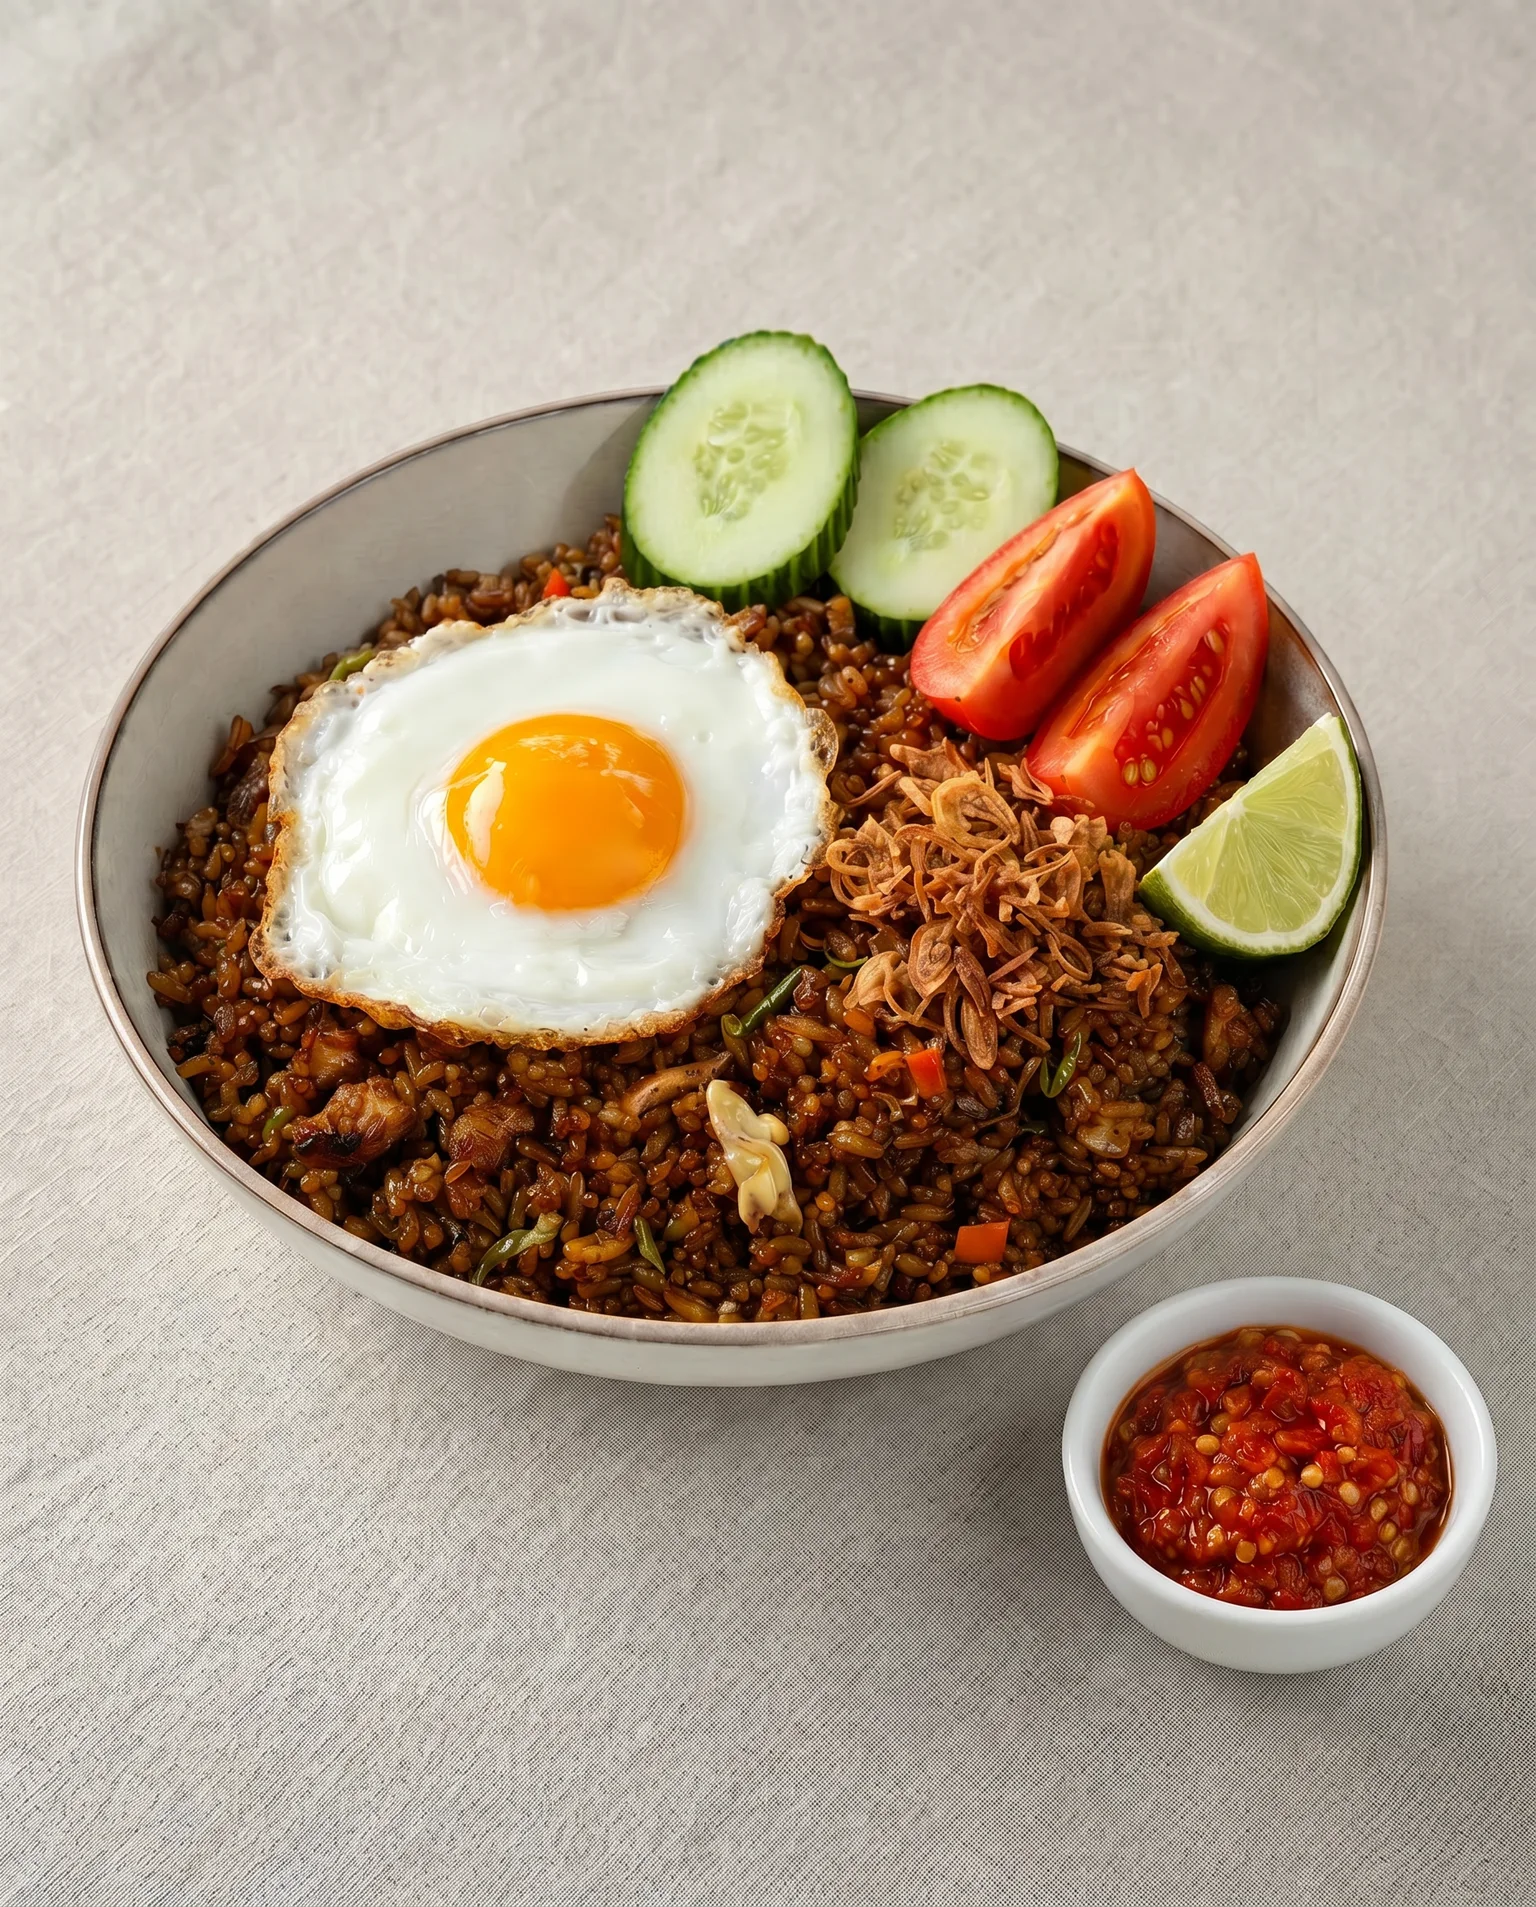
Nasi Goreng Recipe (Authentic Indonesian Fried Rice)
The first time I made nasi goreng at home, I used freshly cooked rice. The result was a wet, clumping mess that smelled right but ate nothing like the dish I was trying to make. The second time, I refrigerated the rice overnight and fried the terasi in the oil before anything else went in the wok. That batch was the one. The difference between a bowl of Indonesian fried rice and a bowl of greasy clumped-together rice is almost entirely in those two decisions, the rice and the terasi. This recipe explains both, and everything else that matters.
What is nasi goreng and what makes it different from other fried rice?
Nasi goreng is Indonesia’s national dish: fried rice seasoned with kecap manis (Indonesian sweet soy sauce), terasi (fermented shrimp paste), and a shallot-garlic-chilli base called bumbu. Nasi goreng literally means “fried rice”, nasi (rice) and goreng (fried), but the flavour has almost nothing in common with Chinese fried rice or Thai khao pad. The kecap manis gives it a dark, caramelised sweetness that no other soy sauce produces. The terasi gives it a savoury, funky depth that comes from months of fermented shrimp rather than minutes in a wok. Together they produce a flavour that is simultaneously sweet, smoky, savoury, and slightly funky, and entirely its own.
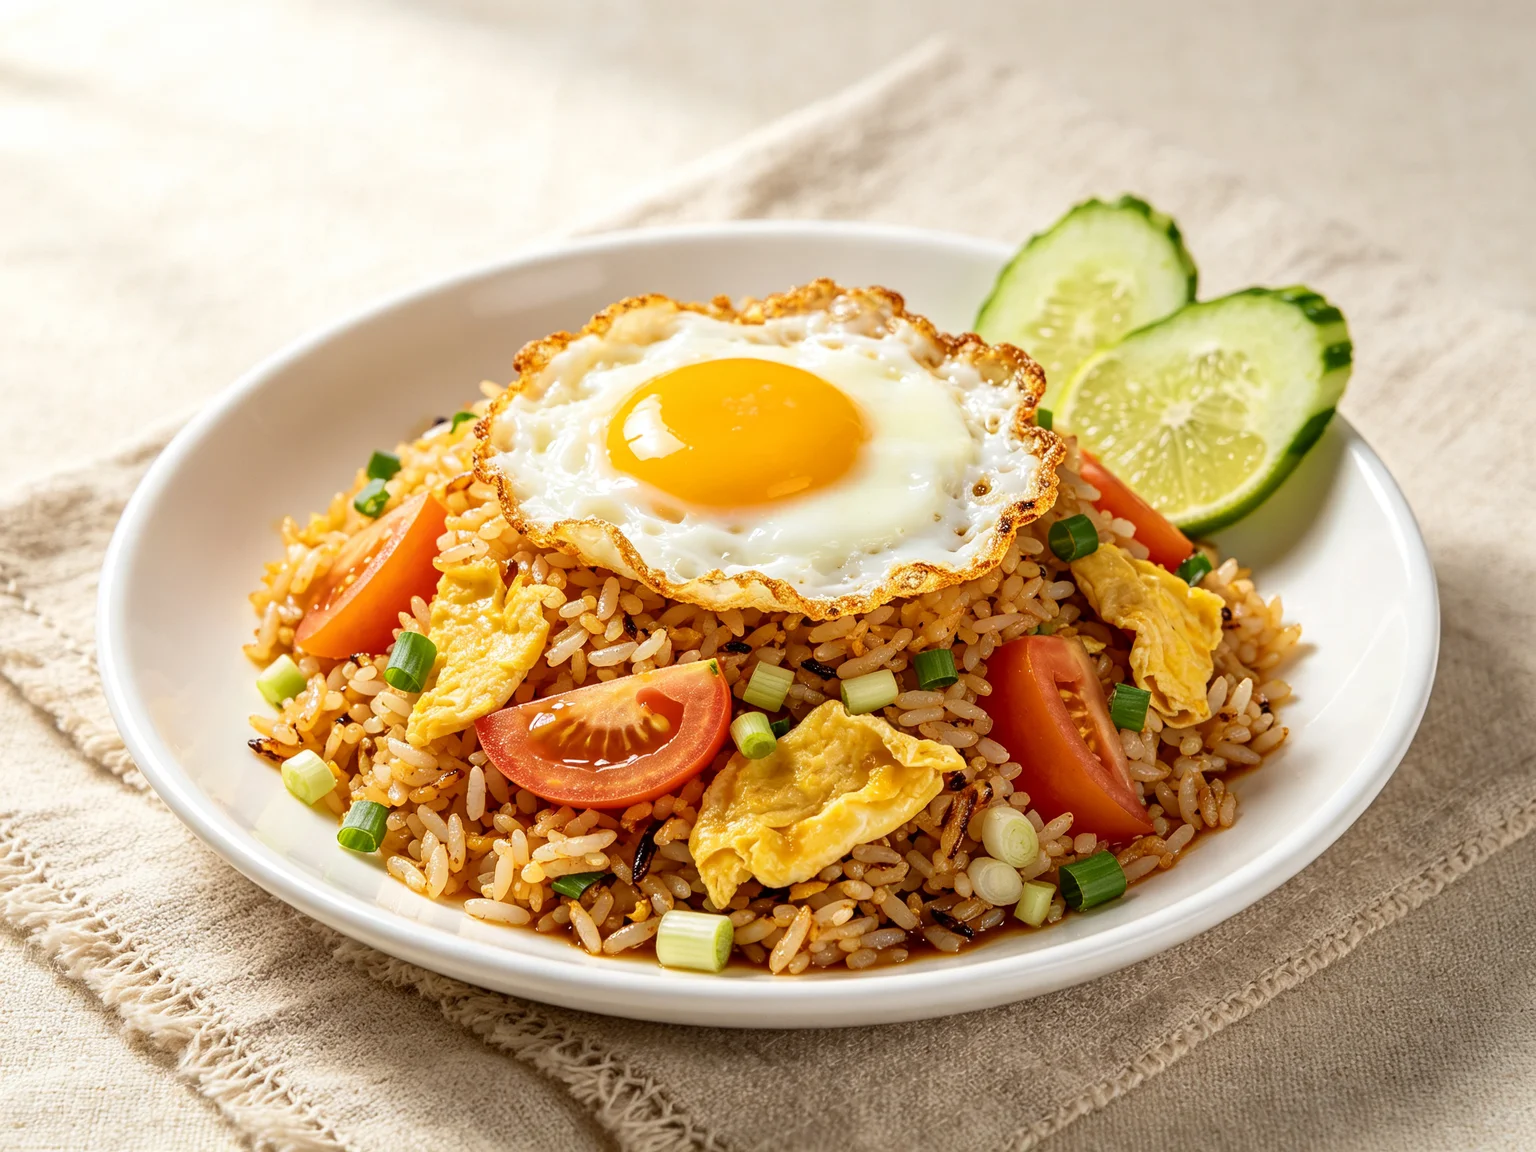
The distinguishing visual marker is the colour. Authentic nasi goreng is dark brown, almost mahogany, from the kecap manis caramelising against a very hot wok. A pale or golden nasi goreng is either missing the kecap manis or was not cooked at high enough heat. The colour is not just aesthetic, it signals that the sugars in the kecap manis have actually caramelised rather than just coating the rice.
Why does nasi goreng need day-old rice?
Day-old rice is not a workaround for using up leftovers. It is the structural requirement that makes the dish work.
When rice is cooked, the starch granules absorb water, swell, and gelatinise, producing the soft sticky texture of freshly cooked rice. When that rice is refrigerated for 8-24 hours, the gelatinised starch undergoes retrogradation: it gradually converts back to a firmer crystalline structure and the grains lose surface moisture. The result is rice that is dry on the surface, firm through the centre, and able to move freely in a hot wok without sticking together.
Fresh rice in a hot wok releases steam. That steam creates a humid environment in the wok that prevents the Maillard reaction, the browning and caramelisation that produces wok hei. The grains clump together and the rice steams rather than fries. No amount of technique fixes fresh rice in a wok. You need the starch retrogradation that only refrigeration time produces.
The optimal window is 8-24 hours. Under 8 hours the retrogradation is incomplete, the grains are still too moist. Over 24 hours the rice starts to dry out excessively, becoming hard rather than firm. If you are planning to make nasi goreng, cook the rice the night before and refrigerate it uncovered. The uncovered refrigeration accelerates the surface moisture loss and produces better-separated grains.
What does terasi do and how do you use it correctly?

Terasi is Indonesian fermented shrimp paste, made from small krill salted and fermented for several weeks to months until they break down into a dense, dark, intensely pungent paste. It is the same family of ingredient as Malaysian belacan, Burmese ngapi, and Thai kapi, all fermented shrimp or fish pastes used as umami foundations in their respective cuisines.
In nasi goreng, terasi does one specific job: it provides a savoury, deeply fermented bottom note that kecap manis and soy sauce cannot produce. It is the difference between a nasi goreng that tastes like very good fried rice and one that tastes unmistakably Indonesian.
The critical technique is how you use it. Terasi must be added to hot oil before any other ingredient and fried for 30-60 seconds until it becomes fragrant and slightly darker, a step called blooming. When raw terasi hits hot oil, the volatile aromatic compounds in the fermented shrimp are released and transformed. What was sharp and pungent becomes mellow, savoury, and deeply complex. Terasi added at the wrong stage, mixed directly into the rice or added after the other ingredients, stays harsh and never fully integrates.
Crumble the terasi into the oil rather than adding it as a block. Smaller pieces have more surface area in contact with the hot oil and bloom faster and more evenly. Fry until the oil smells fragrant and the terasi has darkened slightly, about 45 seconds over high heat.
For vegan cooking, substitute 1 teaspoon of white miso mixed with ¼ teaspoon of finely ground nori. It is not identical but provides a partial approximation of the fermented savoury depth.
What is kecap manis and why does it go in last?
Kecap manis is Indonesian sweet soy sauce made from fermented soy beans and palm sugar. The palm sugar gives it a syrup-like viscosity, roughly 4-5 times thicker than regular soy sauce, and a complex slightly caramel sweetness that regular soy sauce with added sugar does not replicate. The fermentation adds depth. The palm sugar adds body and a specific sweetness that is less sharp than white sugar.
In a very hot wok, the sugars in kecap manis caramelise at approximately 160°C. This caramelisation is what turns the rice dark brown, coats every grain with a glossy layer, and produces the slightly bitter, complex sweetness that defines nasi goreng’s flavour. If kecap manis hits a wok that is not hot enough, it does not caramelise. It just coats the rice in a sweet sauce. The colour will be paler and the flavour will be flatter.
Kecap manis goes in last because it burns before the other ingredients are cooked. Add it too early and the sugars scorch against the wok before the rice has time to fry, producing a bitter taste and a pan that needs scrubbing. The correct sequence: bloom the terasi, fry the bumbu paste, add the protein, add the rice and press and char it, then add the kecap manis for the final 30-60 seconds of cooking.
If kecap manis is unavailable, substitute 3 parts regular dark soy sauce to 1 part palm sugar or brown sugar, warmed together until the sugar dissolves. The result is close but slightly less complex than the real thing.
How do you get wok hei at home without a restaurant burner?
Wok hei, literally “wok breath” in Cantonese and written 镬气, is the distinctive smoky slightly charred flavour produced when food is cooked at extreme high heat in a wok. Restaurant wok burners produce 15,000-20,000 BTUs. A domestic gas hob produces 6,000-12,000 BTUs. An electric hob produces even less usable heat. The difference is real and it matters.
You cannot fully replicate restaurant wok hei at home. But you can get significantly closer than most home recipes suggest by using one specific technique: the press-and-char method.
After adding the rice to the wok, spread it flat across the entire wok surface and press it firmly down with a spatula. Leave it, without stirring or tossing, for 20-30 seconds. The sustained contact between the rice and the hot wok surface allows a Maillard reaction to develop. The proteins and sugars at the base of the rice layer brown and char slightly, producing smoky complex flavour that stirring immediately would prevent.
After 20-30 seconds, scrape and flip, then press again for another 15-20 seconds. Repeat this press-and-char cycle 3-4 times rather than continuously stirring. Continuous stirring moves the rice around the wok and prevents any single grain from developing sustained contact with the hot surface.
Other home techniques that help: use a carbon steel wok rather than a non-stick pan, since carbon steel retains and conducts heat better,, preheat the wok empty over maximum heat for at least 2 minutes before adding oil, and cook in smaller portions. Cooking nasi goreng for 2 people in a large wok produces much better wok hei than cooking for 6 people in the same wok, less food means less temperature drop when ingredients are added.
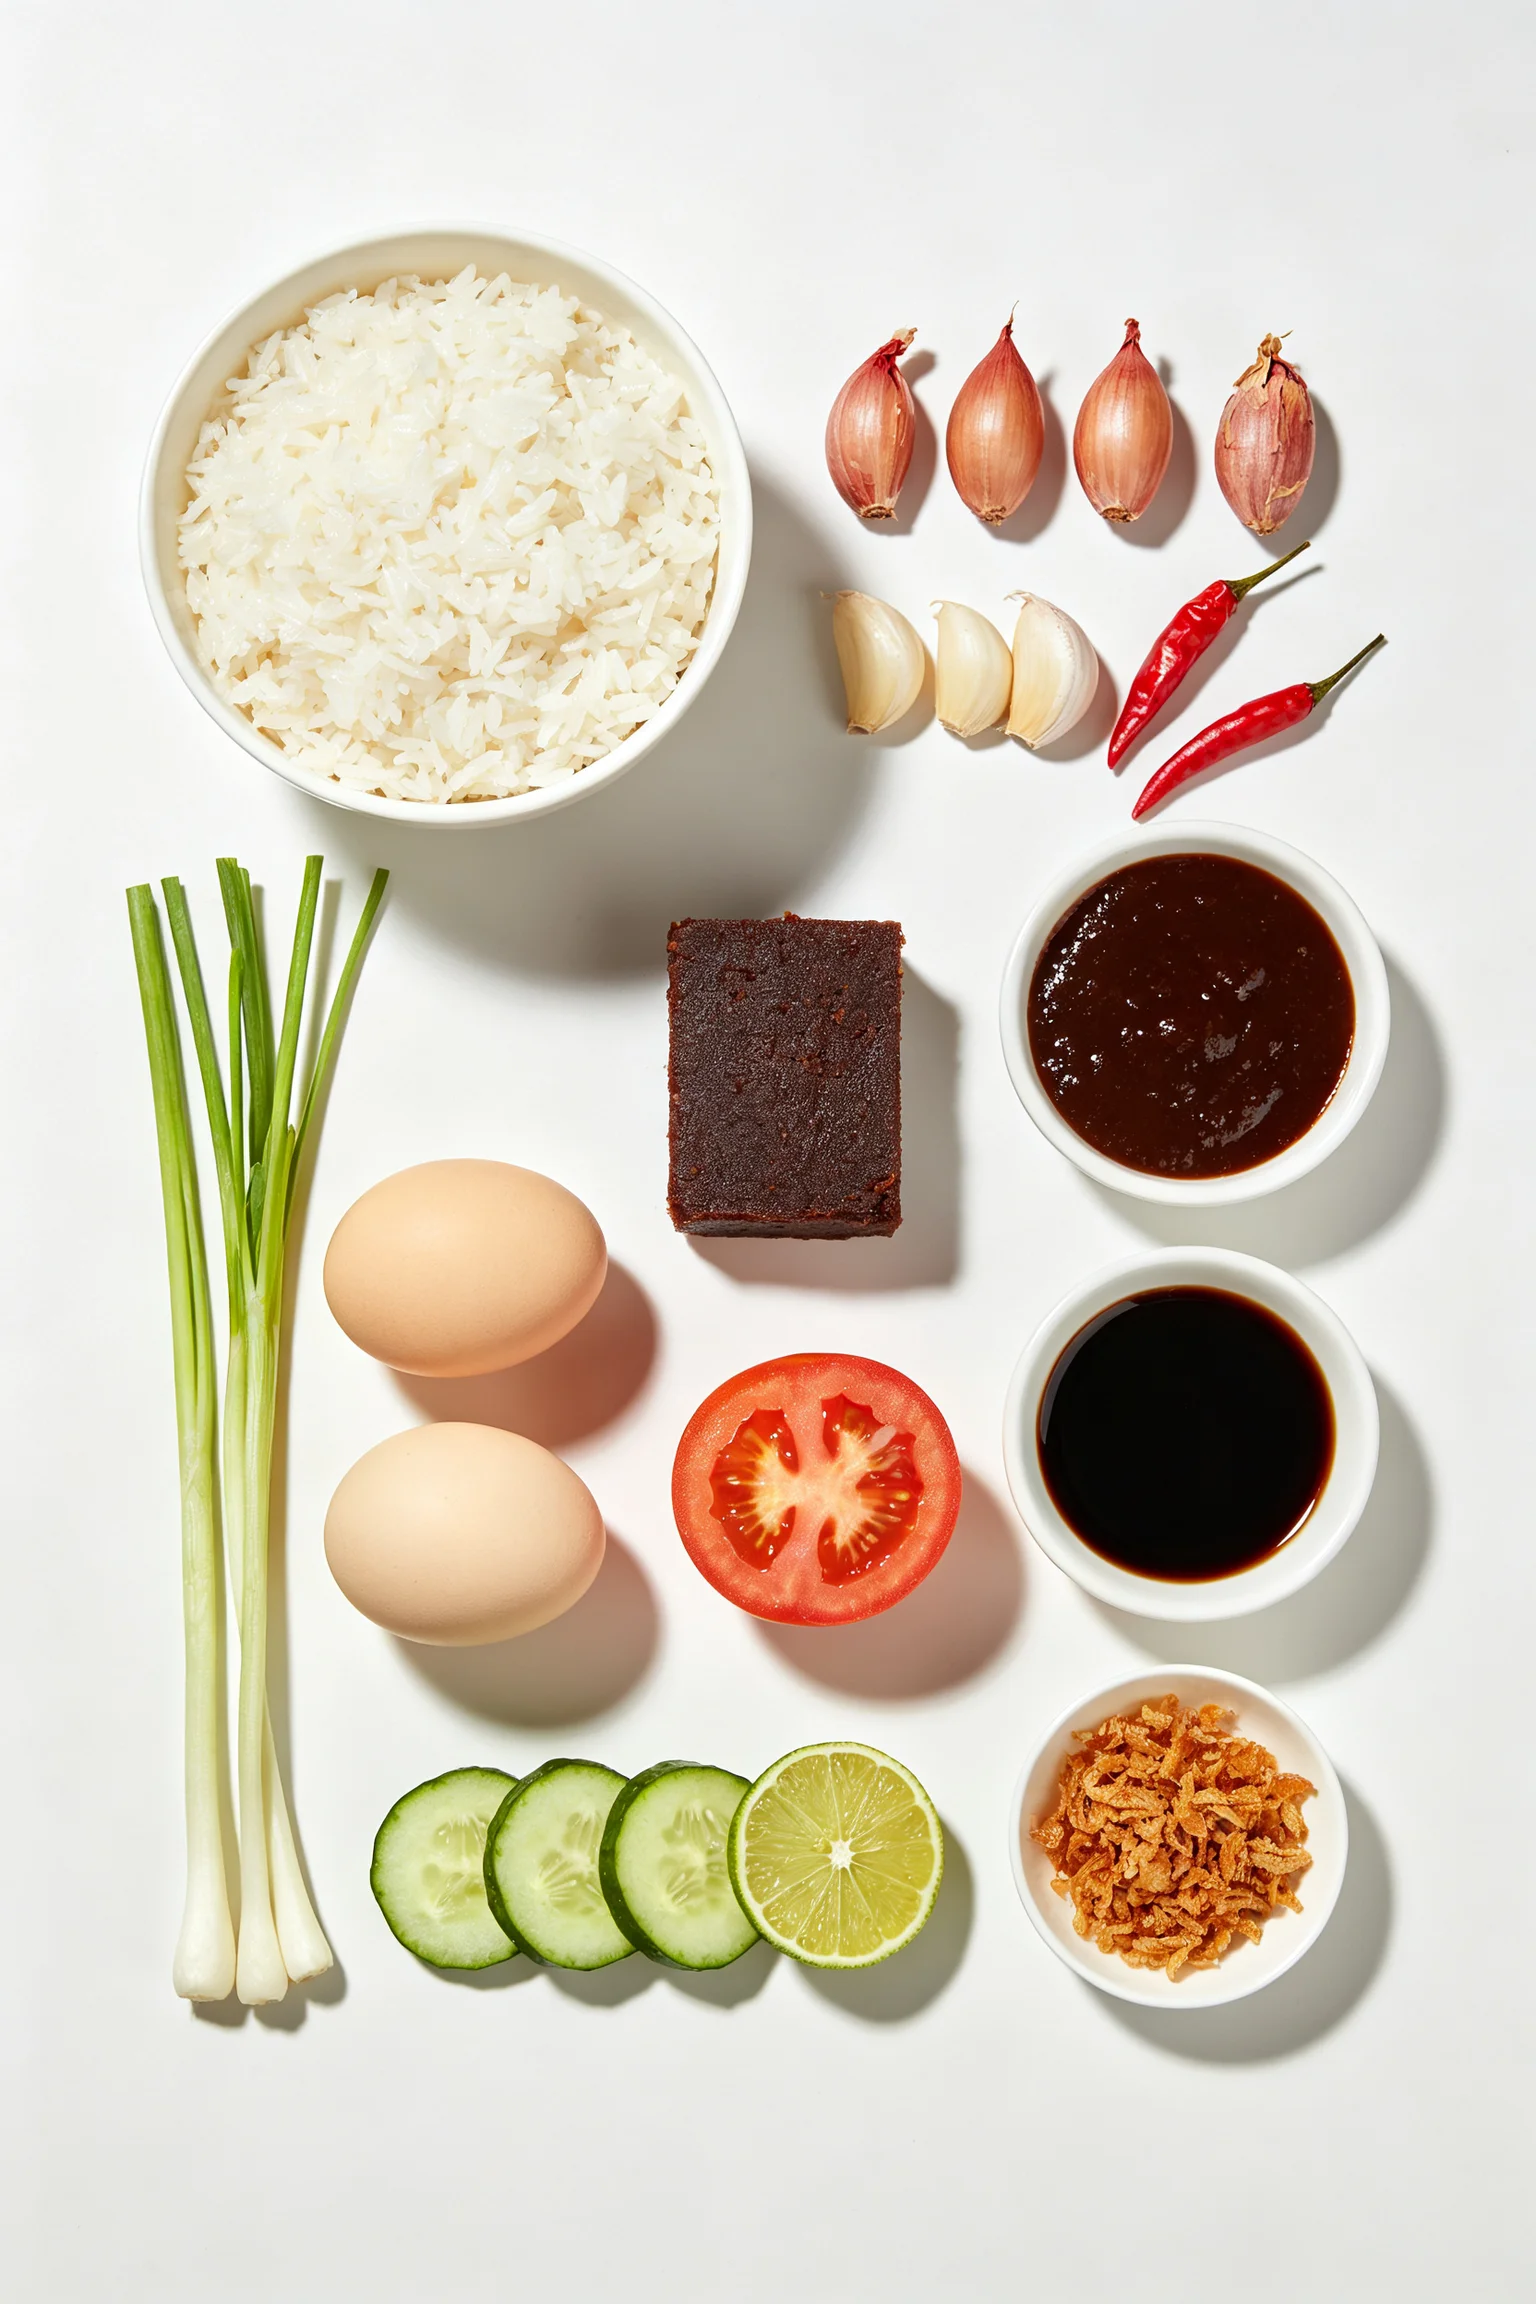
Ingredients
Serves 2, nasi goreng is best made in single or double portions in one very hot wok
For the bumbu paste:
- 4 shallots, peeled and roughly chopped
- 4 garlic cloves
- 2 red chillies (bird’s eye for hot, large red chilli for mild), adjust to taste
- 1 tsp terasi (fermented shrimp paste)
For the rice:
- 300g (2 cups) cooked jasmine rice, refrigerated 8-24 hours
- 2 tbsp neutral oil (or shallot frying oil if you are making crispy shallots)
- 2 eggs
- 100g (3.5oz) protein, chicken thigh, prawns, or tofu, cut small
- 2 spring onions (scallions), sliced into 2cm pieces
- 2-3 tbsp kecap manis, start with 2, add more to taste
- 1 tbsp regular soy sauce
- 1 tsp sesame oil, added off heat at the end
- Salt to taste
Garnishes (not optional, they complete the dish):
- 2 eggs, fried sunny side up, one per serving
- 2 tbsp crispy fried shallots, buy ready-made or fry your own
- Sliced cucumber and tomato
- Prawn crackers (krupuk), serve alongside, not on top
- Sambal oelek or chilli sauce, at the table
- Lime wedges
Instructions
Step 1: Make the bumbu paste
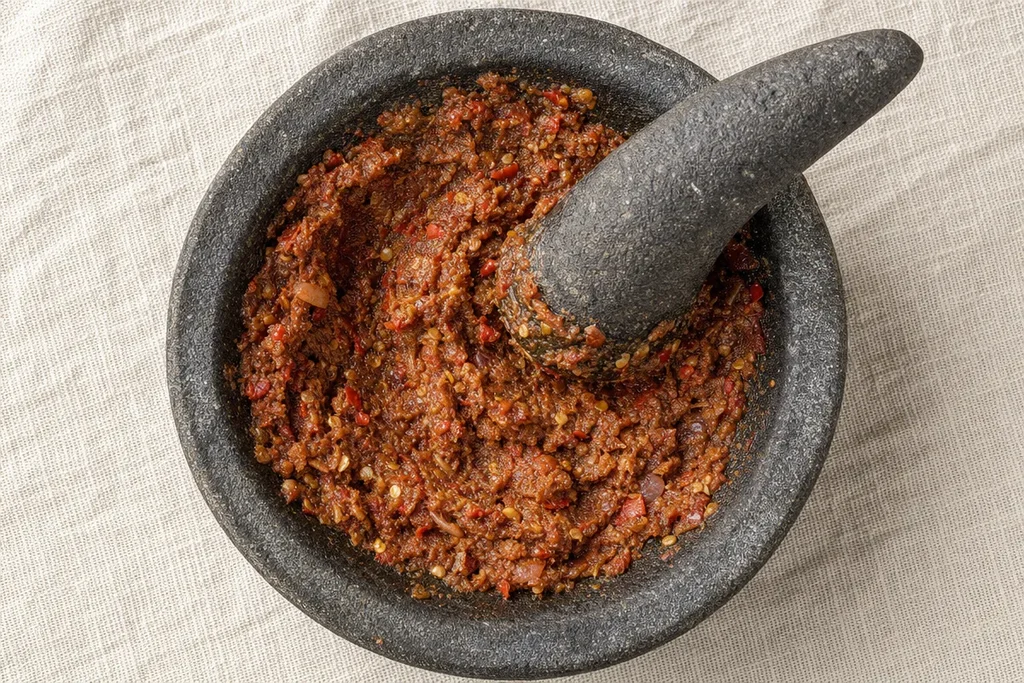
Blend shallots, garlic, and chillies to a coarse paste using a food processor, blender, or mortar and pestle. It does not need to be completely smooth, some texture is fine.
Step 2: Separate the cold rice
Break the cold rice apart with your fingers into individual grains before it goes near the wok. Cold refrigerated rice clumps.
Step 3: Preheat the wok
Place a carbon steel wok or large heavy pan over maximum heat. Heat it empty for 2 full minutes until it is beginning to smoke.
Step 4: Bloom the terasi
Add the terasi directly to the hot oil. Crumble it as you add it.
Step 5: Fry the bumbu
Add the bumbu paste. Fry over high heat for 2-3 minutes, stirring constantly, until the paste darkens, loses its raw smell, and the oil begins to separate slightly around the edges.
Step 6: Add the protein
Add the chicken, prawns, or tofu. Stir-fry over high heat for 2-3 minutes until just cooked through.
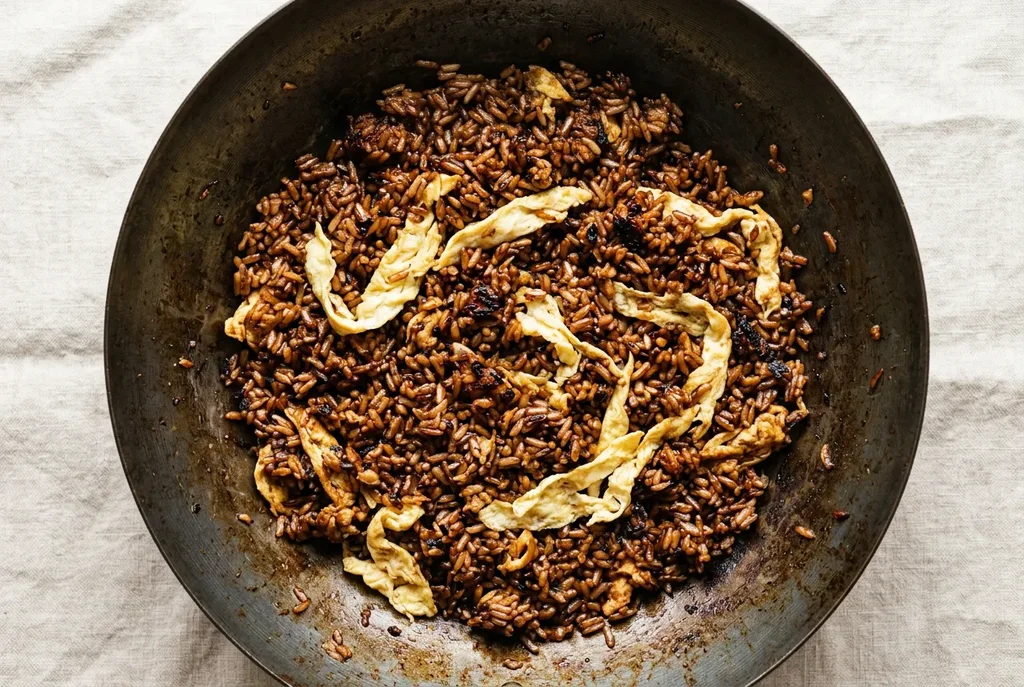
Step 7: Press and char the rice
Add the separated cold rice. Spread it across the entire wok surface using the back of a spatula.
Step 8: Add kecap manis and soy sauce
Pour the kecap manis and soy sauce over the rice. Toss quickly to coat every grain evenly.
Step 9: Fry the eggs and serve
In a separate small pan, fry 2 eggs in a little oil until the whites are set and the edges are slightly crispy but the yolk is still runny. The fried egg is not a garnish, in Indonesia it is considered part of the dish itself.
Plate the rice, top with a fried egg, add crispy shallots, sliced cucumber and tomato. Serve immediately with sambal, lime wedges, and prawn crackers alongside.
What are the regional variations of nasi goreng?
Indonesia has over 17,000 islands and hundreds of distinct culinary traditions. Nasi goreng varies significantly by region.
Nasi goreng kampung (village-style) is the most basic and arguably most authentic version: rice, eggs, anchovies or dried fish, chilli, and shallots. No protein beyond eggs and anchovies. Found at warungs (roadside stalls) across Java and Bali. The absence of elaborate additions produces a cleaner, more intensely charred flavour.
Nasi goreng seafood is common in coastal regions, prawns, squid, and fish replace or supplement chicken. The seafood is added at the bumbu stage and cooked briefly before the rice goes in.
Nasi goreng pattaya wraps the finished nasi goreng in a thin egg omelette, folded around the rice like an envelope. Found widely in Malaysia and increasingly in Indonesian restaurants in cities. Originally a Malaysian adaptation.
Nasi goreng jawa (Javanese style) uses a sweeter kecap manis ratio and often includes a specific Javanese chilli paste rather than standard bird’s eye chilli. The sweetness is more pronounced than other regional versions.
Nasi goreng istimewa (special) is the elevated version, the one served at hotels and restaurants. Includes a wider range of proteins, sometimes a chicken satay alongside, a larger garnish spread, and occasionally a prawn cracker arrangement. The rice itself is made the same way.
How is nasi goreng different from Chinese fried rice?
Nasi goreng and Chinese fried rice share the same base logic, leftover rice, high heat, wok, but differ in every other dimension.
Chinese fried rice is seasoned primarily with soy sauce and sesame oil, producing a savoury clean relatively light flavour. The colour is pale gold to light brown. The technique prioritises separating the rice grains and coating them evenly in a thin layer of egg and soy.
Nasi goreng is seasoned with kecap manis (much sweeter and thicker than soy sauce), terasi (fermented shrimp paste with no Chinese equivalent), and a fried bumbu paste. The colour is deep mahogany. The flavour is simultaneously sweet, smoky, savoury, and funky. The technique requires sustained high heat and the press-and-char method to develop the caramelisation that defines the dish.
The fermented shrimp element is the defining difference. Chinese fried rice has no equivalent to terasi. The fermented depth it adds makes nasi goreng taste heavier, more complex, and more distinctly Southeast Asian than any Chinese fried rice variant.
How do you store and reheat nasi goreng?
Nasi goreng keeps in the refrigerator for 2 days in a sealed container. Unlike some fried rice dishes, it reheats reasonably well because the kecap manis coating protects the grains from drying out excessively.
To reheat: add a small amount of oil to a very hot wok or pan. Add the cold nasi goreng and press it flat against the pan surface for 30-60 seconds to re-develop some char. Stir, press again, and serve immediately. Do not microwave nasi goreng. It steams the rice and removes any remaining wok hei character.
Garnishes: the fried egg, cucumber, tomato, and crispy shallots should always be fresh. Do not store them with the rice.
FAQ
What is kecap manis and can I substitute it? Kecap manis is Indonesian sweet soy sauce made from fermented soy beans and palm sugar. It is the defining flavour ingredient in nasi goreng, thicker than regular soy sauce, significantly sweeter, and with a complex caramel character from the palm sugar. The closest substitute is 3 parts dark soy sauce mixed with 1 part palm sugar or brown sugar, warmed together until dissolved. The result is acceptable but slightly less complex than authentic kecap manis.
What is terasi and do I have to use it? Terasi is Indonesian fermented shrimp paste, the ingredient that gives nasi goreng its distinctive savoury depth. Without it the dish is good fried rice but not authentic nasi goreng. Malaysian belacan or Thai kapi are close substitutes used in equal quantities. For vegan cooking, 1 teaspoon of white miso mixed with a pinch of nori powder provides a partial approximation. Do not skip it entirely if you want the authentic flavour.
Why is my nasi goreng wet and clumping? The most common cause is fresh rice. Freshly cooked rice contains too much moisture, it releases steam in the wok which prevents proper frying and causes the grains to clump. Refrigerate your rice for a minimum of 8 hours before cooking, and separate the grains completely by hand before they go into the wok. The second common cause is a wok that was not hot enough, the oil should shimmer immediately when added to the preheated wok.
Can I make nasi goreng without a wok? A large, heavy-based frying pan or skillet works as a substitute. The wider the pan, the more rice can make direct contact with the hot surface, which improves the press-and-char result. Cast iron is the best alternative to carbon steel. Non-stick pans cannot be heated high enough for proper wok hei and produce a noticeably flatter result. Whatever pan you use, preheat it empty for at least 2 minutes before adding oil.
Is nasi goreng gluten-free? Standard nasi goreng contains kecap manis and soy sauce, both of which typically contain wheat and are not gluten-free. Tamari (gluten-free soy sauce) can replace the regular soy sauce. A certified gluten-free kecap manis is available from some Indonesian brands, check the label carefully as most standard kecap manis contains wheat.
Nasi Goreng Recipe (Authentic Indonesian Fried Rice)
nasi goreng, Indonesian fried rice, fried rice
PT15M
PT15M
PT30M
Nutrition Facts
Ingredients
- 4 shallots, peeled and roughly chopped
- 4 garlic cloves
- 2 red chillies (bird's eye for hot, large red chilli for mild), adjust to taste
- 1 tsp terasi (fermented shrimp paste)
- 300g (2 cups) cooked jasmine rice, refrigerated 8-24 hours
- 2 tbsp neutral oil (or shallot frying oil if you are making crispy shallots)
- 2 eggs
- 100g (3.5oz) protein, chicken thigh, prawns, or tofu, cut small
- 2 spring onions (scallions), sliced into 2cm pieces
- 2-3 tbsp kecap manis, start with 2, add more to taste
- 1 tbsp regular soy sauce
- 1 tsp sesame oil, added off heat at the end
- Salt to taste
- 2 eggs, fried sunny side up, one per serving
- 2 tbsp crispy fried shallots, buy ready-made or fry your own
- Sliced cucumber and tomato
- Prawn crackers (krupuk), serve alongside, not on top
- Sambal oelek or chilli sauce, at the table
- Lime wedges
Instructions
- Step 1: Make the bumbu paste - Blend shallots, garlic, and chillies to a coarse paste using a food processor, blender, or mortar and pestle. It does not need to be completely smooth, some texture is fine. Set aside.
- Step 2: Separate the cold rice - Break the cold rice apart with your fingers into individual grains before it goes near the wok. Cold refrigerated rice clumps. If it goes into the wok in clumps it will not separate once it is hot and partially cooked. Take 2-3 minutes to separate every grain by hand now, it saves the dish.
- Step 3: Preheat the wok - Place a carbon steel wok or large heavy pan over maximum heat. Heat it empty for 2 full minutes until it is beginning to smoke. Add the oil and swirl to coat. The oil should shimmer immediately on contact.
- Step 4: Bloom the terasi - Add the terasi directly to the hot oil. Crumble it as you add it. Fry for 45 seconds, pressing it against the wok, until it darkens slightly and the oil smells fragrant and savoury rather than raw and pungent. This step is not skippable.
- Step 5: Fry the bumbu - Add the bumbu paste. Fry over high heat for 2-3 minutes, stirring constantly, until the paste darkens, loses its raw smell, and the oil begins to separate slightly around the edges. The paste should look drier and more concentrated than when it went in.
- Step 6: Add the protein - Add the chicken, prawns, or tofu. Stir-fry over high heat for 2-3 minutes until just cooked through. Do not overcook, the protein will continue cooking when the rice goes in.
- Step 7: Press and char the rice - Add the separated cold rice. Spread it across the entire wok surface using the back of a spatula. Press firmly. Leave for 20-30 seconds without stirring. Scrape and flip. Press again for 15-20 seconds. Repeat 3-4 times. The base of the rice layer should be developing colour and a slightly smoky smell. Add the spring onions halfway through this stage.
- Step 8: Add kecap manis and soy sauce - Pour the kecap manis and soy sauce over the rice. Toss quickly to coat every grain evenly. Fry for 30-60 seconds more until the kecap manis caramelises and the rice turns deep brown and glossy. Taste and add more kecap manis or salt. Remove from heat. Add sesame oil and toss once.
- Step 9: Fry the eggs and serve - In a separate small pan, fry 2 eggs in a little oil until the whites are set and the edges are slightly crispy but the yolk is still runny. The fried egg is not a garnish, in Indonesia it is considered part of the dish itself. Plate the rice, top with a fried egg, add crispy shallots, sliced cucumber and tomato. Serve immediately with sambal, lime wedges, and prawn crackers alongside.
Did you make this recipe?
Tag @asianfoodsdaily on Instagram or leave a comment below!
About Asha
Half Asian, half African cook raised between two food-obsessed cultures. I've spent 10 years learning Asian cooking traditions through family, friends, and thousands of hours at the stove — testing every dish until it works in a standard home kitchen.
Read my full story


Loading comments...