Chicken Katsu Curry Udon (チキンカツカレーうどん)
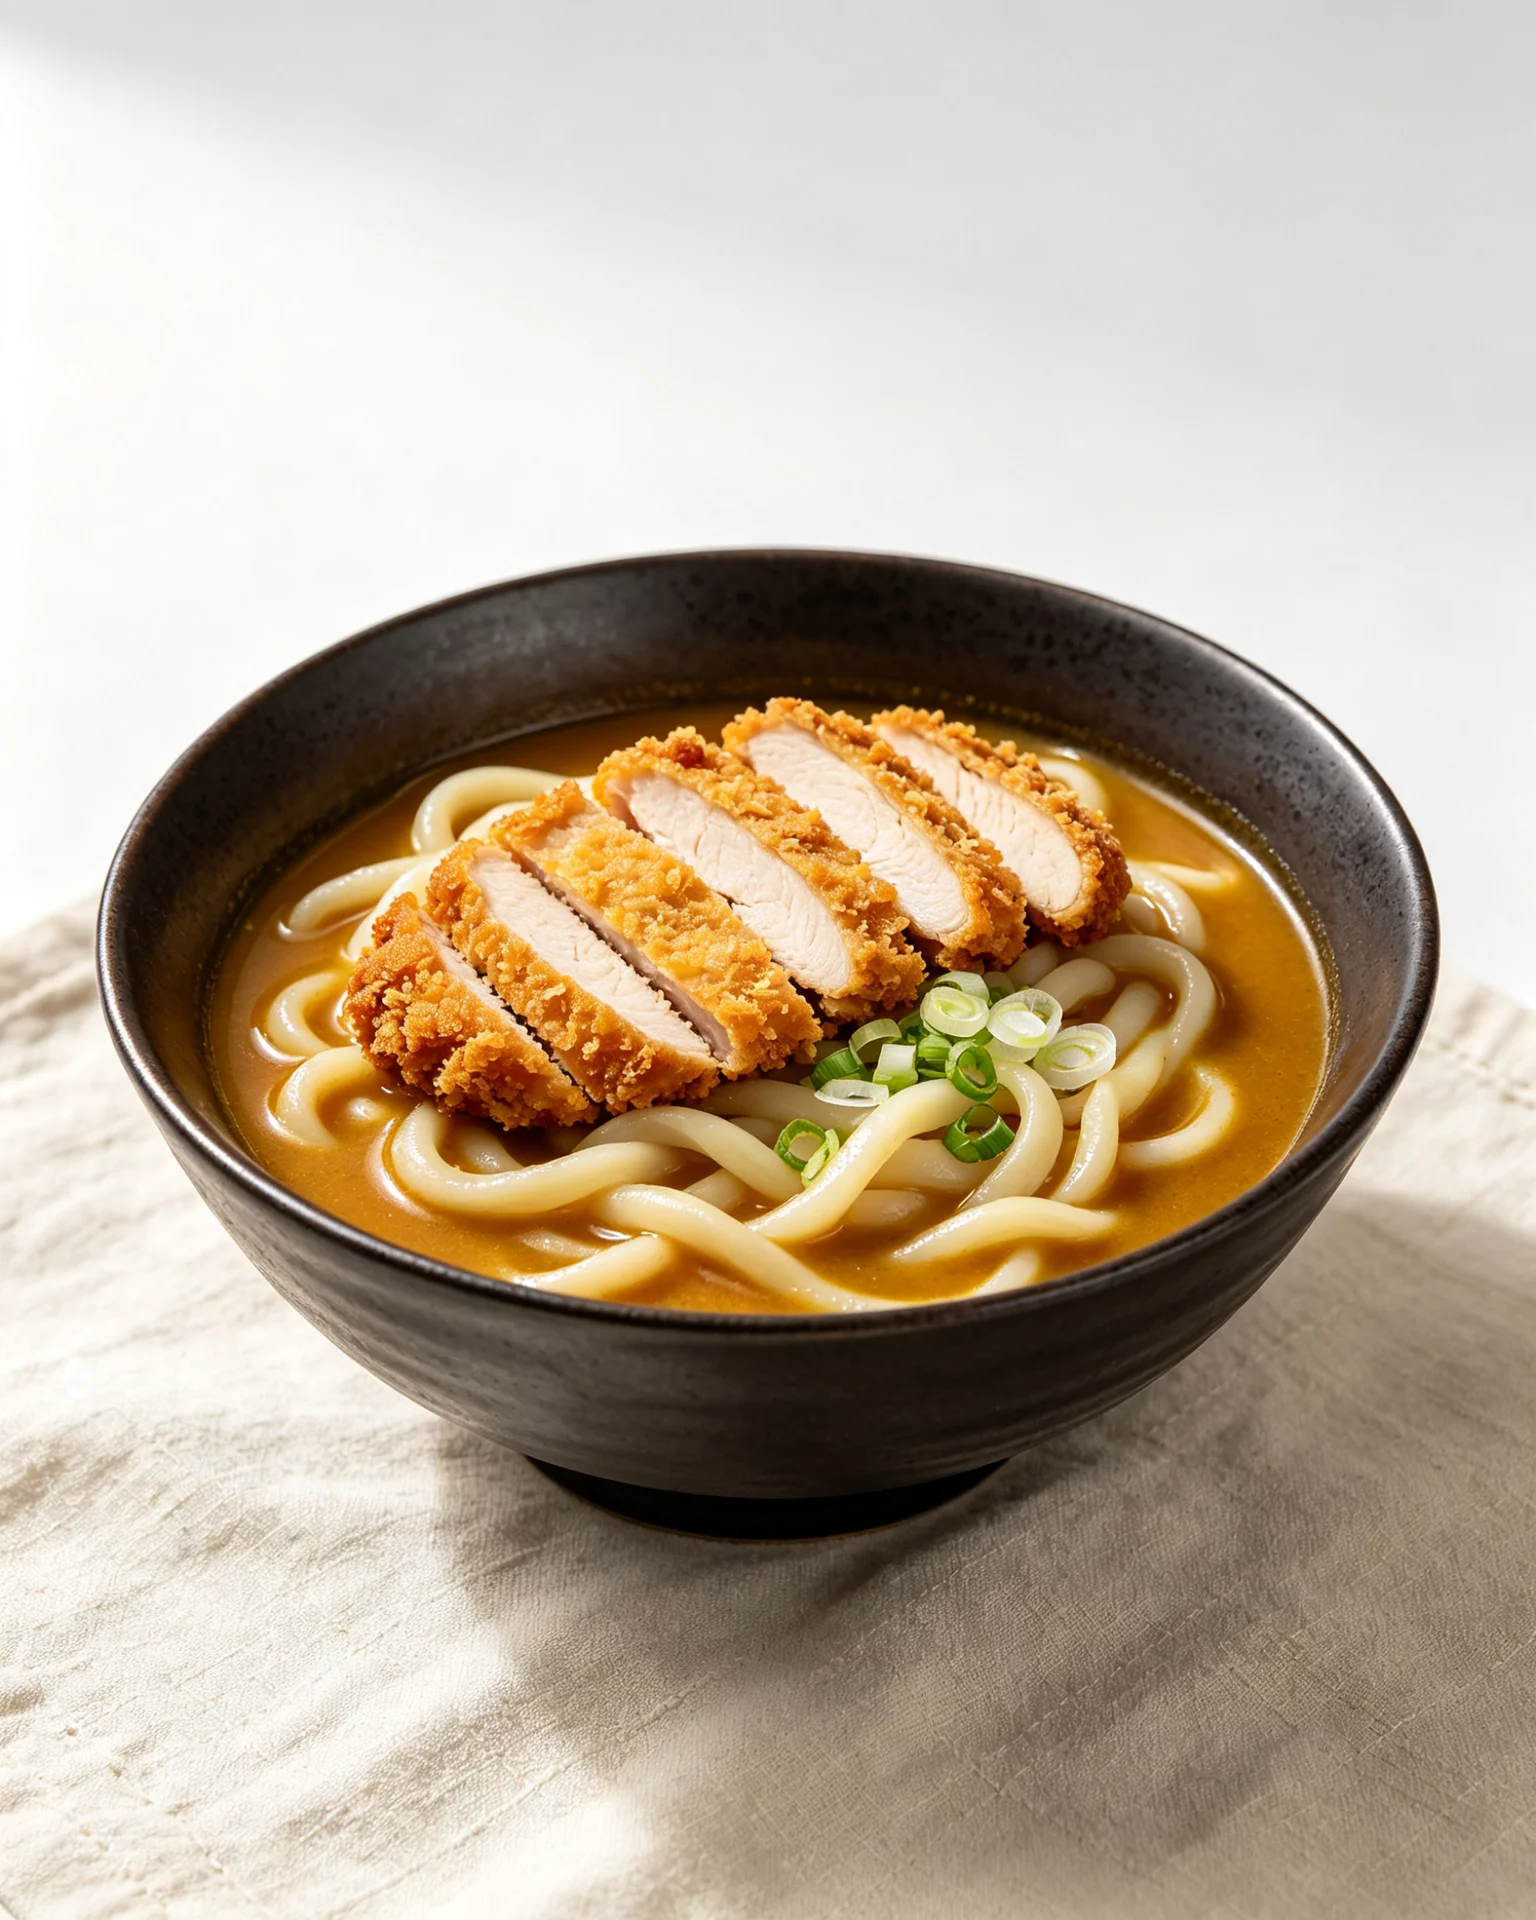
Three things in one bowl: crispy panko chicken, thick chewy udon noodles, and a Japanese curry broth that clings to everything. That is it. That is the whole pitch, and it is enough. I have been making versions of this for years and it still gets eaten faster than anything else I put on the table.
The combination works because each component operates in a different texture register. The katsu shatters. The udon is elastic and slightly slippery. The curry broth is thick and coats both. Everything stays distinct, the katsu does not go soft immediately because the broth is thick enough to surround rather than soak it. That thickness is why the roux addition technique matters: adding curry roux to boiling liquid produces lumps. Adding it off heat dissolves it smoothly. One technique change, completely different sauce texture.
What is chicken katsu curry udon and what makes the combination work?
Chicken katsu curry udon is a combination dish that does not appear in historical Japanese recipe books. It is a modern restaurant creation, Japanese curry rice and udon noodle soup meeting in one bowl, that became popular through izakayas and ramen shops that added katsu as a topping to their existing curry udon.
Each component has a different origin. Katsu (カツ) arrived in Japan during the Meiji era (1868-1912) as a Japanese adaptation of the German and Austrian Schnitzel, breaded and fried cutlet, introduced through Western contact during Japan’s modernisation period. The Japanese version substituted panko for European breadcrumbs and adapted the frying technique to produce something distinct from the original. Japanese curry arrived through a separate route, covered in the next section. Udon is ancient by comparison, thick wheat noodles in Japan date to the 8th century.
The combination works because the textures are genuinely complementary. Crispy katsu against thick, elastic udon in rich curry broth produces three simultaneous sensations in one bite. The curry broth is thick enough from the roux to coat the noodles fully without making the katsu soggy immediately, the thickness is what gives the dish its structural logic.
Where does Japanese curry actually come from?
Japanese curry (カレーライス, kare raisu) is one of Japan’s most popular everyday dishes. Its origin involves three layers of cultural adaptation that most people eating it have no idea about.
Indian cooking developed complex spice blends over centuries, what we call curry in English is an oversimplification of hundreds of distinct regional spice combinations. British colonial administrators and eventually the British Royal Navy adapted these spice blends into a standardised curry powder that could be used to make a single simplified curry sauce. This British curry was a significantly simplified version of any Indian original.
In the late 19th century during the Meiji era, British Royal Navy sailors docked regularly at Japanese ports. Their standard ration included curry, the British version, served with bread rather than rice. Japanese naval cooks encountered this dish and incorporated it into Japanese naval rations, substituting rice for bread and adapting the sauce using roux-based thickening more familiar from Western sauce-making than from Indian or British cooking.
From the navy, the dish entered civilian Japanese cooking and was adapted further, sweeter than British curry, thickened more heavily with roux, milder in heat, incorporating distinctly Japanese ingredients like dashi. The curry roux blocks now sold in every Japanese supermarket and Asian grocery store worldwide are the industrialised version of this Japanese adaptation.
The result: kare raisu is a roux-thickened, mildly spiced, slightly sweet curry that bears limited resemblance to Indian curry despite three layers of cultural origin connecting them. It is genuinely Japanese, not a copy of anything that preceded it.
Why does panko produce a crispier crust than regular breadcrumbs?
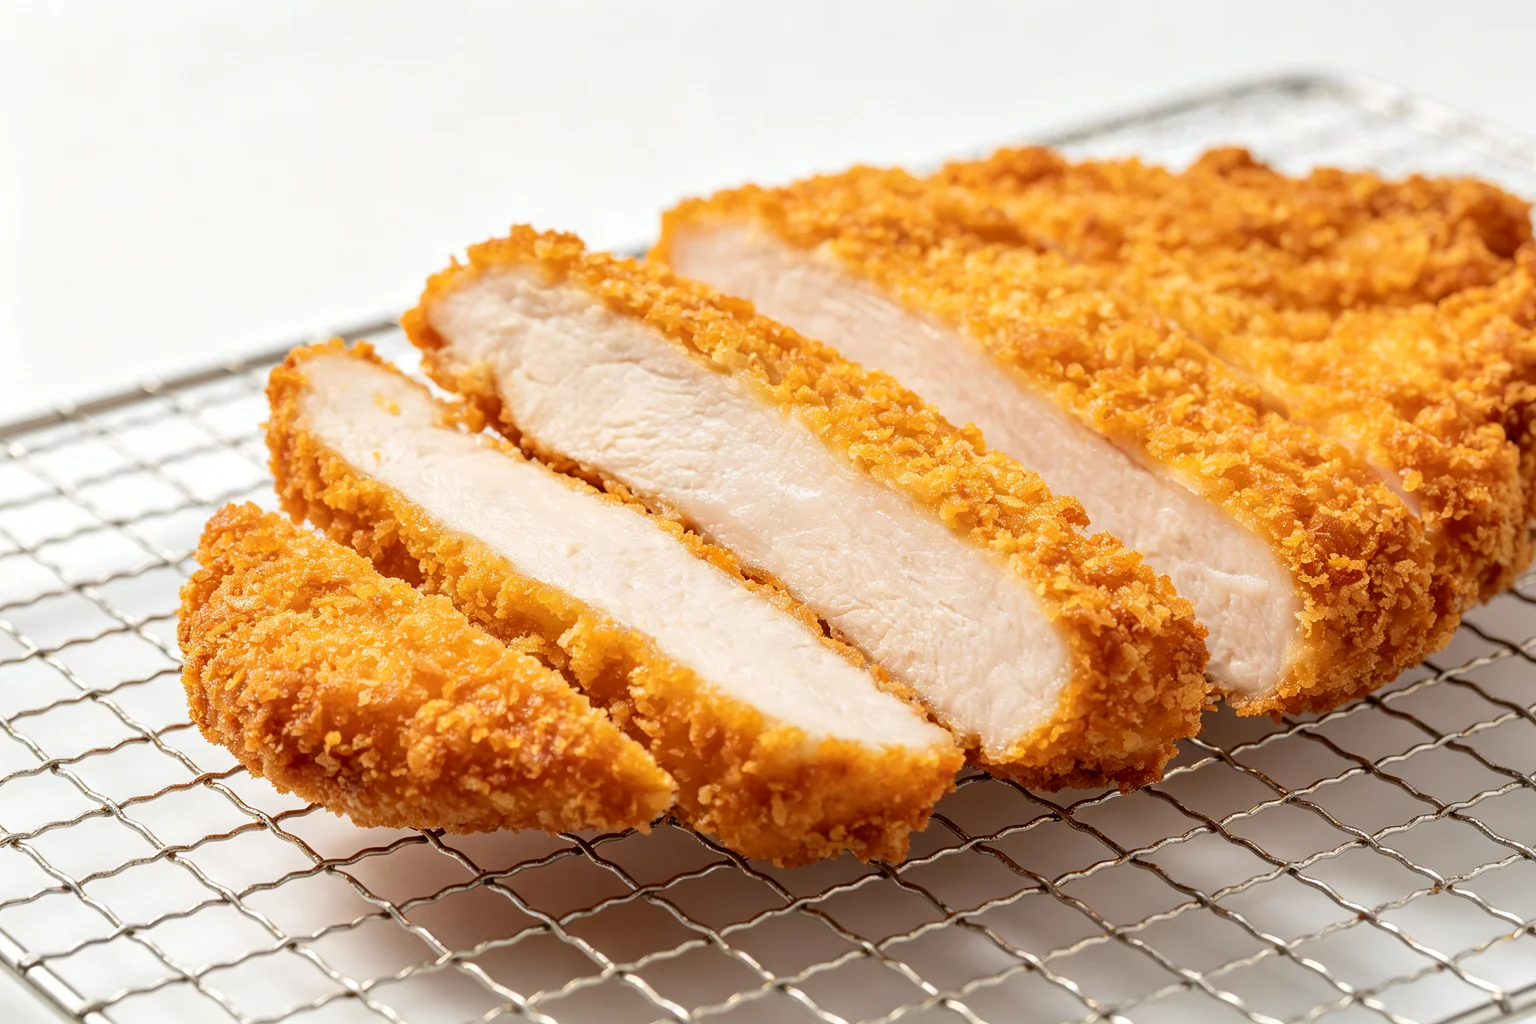
Panko (パン粉) is produced differently from standard Western breadcrumbs, and the production difference is why the texture difference is so significant.
Standard breadcrumbs are made from bread baked by conventional convection heat. The exterior of the bread forms a crust during baking and the interior crumb is denser and more regular. When shredded or ground into crumbs, the result is a relatively fine, dense material.
Panko is produced from bread baked by electrical current running directly through the dough. The heat generates uniformly throughout the bread without a hot exterior environment, no crust forms. The resulting loaf is very white and has an extremely airy, irregular crumb structure. When this bread is shredded and dried, it produces large, flat, irregular flakes with significant air pockets throughout each piece.
In the frying process, these irregular flakes do not compact together under oil pressure. The air pockets remain open. Each flake crisps individually rather than fusing into a solid crust. The result is a coating with open, feathery texture, significantly lighter, crispier, and less oil-saturated than the same coating using regular breadcrumbs, which compact into a denser layer and absorb more oil.
This is why panko is not optional for katsu. Regular breadcrumbs produce a breaded chicken cutlet. Panko produces katsu. The texture is categorically different.
Why do you pound the chicken to even thickness?
A chicken breast in its natural shape is significantly thicker at the centre than at the thinner tapered ends. At 170°C oil temperature, the thin end of an unpounded breast cooks through in approximately 3 minutes while the thick centre requires 6-7 minutes.
By the time the centre of an unpounded breast is cooked through, the thin end has been at temperature for twice as long. The thin end is dry and overcooked. The thick end is correct. The panko coating on the thin end is also at risk of overcooking and burning before the thick end is done.
Pounding to an even 1cm thickness solves this completely. Every part of the breast reaches 70°C internal temperature at the same time. The panko coating develops to the same golden colour across the entire surface. The entire cutlet comes out of the oil at the same moment.
Butterfly cutting, slicing the breast horizontally through the middle without cutting all the way through, then opening it flat, achieves the same result with less physical effort. Both techniques produce the same outcome: an even thickness across the whole piece.
Why do you turn off the heat before adding the curry roux?
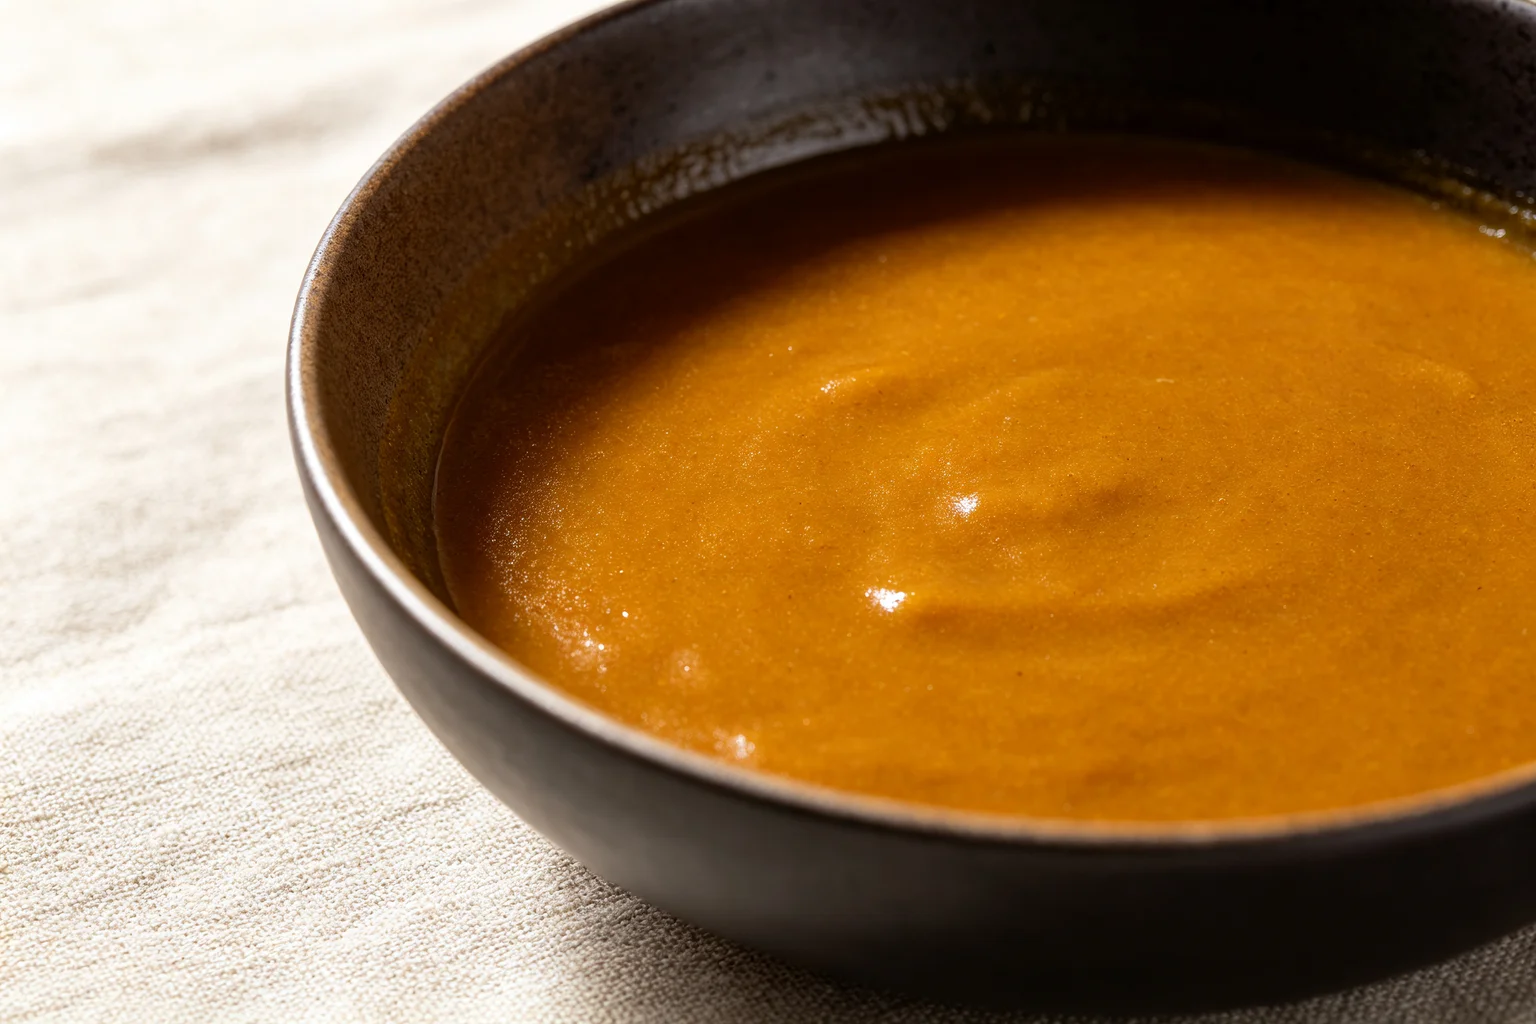
Curry roux blocks contain modified starch as the primary thickening agent alongside fat, spices, and flavour compounds. The starch gelatinises at approximately 60-70°C, the same temperature range as cornstarch in a stir-fry sauce.
When a piece of curry roux is added to actively boiling liquid at 100°C, the outer surface of the block contacts the boiling liquid. The surface starch gelatinises immediately, a cooked starch skin forms around the outside of the block before the interior has had time to melt and dissolve. These hardened starch skins produce lumps in the finished sauce: partially dissolved roux pieces surrounded by set starch that does not smooth out regardless of how much you stir.
Turning off the heat before adding the roux: the liquid drops to approximately 80-90°C within a minute of removing from heat. This temperature is still hot enough to melt the fat in the roux block and dissolve the spice compounds into the liquid, but not hot enough to immediately gelatinise the surface starch. The roux dissolves progressively and evenly into the liquid before the starch begins to set. The result is a completely smooth, lump-free sauce.
Break the roux into smaller pieces before adding, smaller pieces have more surface area and dissolve faster. Stir constantly as it dissolves. Once fully dissolved, return to low heat and simmer 5 minutes to complete the thickening.
Why drain the katsu on a rack and not paper towels?
When the katsu comes out of the oil, the crust is at approximately 170-180°C and the interior chicken is at approximately 70-75°C. The temperature differential drives steam outward from the interior, interior moisture converts to steam and moves toward the cooler crust.
On a wire rack, this steam escapes from all surfaces. Air circulates freely under the katsu and the steam from the bottom surface disperses into the air around it. Both the top and bottom crust stay dry and crispy.
On paper towels, the bottom surface rests on an absorbent material. The paper towels absorb the oil dripping off the katsu, but they also block the steam escaping from the bottom. That trapped steam condenses on the underside of the crust and the moisture softens the bottom panko layer within 3-5 minutes of draining. The top stays crispy. The bottom turns soft.
This matters particularly for katsu curry udon where the katsu is placed directly into a bowl with broth. The bottom of the katsu is the first part to contact the curry broth. A firm, properly crisped bottom crust provides more resistance to the broth and stays crispy longer than a bottom crust that was already softened by steam before the broth was added.
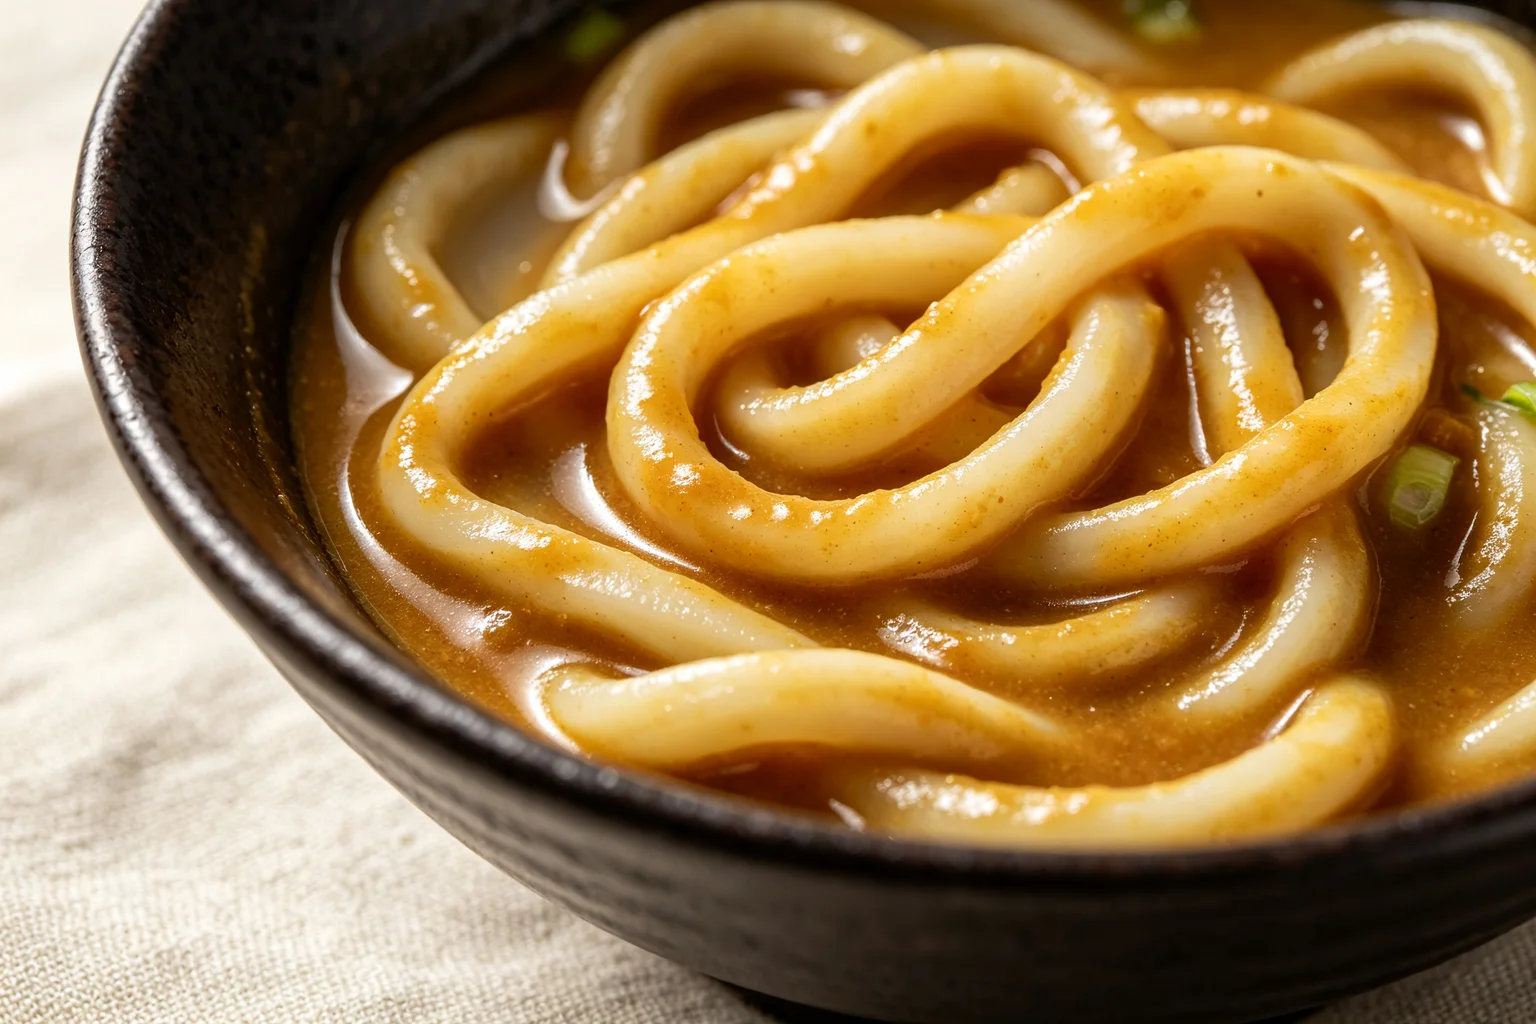
Why is frozen udon better than fresh refrigerated for this dish?
This is counterintuitive but consistently true.
Udon noodles depend on gluten, the protein network formed when wheat flour and water are mixed and worked. The quality and consistency of the gluten network determines the chewiness and elasticity of the finished noodle.
Fresh refrigerated udon in commercial packages has been through production, partial drying, and re-hydration, a process that can produce an uneven gluten network and a noodle that is less elastic and more prone to sticking. The refrigerated storage also continues to affect the gluten structure over time.
Frozen udon is frozen immediately after production at the peak of its gluten development. The freezing converts the water in the noodle to ice crystals distributed relatively evenly through the gluten network. When thawed and briefly cooked in boiling water, this noodle has a more even gluten structure, the result is a chewier, more elastic, more distinctly textured noodle.
For curry udon specifically, the thick curry broth is heavy. It needs a noodle with enough chew and structure to hold its character when coated in thick sauce. Frozen udon provides this. Refrigerated fresh udon, softer and less elastic, can become slightly mushy under the weight of the curry broth.
Ingredients
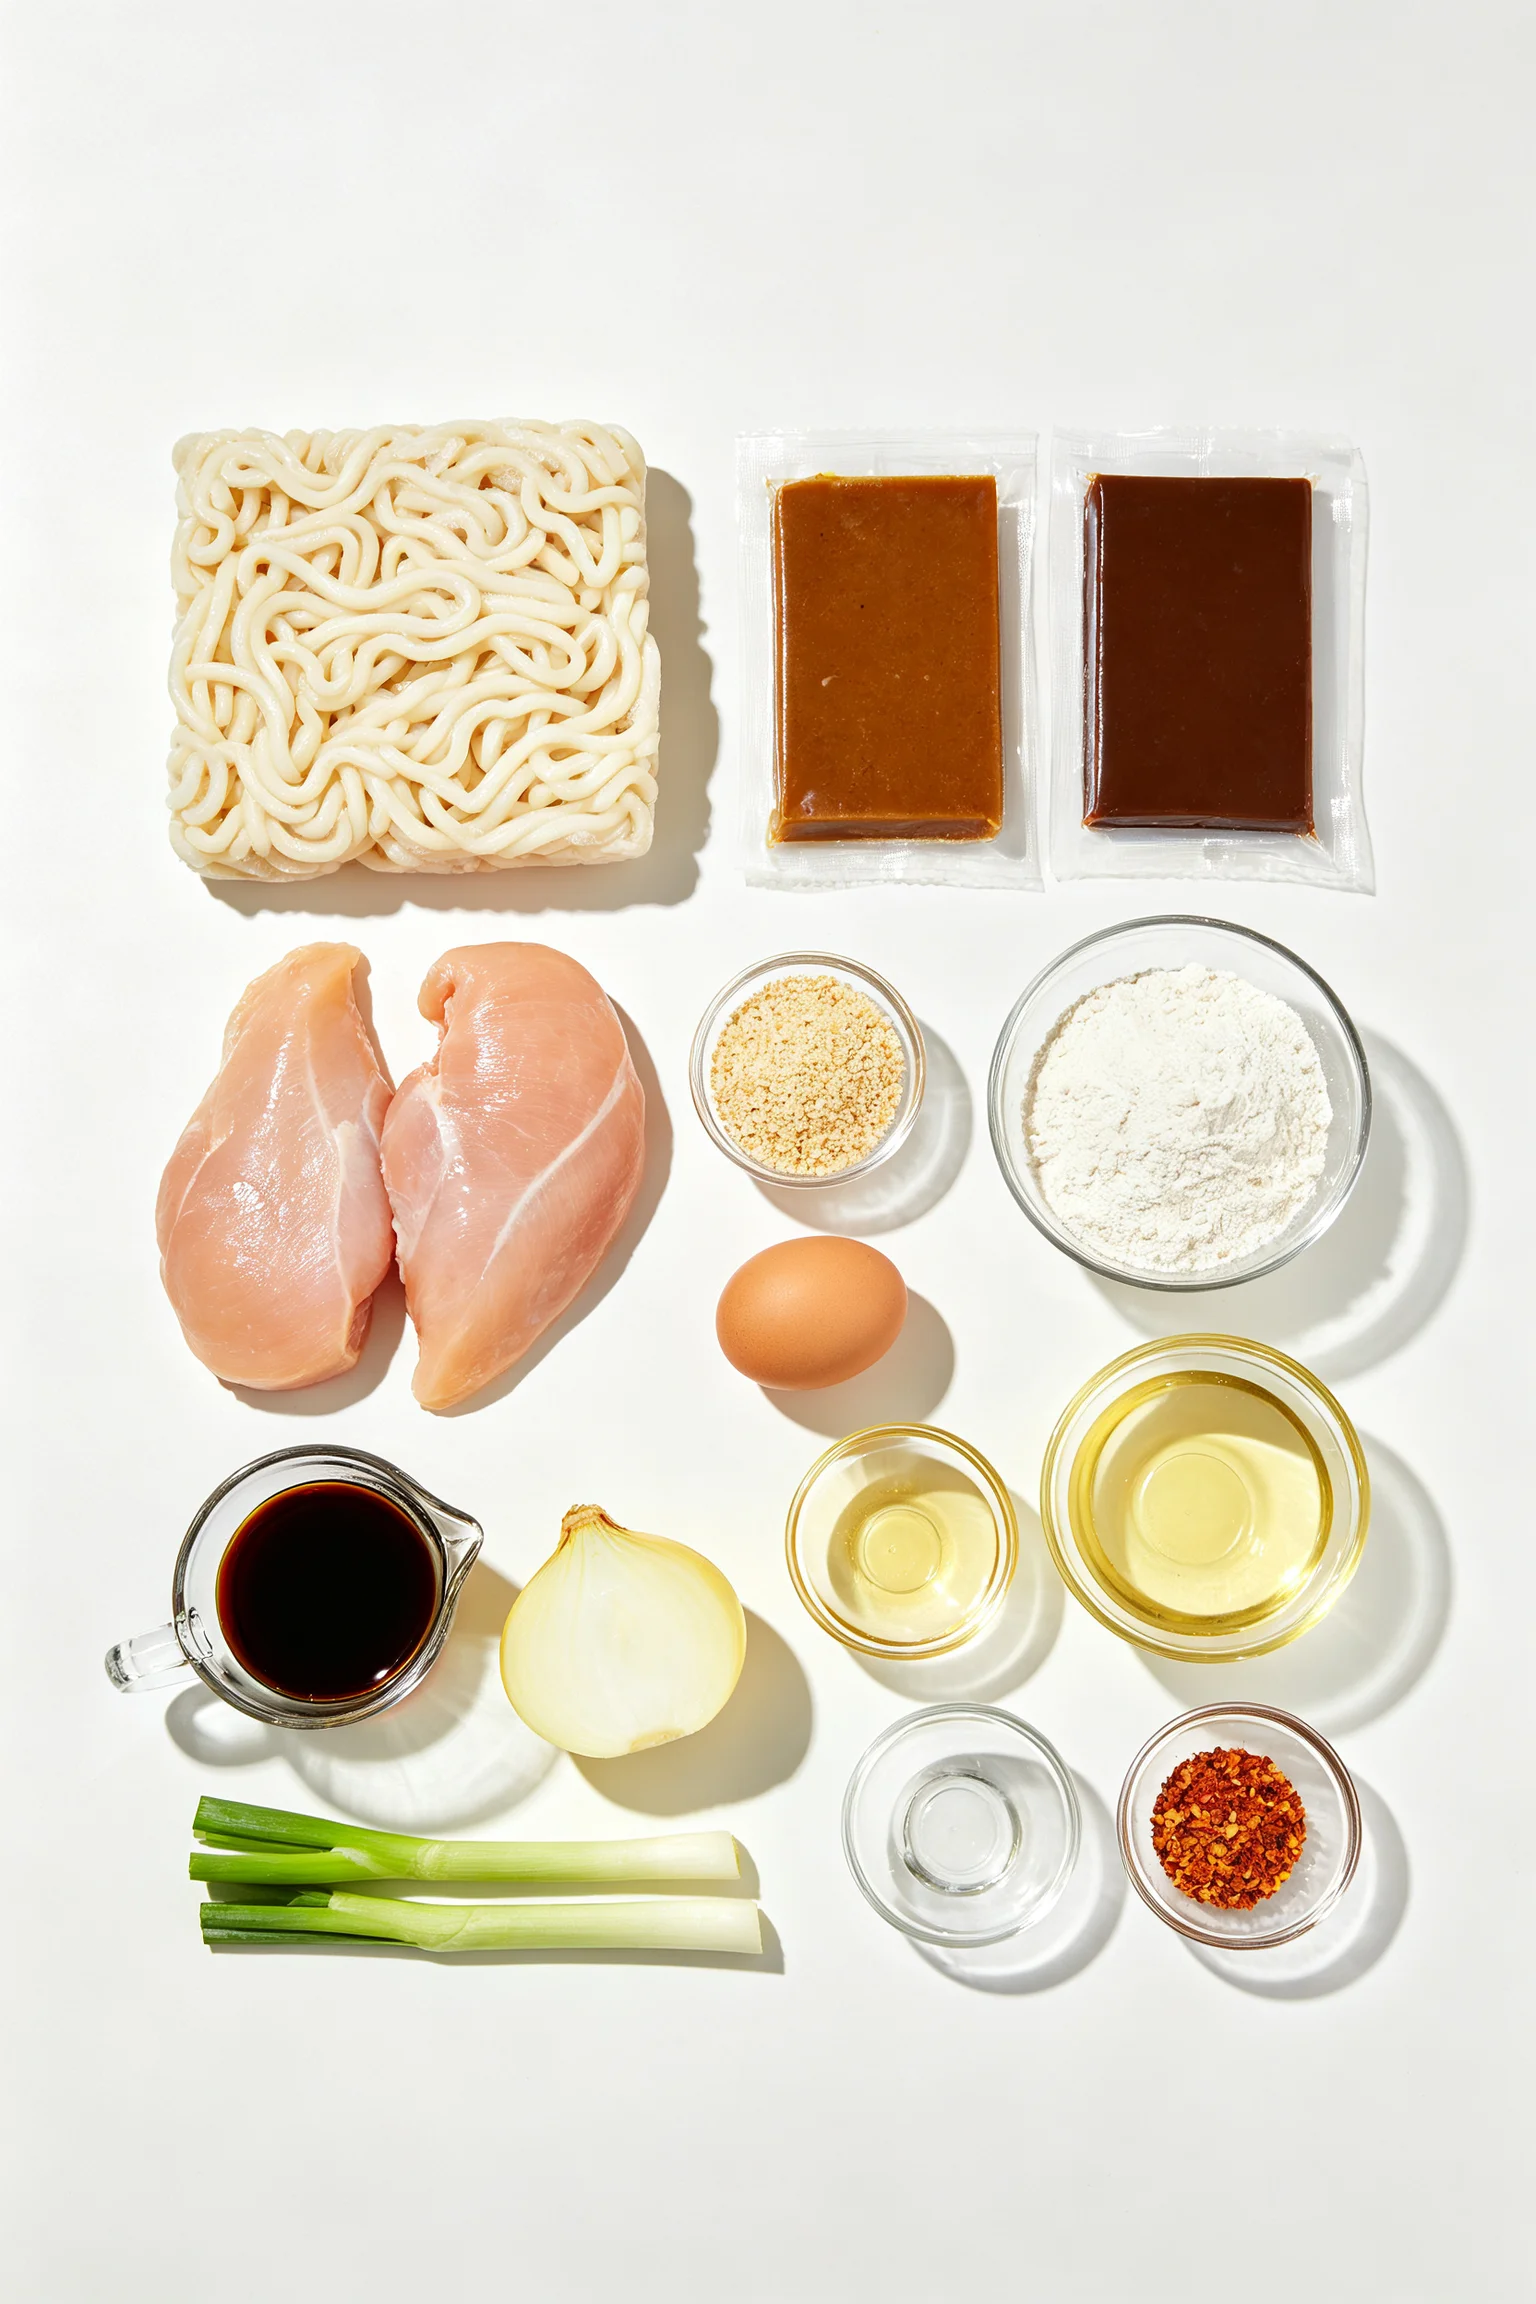
Serves 2
Chicken katsu:
- 2 boneless chicken breasts, pounded or butterflied to 1cm even thickness
- Salt and white pepper
- 3 tbsp plain flour
- 1 egg, beaten
- 1 tbsp milk
- 80g (1 cup) panko breadcrumbs
- Neutral oil for frying (enough for 3-4cm depth in your pan)
Japanese curry broth:
- 1 tbsp neutral oil
- 1 medium onion, thinly sliced
- 500ml (2 cups) dashi (from powder or packet)
- 200ml (¾ cup) water
- 2 tbsp soy sauce
- 1 tbsp mirin
- 80-100g Japanese curry roux (approximately 2 blocks, S&B medium or House Vermont curry recommended)
Udon:
- 2 portions frozen udon noodles (approximately 200g each)
Toppings:
- 2 spring onions, thinly sliced
- Shichimi togarashi (Japanese seven-spice) for serving
- Pickled ginger (optional)
Instructions
Make the curry broth first. It keeps warm while you fry the katsu.
Step 1: Make the curry broth
Heat oil in a medium saucepan over medium heat. Add the sliced onion.
Pour in the dashi and water. Add soy sauce and mirin. Bring to a gentle simmer. Simmer 5 minutes.
Turn off the heat completely. Wait 1 minute for the liquid to drop below boiling. Break the curry roux blocks into smaller pieces. Add them to the hot liquid. Stir constantly until every piece has fully dissolved, 2-3 minutes. No lumps should remain.
Return to the lowest heat. Simmer gently for 5 minutes, stirring occasionally, until the sauce is thick and coats a spoon heavily. Keep warm on the lowest heat while you prepare the katsu.
Step 2: Prepare the dredging station
Set up three shallow dishes in a line: flour seasoned with salt and pepper in the first, beaten egg mixed with milk in the second, panko in the third.
Step 3: Bread the chicken
Season the pounded chicken on both sides with salt and white pepper. Dredge in flour, coat completely, shake off excess.
Place the breaded cutlets on a plate. Leave for 5 minutes, this resting time lets the coating bond to the chicken before frying.
Step 4: Fry the katsu
Pour oil to a depth of 3-4cm in a heavy-based frying pan or wok. Heat to 170°C.
Fry the chicken cutlets one at a time if the pan is small, do not crowd. Fry 4-5 minutes on the first side until deep golden. Flip carefully. Fry 3-4 minutes on the second side. The crust should be deep golden-brown and the internal temperature should read 70°C.
Remove with tongs. Place on a wire rack over a tray. Do not place on paper towels. Rest 3-4 minutes before slicing, the internal temperature continues rising for 2-3 minutes after coming out of the oil.
Step 5: Cook the udon
While the katsu rests, bring a large pot of water to a full boil. Add the frozen udon portions directly from frozen.
Step 6: Assemble
Divide the cooked udon between two deep bowls. Ladle the hot curry broth generously over the noodles, enough to pool around them but not to submerge them completely.
Slice the rested katsu across the grain into 2cm slices. Fan the slices over the top of the noodles, placing them so the cut surface faces up, this displays the crispy panko layer and the juicy interior simultaneously. Add spring onions. Serve immediately with shichimi togarashi and pickled ginger alongside.
How do you store and reheat chicken katsu curry udon?
Store the components separately. The katsu and the curry broth should never be stored together, the katsu will become completely soft as it absorbs the broth overnight.
Curry broth: Keeps refrigerated for 4 days. Reheats on the stovetop over low heat with a splash of dashi or water if it has thickened further overnight. The broth continues developing flavour overnight and is often better on day two.
Katsu: Keeps refrigerated for 2 days. To re-crisp: place on a wire rack in a 200°C oven for 6-8 minutes, or in an air fryer at 200°C for 4-5 minutes. The panko will not return to its just-fried state but becomes acceptably crispy again. Do not microwave, it becomes rubbery.
Udon: Best cooked fresh for each serving. Frozen udon keeps indefinitely in the freezer, cook from frozen each time rather than storing cooked noodles, which clump together and become sticky.
Love Japanese food?
Check out my complete guide to Japanese home cooking, pantry essentials, and techniques.
FAQ
Which curry roux brand is best for this recipe? After testing four brands, S&B medium-hot and House Vermont curry are the most consistent performers for the curry udon broth. S&B medium-hot has a slightly more complex spice profile and a noticeable heat. House Vermont curry is milder and sweeter with a more rounded flavour. Both produce excellent results, the choice depends on heat preference. Avoid the mild versions of either brand for this dish as the curry character gets lost in the dashi broth. Java curry (House brand) is also good and slightly earthier than Vermont.
Can I use chicken thigh instead of breast for the katsu? Yes, and some cooks prefer it. Thigh produces a juicier, slightly richer katsu because of the higher fat content. The technique is identical, pound or butterfly to 1cm even thickness. The frying time may be slightly shorter since thigh is often thinner to begin with. The main reason breast is traditional for katsu is that the large flat surface produces a more dramatic, visually impressive cutlet for presentation.
Why does my curry broth have lumps in it? The roux was added to boiling or near-boiling liquid. Turn off the heat and wait a full minute before adding the curry roux next time. Break the roux into small pieces, smaller pieces dissolve faster and produce fewer lumps. Stir constantly from the moment the first piece goes in. If lumps have already formed, push the broth through a fine mesh sieve, the strained broth will be smooth and the lumps can be discarded.
Can I make the curry broth in advance? Yes, the curry broth is actually better made a day ahead. The spices in the curry roux continue developing and integrating overnight. The broth thickens slightly as it cools and reheats to a silkier, more cohesive consistency than freshly made broth. Make the broth up to 3 days ahead, refrigerate, and reheat gently before assembling the bowls. The katsu should always be fried fresh.
You might also like: Check out our complete Japanese cooking guide for more essential ingredients and techniques.
Chicken Katsu Curry Udon (チキンカツカレーうどん)
Japanese, Curry Roux Tempering, Japanese Curry Roux (S&B Golden Curry)
PT20M
PT30M
PT50M
Nutrition Facts
Ingredients
- 2 boneless chicken breasts, pounded or butterflied to 1cm even thickness
- Salt and white pepper
- 3 tbsp plain flour
- 1 egg, beaten
- 1 tbsp milk
- 80g (1 cup) panko breadcrumbs
- Neutral oil for frying (enough for 3-4cm depth in your pan)
- 1 tbsp neutral oil
- 1 medium onion, thinly sliced
- 500ml (2 cups) dashi (from powder or packet)
- 200ml (¾ cup) water
- 2 tbsp soy sauce
- 1 tbsp mirin
- 80-100g Japanese curry roux (approximately 2 blocks, S&B medium or House Vermont curry recommended)
- 2 portions frozen udon noodles (approximately 200g each)
- 2 spring onions, thinly sliced
- Shichimi togarashi (Japanese seven-spice) for serving
- Pickled ginger (optional)
Instructions
- Step 1: Make the curry broth - Heat oil in a medium saucepan over medium heat. Add the sliced onion. Cook, stirring occasionally, for 8-10 minutes until soft and beginning to caramelise to a light golden colour. Pour in the dashi and water. Add soy sauce and mirin. Bring to a gentle simmer. Simmer 5 minutes. Turn off the heat completely. Wait 1 minute for the liquid to drop below boiling. Break the curry roux blocks into smaller pieces. Add them to the hot liquid. Stir constantly until every piece has fully dissolved, 2-3 minutes. No lumps should remain. Return to the lowest heat. Simmer gently for 5 minutes, stirring occasionally, until the sauce is thick and coats a spoon heavily. Keep warm on the lowest heat while you prepare the katsu.
- Step 2: Prepare the dredging station - Set up three shallow dishes in a line: flour seasoned with salt and pepper in the first, beaten egg mixed with milk in the second, panko in the third.
- Step 3: Bread the chicken - Season the pounded chicken on both sides with salt and white pepper. Dredge in flour, coat completely, shake off excess. Dip in the egg, coat completely, let excess drip off. Press firmly into the panko, coat every surface, pressing the panko into the chicken with your palm so it adheres well. Check for bare spots and fill them in. Place the breaded cutlets on a plate. Leave for 5 minutes, this resting time lets the coating bond to the chicken before frying.
- Step 4: Fry the katsu - Pour oil to a depth of 3-4cm in a heavy-based [frying](/recipes/how-to-make-japanese-fried-chicken-karaage/) pan or wok. Heat to 170°C. Test with panko: drop a small pinch in, it should sizzle immediately, rise to the surface, and turn golden within 30 seconds. Fry the chicken cutlets one at a time if the pan is small, do not crowd. Fry 4-5 minutes on the first side until deep golden. Flip carefully. Fry 3-4 minutes on the second side. The crust should be deep golden-brown and the internal temperature should read 70°C. Remove with tongs. Place on a wire rack over a tray. Do not place on paper towels. Rest 3-4 minutes before slicing, the internal temperature continues rising for 2-3 minutes after coming out of the oil.
- Step 5: Cook the udon - While the katsu rests, bring a large pot of water to a full boil. Add the frozen udon portions directly from frozen. Cook for 2-3 minutes, loosening the noodles with chopsticks or tongs as they thaw. Drain.
- Step 6: Assemble - Divide the cooked udon between two deep bowls. Ladle the hot curry broth generously over the noodles, enough to pool around them but not to submerge them completely. The noodles should be sitting in broth with the surface visible. Slice the rested katsu across the grain into 2cm slices. Fan the slices over the top of the noodles, placing them so the cut surface faces up, this displays the crispy panko layer and the juicy interior simultaneously. Add spring onions. Serve immediately with shichimi togarashi and pickled ginger alongside.
Did you make this recipe?
Tag @asianfoodsdaily on Instagram or leave a comment below!
About Asha
Half Asian, half African cook raised between two food-obsessed cultures. I've spent 10 years learning Asian cooking traditions through family, friends, and thousands of hours at the stove — testing every dish until it works in a standard home kitchen.
Read my full story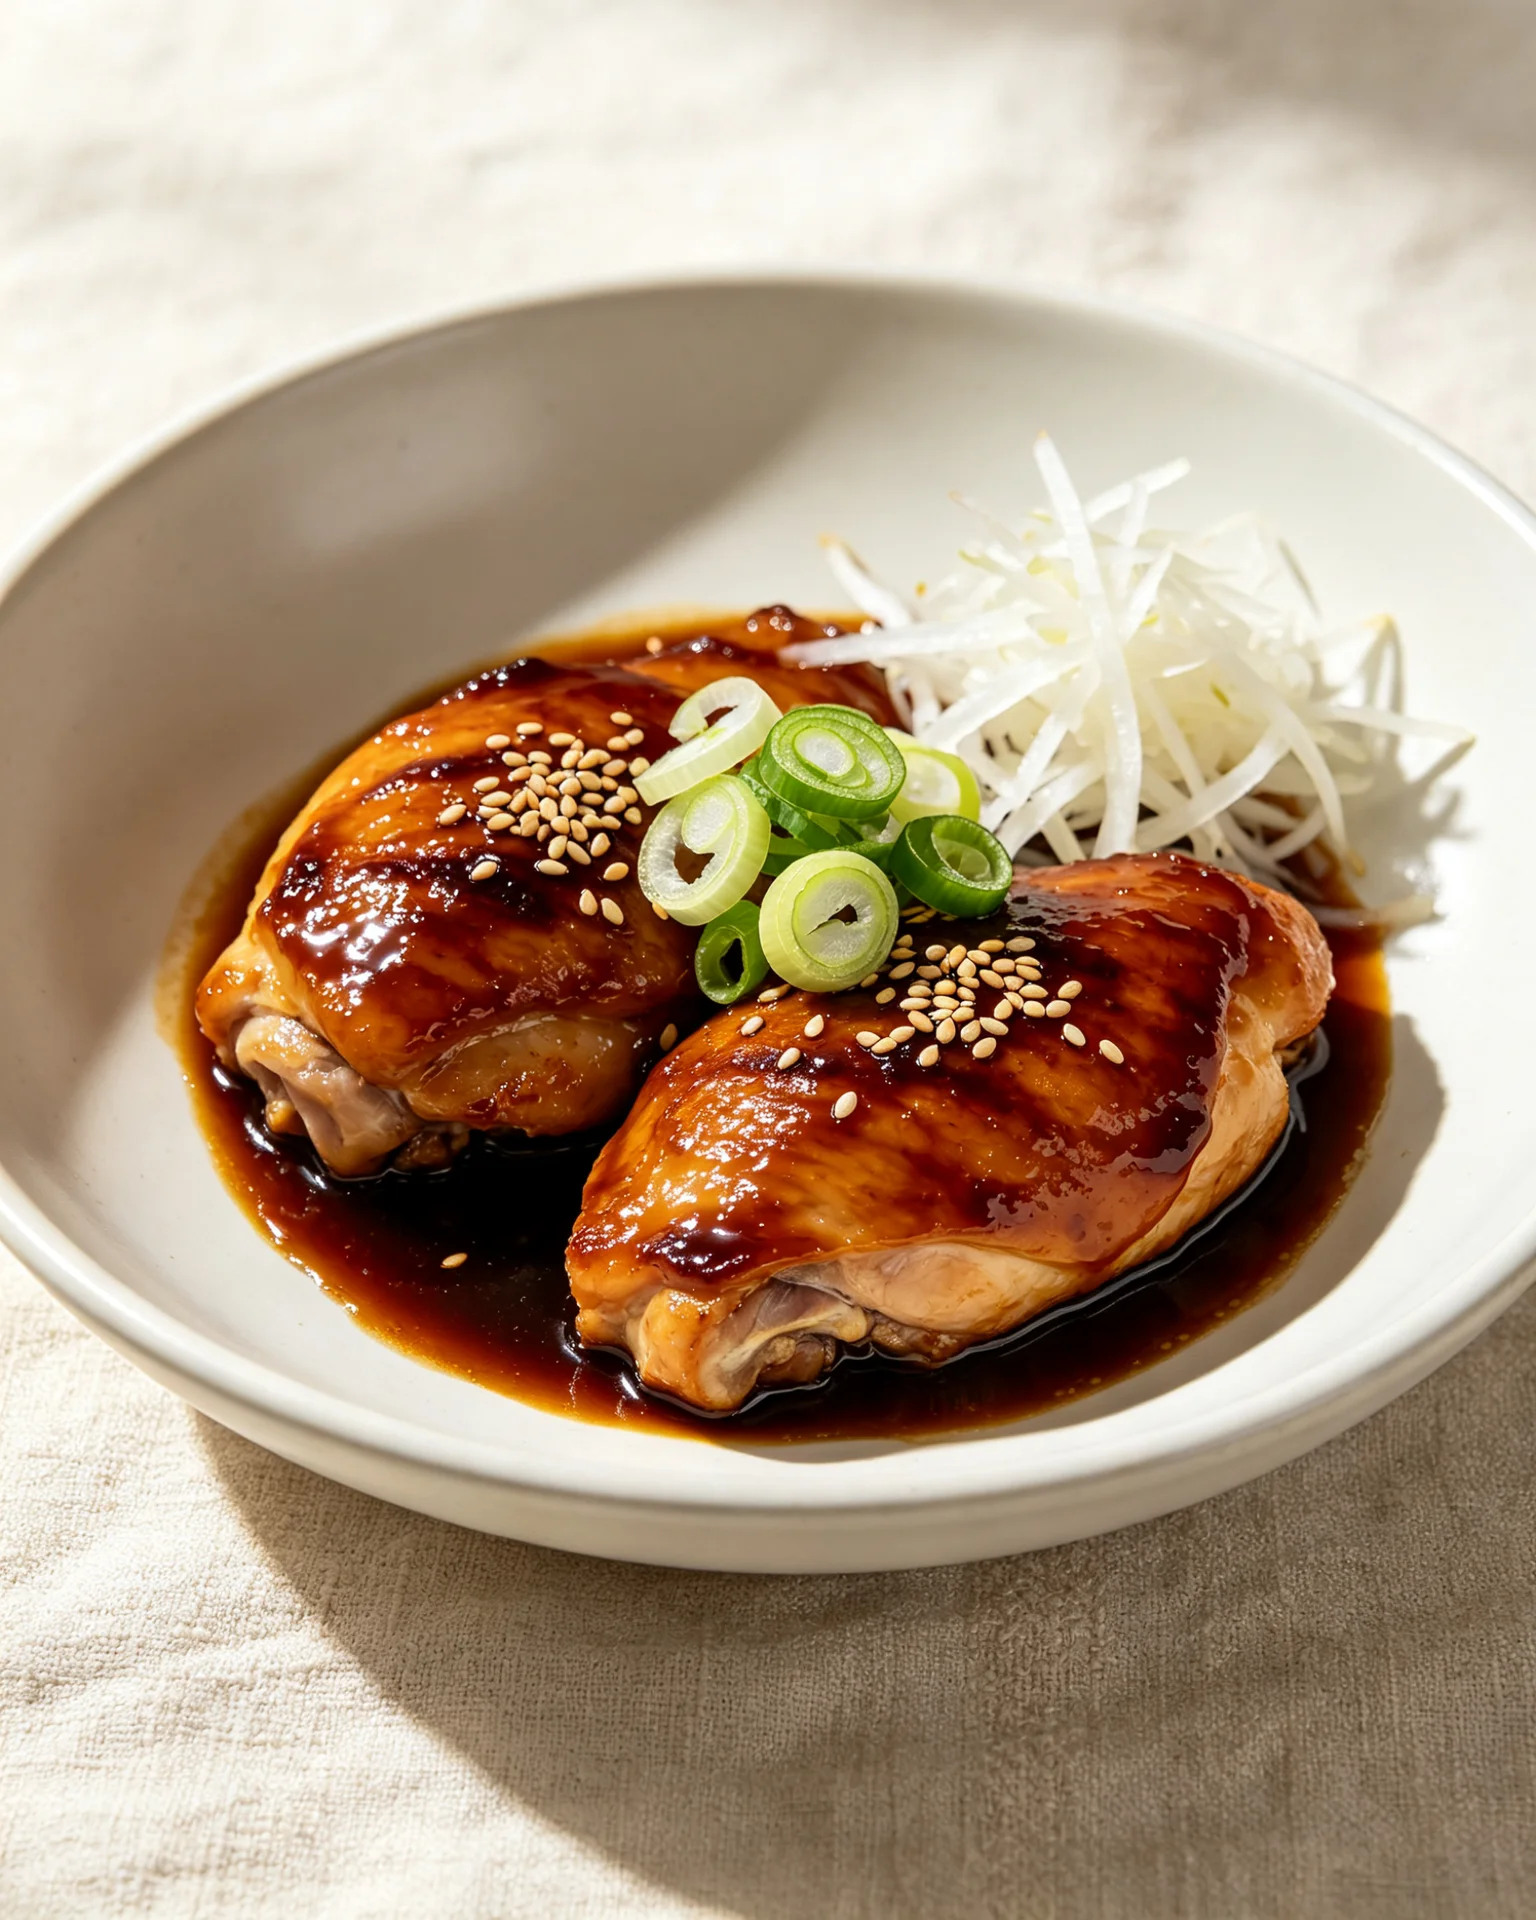


Loading comments...