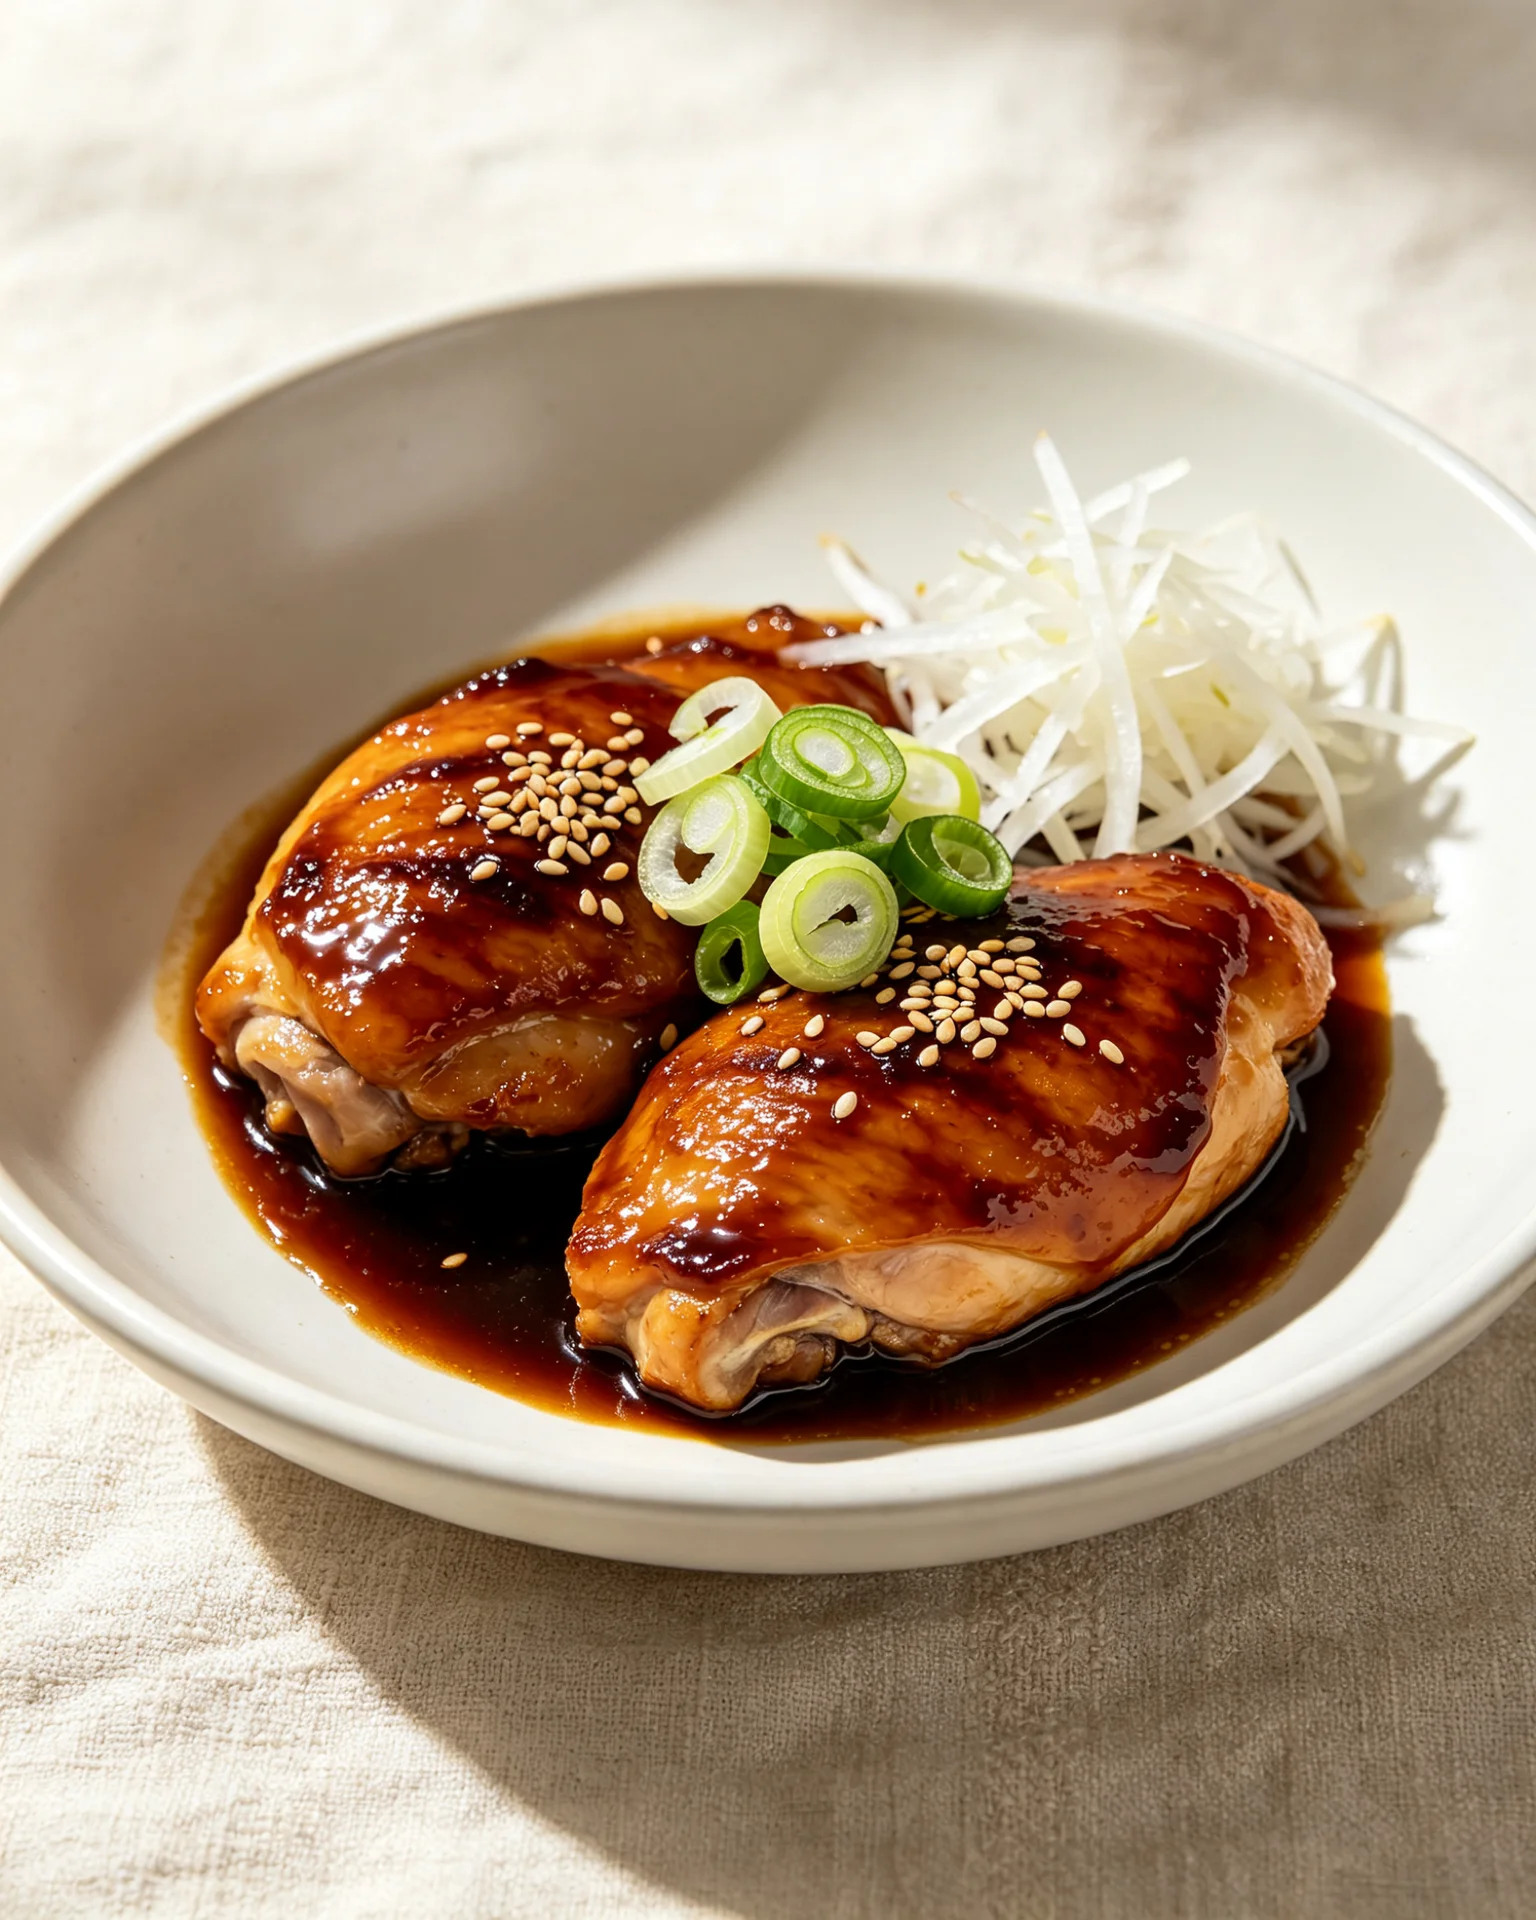
Hibachi Chicken Recipe (Teppanyaki)

Hibachi chicken is bite-sized chicken cooked over very high heat with butter, garlic, soy sauce, and sesame oil. The version most people know from Japanese steakhouses is technically teppanyaki, flat iron griddle cooking, not hibachi, which uses an open charcoal grate. The distinction matters for home cooking because the correct equipment is a flat cast iron pan, not a ridged grill pan. The flavour comes from conduction heat against flat iron, not from smoke.
The technique change that makes the biggest difference at home is searing the chicken whole and dicing it after. Diced raw chicken releases moisture from every cut surface simultaneously in the pan. In a home cast iron with limited thermal mass, that collective moisture drops the pan temperature and the chicken steams rather than sears. A whole breast has far fewer cut surfaces, releases less moisture per cooking area, and achieves the Maillard sear that produces the steakhouse character. Dice it after resting and the juices stay inside.
What is hibachi chicken and is it actually hibachi?
Traditional hibachi (火鉢, fire bowl) is a Japanese open-grate charcoal or gas grill where the food makes direct contact with the flame and picks up light smoke character. The word literally describes the heating device.
Teppanyaki (鉄板焼き, iron plate grilling) uses a solid flat iron griddle. Heat transfers to the food entirely by conduction from the hot iron surface. No flame contact, no smoke. Everything cooks against the flat iron.
Benihana, the restaurant chain that brought this style of cooking to American mainstream dining from 1964, uses teppanyaki cooking. The tableside theatre, the knife tricks, the onion volcano, the shrimp toss, happens on flat iron griddles. What Americans call hibachi food is teppanyaki food.
The practical implication for home cooking: the cast iron pan or carbon steel pan is the correct tool. Grill pans with ridges create grill marks and allow fat to drip away, they do not produce the same full-surface conduction contact that generates the steakhouse result. A flat cast iron pan heated to maximum heat is the closest home equivalent to the flat iron griddles in teppanyaki restaurants.
Why do you sear the chicken whole and dice it after?
This is the single technique change that most improves home hibachi chicken and almost no recipe explains why.
When raw chicken is cut into bite-sized pieces before cooking, each cut creates exposed muscle fibres at each new surface. These exposed fibres begin releasing moisture immediately when heated. Twelve pieces of diced chicken have twelve times more cut surface area than one whole breast, twelve simultaneous sources of moisture releasing into the pan.
A home cast iron pan has limited thermal mass compared to a restaurant teppanyaki griddle. The collective moisture from twelve cut surfaces drops the pan temperature. Below approximately 140-150°C the Maillard reaction cannot proceed, the proteins and sugars on the surface cannot form the complex aromatic compounds that produce the sear. The moisture accumulates, the pieces effectively steam in their own liquid, and the result is pale, slightly tough chicken without the caramelised exterior.
A whole chicken breast has two main surfaces (top and bottom) and minimal exposed edge area. Far less total moisture release. The pan temperature recovers after the breast goes in and the Maillard reaction proceeds on both surfaces, the breast develops a proper golden-brown sear rather than steaming.
After the sear, rest the whole breast for 3 minutes. During resting, the internal juices redistribute throughout the meat. Dicing at this point creates the cut surfaces that ultimately let the juices run, but the juices have already redistributed and are less likely to pool immediately from the cuts. The pieces stay juicier after dicing than pieces cut from a freshly seared breast.
Why do you add the butter after the initial sear?
Butter contains approximately 80% milk fat, 16-17% water, and 3-4% milk solids, primarily proteins and sugars from the milk.
The milk solids are what burn. They begin browning at approximately 150°C and produce bitter, acrid compounds when they burn above 160-165°C. A cast iron pan preheated to the temperature needed for a proper chicken sear, 220-230°C, is well above this threshold. Adding butter to the pan at the beginning of cooking produces immediately burnt milk solids regardless of how quickly you add the chicken.
The sequence: heat the pan dry. Add a high smoke point oil, safflower oil (265°C), avocado oil (270°C), or refined peanut oil (230°C) are the correct choices. Sear the chicken whole in the oil. Remove the chicken. The pan temperature drops slightly from the chicken’s thermal mass and from a brief moment off heat.
Add the butter now. The water content in the butter evaporates immediately, producing foam. The milk solids begin to caramelise at the now-lower temperature rather than burning. The butter foams, smells nutty, and begins to develop a light brown colour around the edges, this is brown butter character, the nutty, complex base for the basting stage. Garlic and soy go in at this point, not before.
Why does garlic go in after the butter foams?
Raw garlic contains volatile aromatic compounds, primarily allicin and other thiosulfinates, that develop their fragrance when heated but burn and turn bitter above approximately 160-165°C with sustained exposure.
At the 200°C+ temperature of the initial sear, raw garlic added to the pan would burn within 30-45 seconds. The resulting bitter, sharp compounds cannot be corrected and they coat everything that follows.
When butter is added to the hot pan after removing the chicken, the butter’s water content evaporates and the pan temperature drops to approximately 150-165°C, the butter’s cooling effect plus the brief removal from direct heat. Adding garlic when the butter is actively foaming puts it into this temperature window: hot enough to develop the garlic aromatics quickly, cool enough to stir for 45-60 seconds without burning.
The garlic should turn golden and smell intensely fragrant within 45-60 seconds. If it darkens too quickly, remove the pan from heat briefly, the residual heat of a cast iron pan is sufficient to continue cooking the garlic without the direct burner adding more heat.
This is the same garlic sequencing principle used in Chinese stir-fry, covered in more detail in the Chinese beef stir-fry recipe on this site. The application is identical: garlic goes into a slightly cooled fat, not into the hottest moment of the cooking process.
Why pour the soy sauce around the perimeter and not directly on the chicken?
When soy sauce is poured directly onto hot chicken in a pan, the water content of the soy sauce, approximately 70% water, produces steam immediately on contact with the hot protein surface. This steam lowers the chicken’s surface temperature and interrupts the Maillard reaction. The result is soy-steamed chicken: the exterior develops soy flavour but loses its sear character and the surface becomes slightly soft.
Poured around the perimeter of the pan, the soy sauce hits the empty hot iron surface rather than the chicken. The water content evaporates immediately from the pan surface, the soy sauce is thin enough that this takes approximately 2-3 seconds. The remaining soy solids, glutamate, amino acids, natural sugars, begin to caramelise against the hot iron before the soy liquid reaches the chicken.
This caramelised soy, mixed with the butter already in the pan, coats the chicken as it is tossed and basted, the chicken gets a complex caramelised soy character rather than raw or steamed soy. The difference in flavour is significant enough to notice on the first bite.
What oil do teppanyaki restaurants actually use?
Safflower oil. It has one of the highest smoke points of common cooking oils, approximately 265°C, and a completely neutral flavour that does not compete with the butter-garlic-soy character of the dish.
Most home recipes specify vegetable oil or canola oil, which are acceptable substitutes with smoke points of approximately 220-230°C. The difference becomes noticeable at the very high temperatures needed for the initial sear, neutral oils with higher smoke points give more headroom before producing off-flavours from oil degradation.
Avocado oil (270°C) is the best widely available home alternative to safflower oil. Refined peanut oil (230°C) works well. Extra virgin olive oil (190°C) is incorrect for this application, the smoke point is too low and the flavour competes.
The oil only matters for the initial sear stage. Once the butter is added, the oil is diluted and the butter’s flavour dominates.
What does the lemon juice finish do?
The lemon juice is added off heat at the very end, a small squeeze over the finished chicken in the pan before plating.
Its function is acid balance. The butter and soy sauce combination is rich and heavy, glutamate from soy, fat from butter, salt from both. Without an acid component, the dish tastes complete but slightly one-note after a few bites. The fat and salt dominate.
Citric acid from lemon juice raises the perceived brightness of all the other flavours and provides contrast to the fat richness, the same function as calamansi on Filipino pancit bihon or lime at the table in pad thai. The lemon does not make the dish taste of lemon. It makes the soy-butter-garlic taste more vivid and prevents the richness from becoming heavy.
Add it off heat, lemon juice’s volatile aromatic compounds evaporate rapidly at cooking temperatures. Off heat over the finished dish, those compounds are preserved and the squeeze provides both acid balance and fresh citrus fragrance.
Ingredients
Serves 2
Chicken:
- 2 boneless chicken breasts or thighs (approximately 300g total)
- Salt and white pepper
For cooking:
- 2 tbsp safflower oil, avocado oil, or neutral high smoke point oil
- 2 tbsp unsalted butter
- 4 garlic cloves, finely minced
- 2 tbsp soy sauce
- 1 tbsp sake or dry sherry
- 1 tsp sesame oil (added off heat)
- ½ lemon, juiced (added off heat)
Optional add-ins:
- 1 tsp mirin (adds gloss and slight sweetness)
- ½ tsp grated fresh ginger
To serve:
- Hibachi fried rice
- Sautéed hibachi vegetables (zucchini, onion, mushroom, broccoli)
- Yum yum sauce or Japanese ginger sauce
Instructions
Preheat the pan properly before anything goes in. An inadequately heated pan is the most common reason hibachi chicken fails at home.
Step 1: Preheat the pan
Place a cast iron pan over the highest heat your burner produces. Leave it for 4-5 minutes, significantly longer than most people wait.
Step 2: Season the chicken
While the pan heats, season the chicken breasts or thighs on both sides with salt and white pepper. Do not marinate, the flavour comes from the sear and the butter-soy basting, not from a marinade.
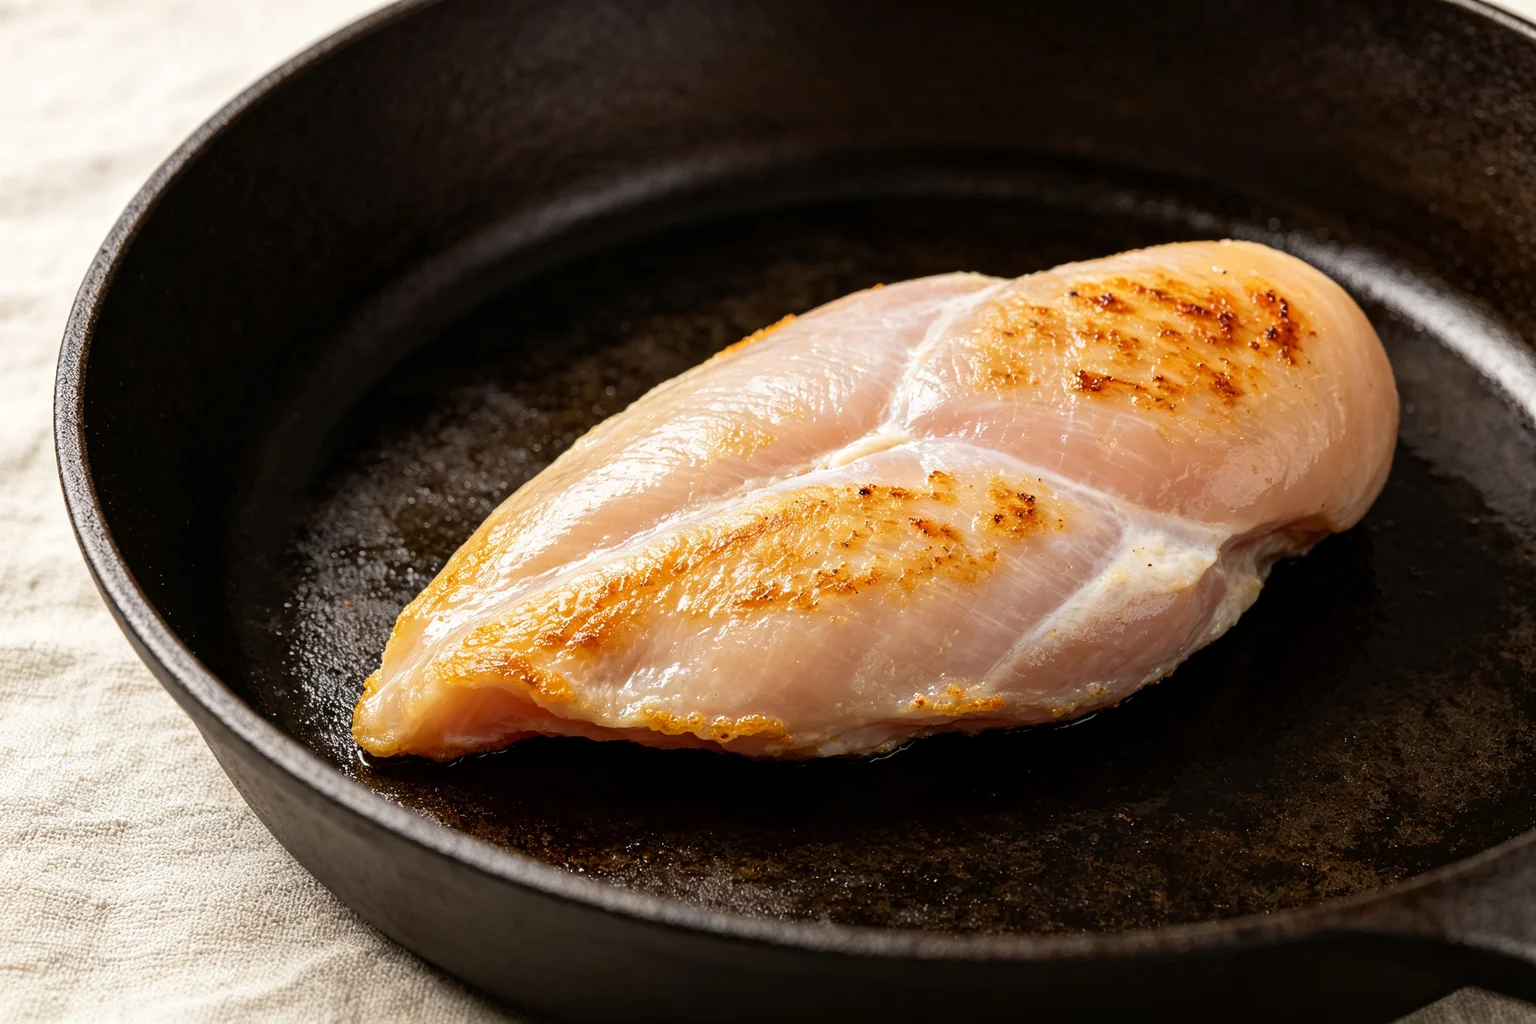
Step 3: Sear the chicken whole
Add the safflower oil to the smoking hot pan. Lay the chicken in, do not move it for 3-4 minutes.
Flip. Sear 2-3 minutes on the second side until the chicken is cooked through with an internal temperature of 70°C. Remove to a plate. Rest 3 minutes.
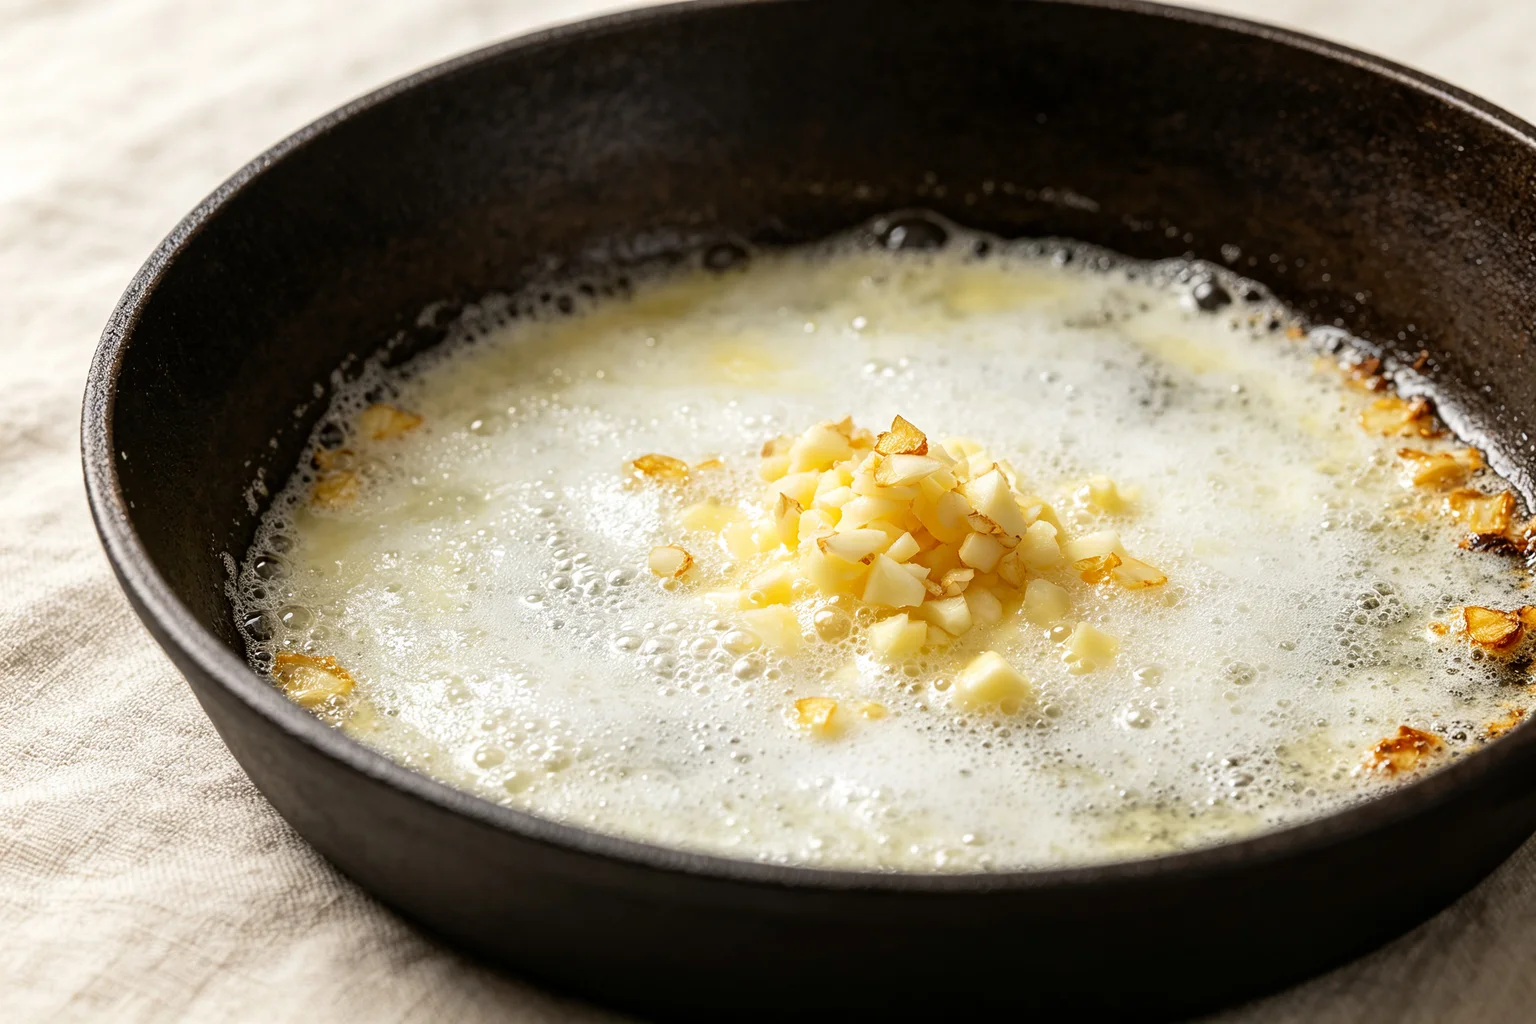
Step 4: Butter and garlic
While the chicken rests, reduce the burner to medium-high. Add the butter to the still-hot pan.
Step 5: Soy sauce around the perimeter
Add the sake to the pan and let it sizzle for 10 seconds. Then pour the soy sauce around the perimeter of the pan, not directly on the garlic or butter, not onto any chicken.
Step 6: Dice and return the chicken
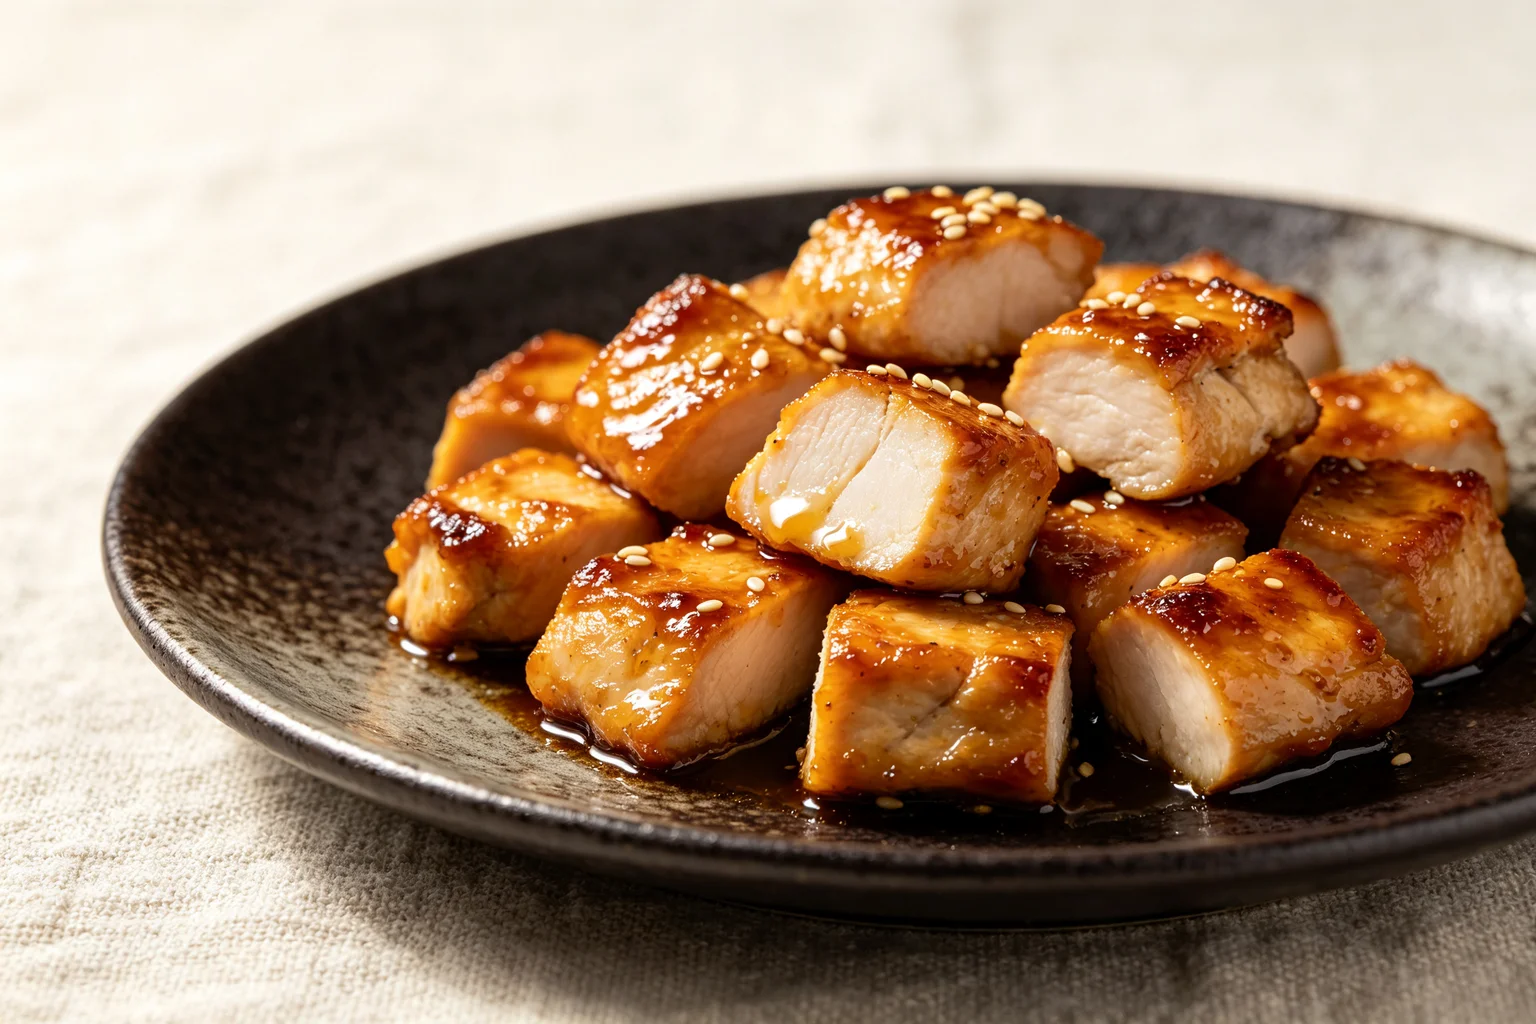
Dice the rested chicken into bite-sized pieces, 2-3cm cubes. Return them to the pan with the butter-garlic-soy sauce.
Step 7: Finish off heat
Remove from heat. Add sesame oil and lemon juice.
How do you serve hibachi chicken?
Serve alongside hibachi fried rice and sautéed hibachi vegetables, the three components together constitute the full steakhouse experience at home.
Hibachi vegetables: same cast iron pan, same high heat. Zucchini, onion, and mushroom in butter, soy, and a pinch of salt. The vegetables should char slightly at the edges and stay slightly firm, not fully soft. Total time 3-4 minutes.
Yum yum sauce (the pink steakhouse sauce): mayonnaise, ketchup, butter, garlic powder, paprika, sugar, and a small amount of water. Mix together and refrigerate 30 minutes before serving. It does not require cooking.
Japanese ginger sauce: grated fresh ginger, soy sauce, rice vinegar, sesame oil, and a small amount of sugar. No cooking required.
How do you store and reheat hibachi chicken?
Keeps in the refrigerator for 3 days. The butter and soy sauce flavour deepens slightly overnight.
To reheat: a hot cast iron pan for 2-3 minutes with a small splash of soy sauce and a knob of butter. The pan re-crisps the exterior slightly and the fresh butter and soy restore the gloss. Do not microwave, it makes the chicken rubbery and the butter separates.
Love Japanese food?
Check out my complete guide to Japanese home cooking, pantry essentials, and techniques.
FAQ
Why is my hibachi chicken pale and not golden? The pan was not hot enough before the chicken went in, or the chicken was diced before searing. Both prevent the Maillard reaction. Preheat the cast iron for 4-5 full minutes until a drop of water vaporises on contact. Sear the chicken whole without moving it for 3-4 minutes on the first side. Only flip when it releases naturally from the pan. If it sticks, leave it, a stuck surface is still developing the sear.
Can I use chicken thigh instead of breast? Yes. Thigh is forgiving at high heat, the higher fat content keeps the interior moist even if the sear takes longer than intended. Breast at very high heat has less margin for error. The sear-then-dice technique is identical for both. Thigh may require 1-2 additional minutes per side due to slightly thicker irregular shape, use a thermometer to confirm 70°C internal before resting.
What is the difference between hibachi chicken and teriyaki chicken? Hibachi chicken uses butter, garlic, soy sauce, and lemon, no sweetener, no marinade, flavour comes from the sear and the butter basting. Teriyaki chicken uses a sweet soy-mirin-sake glaze applied during cooking that caramelises into a sticky coating. The teriyaki sauce is the point of teriyaki; the sear is the point of hibachi. They use similar base ingredients but produce different flavour profiles and different textures. The teriyaki chicken recipe on this site covers the hon-mirin vs aji-mirin distinction in detail.
Do I need a cast iron pan or will a regular non-stick work? Cast iron or carbon steel is strongly preferred. Non-stick pans have a maximum safe temperature of approximately 260°C, above this the non-stick coating begins to degrade. The temperatures needed for a proper hibachi sear approach or exceed this limit. Non-stick at the heat required produces a less effective sear, potential coating degradation, and a shorter pan lifespan. A cast iron pan handles any temperature the home burner can produce, retains heat extremely well, and improves with use. It is the correct tool for this application.
You might also like: Check out our complete Japanese cooking guide for more essential ingredients and techniques.
Hibachi Chicken Recipe (Teppanyaki)
PT10M
PT15M
PT25M
Nutrition Facts
Ingredients
- 2 boneless chicken breasts or thighs (approximately 300g total)
- Salt and white pepper
- 2 tbsp safflower oil, avocado oil, or neutral high smoke point oil
- 2 tbsp unsalted butter
- 4 garlic cloves, finely minced
- 2 tbsp soy sauce
- 1 tbsp sake or dry sherry
- 1 tsp sesame oil (added off heat)
- ½ lemon, juiced (added off heat)
- 1 tsp mirin (adds gloss and slight sweetness)
- ½ tsp grated fresh ginger
- Hibachi fried rice
- Sautéed hibachi vegetables (zucchini, onion, mushroom, broccoli)
- Yum yum sauce or Japanese ginger sauce
Instructions
- Step 1: Preheat the pan - Place a cast iron pan over the highest heat your burner produces. Leave it for 4-5 minutes, significantly longer than most people wait. The pan should be smoking when a drop of water flicked onto the surface immediately vaporises. This is the correct temperature.
- Step 2: Season the chicken - While the pan heats, season the chicken breasts or thighs on both sides with salt and white pepper. Do not marinate, the flavour comes from the sear and the butter-soy basting, not from a marinade.
- Step 3: Sear the chicken whole - Add the safflower oil to the smoking hot pan. Lay the chicken in, do not move it for 3-4 minutes. A proper sear requires uninterrupted contact between the protein and the hot surface. The chicken should release naturally from the pan when the sear is complete, if it sticks, it is not ready to flip. Flip. Sear 2-3 minutes on the second side until the chicken is cooked through with an internal temperature of 70°C. Remove to a plate. Rest 3 minutes.
- Step 4: Butter and garlic - While the chicken rests, reduce the burner to medium-high. Add the butter to the still-hot pan. The butter will foam immediately as the water content evaporates. When the foam subsides and the butter is beginning to show light brown colour at the edges, add the minced garlic. Stir constantly for 45-60 seconds until golden and intensely fragrant. Do not let it darken past golden.
- Step 5: Soy sauce around the perimeter - Add the sake to the pan and let it sizzle for 10 seconds. Then pour the soy sauce around the perimeter of the pan, not directly on the garlic or butter, not onto any chicken. Let the soy hit the hot pan edges and sizzle for 5-10 seconds before you stir it into the butter and garlic mixture. The sauce in the pan should look slightly caramelised and smell deeply savoury.
- Step 6: Dice and return the chicken - Dice the rested chicken into bite-sized pieces, 2-3cm cubes. Return them to the pan with the butter-garlic-soy sauce. Toss to coat every piece thoroughly. Cook 30-45 seconds more, tossing, until every piece is coated and glossy.
- Step 7: Finish off heat - Remove from heat. Add sesame oil and lemon juice. Toss once more. The sesame oil and lemon are added off heat to preserve their volatile aromatic compounds. Plate immediately.
Did you make this recipe?
Tag @asianfoodsdaily on Instagram or leave a comment below!
About Asha
Half Asian, half African cook raised between two food-obsessed cultures. I've spent 10 years learning Asian cooking traditions through family, friends, and thousands of hours at the stove — testing every dish until it works in a standard home kitchen.
Read my full story


Loading comments...