Sri Lankan Hoppers (Appa) Recipe — Plain and Egg Hoppers
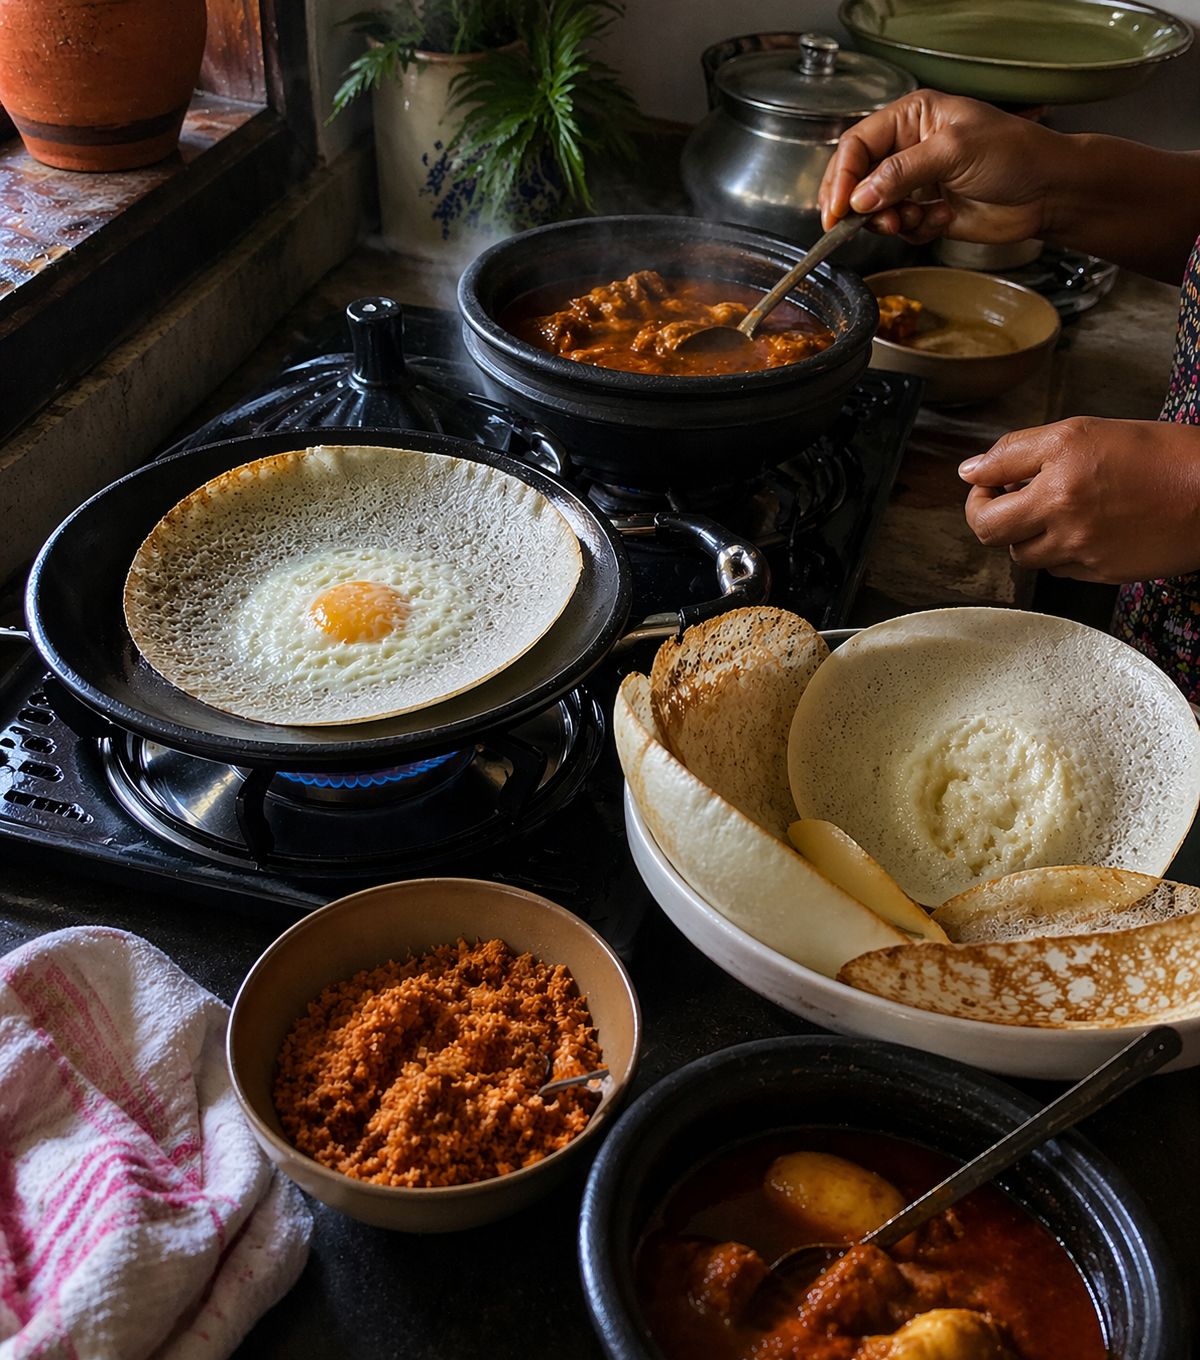
Hoppers are the dish that stops people mid-bite the first time they eat them. The edges are thin and lacework-crisp. The centre is thick, soft, and spongy from the fermented batter. The whole thing takes about 90 seconds to cook once the pan is hot. Getting to that point — a batter that has fermented correctly and a technique that produces the shape — takes understanding two things most recipes gloss over: why fermentation time matters more than yeast quantity, and what the swirl is actually doing.
What are hoppers?
Hoppers — called appa in Sinhala — are bowl-shaped fermented rice flour pancakes cooked in a small, curved pan called an appachatti. The batter is made from rice flour, coconut milk, a small amount of yeast, and sugar. It ferments for 8–18 hours before cooking, developing the slight sourness and the gas bubbles that produce the hopper’s characteristic texture.
The curved pan does the structural work. When you pour batter into a hot appachatti and swirl it, the batter climbs the walls and sets there, thin and crisp from direct contact with the hot metal. The centre pools thicker and steams under the lid, cooking soft and spongy from indirect heat. You get two completely different textures from the same batter in the same 90 seconds — that is the hopper.
Egg hoppers are made by cracking an egg into the centre of the batter just before fitting the lid. The egg sets in the steam while the edges crisp. The yolk is traditionally left runny — it breaks when you eat, running into the pol sambol alongside. This is the version most people encounter first and become obsessed with.
Hoppers are a breakfast and dinner dish in Sri Lanka, not lunch. They are eaten with pol sambol, parippu, and a curry — the same set of accompaniments as a rice and curry meal but built around the hopper instead of rice.
Why fermentation time matters more than yeast quantity
Most hopper recipes either use a lot of yeast and ferment for 2 hours, or use a small amount of yeast and ferment overnight. The difference is not just timing — it produces a fundamentally different batter.
A 2-hour ferment with active yeast produces a batter that has risen but not developed flavour. The bubbles are there, the batter is aerated, and the hoppers will have the right texture. But the slight sourness that makes a Sri Lankan hopper taste the way it does — that faint tang underneath the coconut — comes from lactic acid produced by wild yeasts and bacteria during longer fermentation. Two hours is not enough time for that to develop.
An 8–18 hour ferment with a small amount of yeast produces a batter that is genuinely sour and complex. The yeast does the structural work of creating bubbles and lift; the long time at room temperature allows the wild fermentation to develop the flavour. This is why traditional Sri Lankan hopper batter uses toddy — fermented palm sap — as the leavening agent rather than commercial yeast. Toddy is already alive with wild yeasts and bacteria that produce both the lift and the sour flavour simultaneously.
This recipe uses a small amount of dried yeast with an overnight ferment. It is the closest approximation to traditional toddy-fermented batter that a home cook outside Sri Lanka can produce without specialist ingredients. If you are short on time, 4 hours works. The hoppers will be correct in texture but milder in flavour.
Do you need a hopper pan?
A proper appachatti — the small, curved, wok-like pan sold specifically for hoppers — produces the best result. The shape is structural: the curve is what allows the batter to climb the walls and set crisp while the centre cooks soft. Most Sri Lankan and South Asian grocery stores carry them. They are inexpensive and last indefinitely.
If you do not have one, a small wok with a 20–22cm base works reasonably well. A regular frying pan does not — the flat base means the batter spreads instead of climbing walls, and you get a flat, crêpe-like result rather than a bowl shape.
The pan must have a lid that fits. The lid is not optional. The centre of the hopper cooks by steam trapped under the lid — without it the centre stays raw while the edges burn.
Ingredients
Makes 10–12 hoppers | Serves 4
Batter (make 8–18 hours before cooking):
- 250g (2 cups) rice flour — not glutinous rice flour
- 400ml (1¾ cups) thin coconut milk
- 100ml (scant ½ cup) water, lukewarm
- 1 tsp caster sugar
- ¼ tsp dried active yeast (not instant yeast — see note)
- ½ tsp salt
To cook:
- 200ml (scant 1 cup) thick coconut milk — added to batter just before cooking
- Coconut oil or neutral oil — for greasing the pan
For egg hoppers (optional):
- 4–6 eggs — 1 per hopper
Instructions
Step 1 — Make the batter (8–18 hours before cooking)
Combine the lukewarm water, sugar, and yeast in a small bowl. Stir and leave for 10 minutes until the surface is foamy. If nothing happens after 10 minutes the yeast is dead — start again with fresh yeast.
In a large bowl, whisk the rice flour, thin coconut milk, and salt together until smooth with no lumps. Add the activated yeast mixture and whisk again. The batter will be fairly thin — slightly thicker than single cream.
Cover the bowl with a clean cloth or loose-fitting lid. Leave at room temperature for 8–18 hours. Do not refrigerate during fermentation — the cold stops the yeast working.
The batter is ready when the surface has small bubbles across it and the batter smells faintly sour and yeasty. It will have risen slightly and may have a few larger bubbles at the edges of the bowl. If it smells strongly alcoholic rather than faintly sour, it has over-fermented — use it quickly, as the flavour will be sharp.
Step 2 — Finish the batter before cooking
Just before you are ready to cook, stir the thick coconut milk into the fermented batter. This is the step that adjusts the batter to cooking consistency and adds the final richness. The batter should now be thin enough to run freely but thick enough to coat a spoon lightly — similar to thin cream.
If the batter seems too thick, add a small splash of water and stir. If it seems thin, it is probably correct — hopper batter is thinner than most pancake batters.
Step 3 — Heat the pan
Place the appachatti over medium-high heat. Add a very small amount of coconut oil — about ¼ teaspoon — and wipe it around the pan with a folded piece of kitchen paper. The pan should be hot enough that a drop of batter sizzles and sets immediately on contact. This takes 2–3 minutes of preheating.
Step 4 — The swirl
Ladle approximately 3–4 tablespoons of batter into the centre of the hot pan. Immediately pick up the pan with both hands and swirl it in a wide, circular motion — like swirling wine in a glass — so the batter climbs the walls. It should reach about two-thirds of the way up the sides before it sets.
You have approximately 3–4 seconds to complete the swirl before the batter starts to set. Move decisively. The first hopper of the batch almost always fails — the pan temperature is not yet fully calibrated and the swirl timing is unfamiliar. This is normal. Eat the first one in the kitchen and adjust from there.
Step 5 — Cook plain hoppers
After the swirl, fit the lid and reduce the heat to medium. Cook for 90 seconds to 2 minutes. The hopper is ready when the edges are golden-brown and pulling away from the pan walls, and the centre is set and no longer glossy. Lift the hopper out with a flexible spatula — it should release cleanly. If it sticks, the pan was not hot enough before adding the batter.
Re-oil the pan lightly between every 2–3 hoppers.
Step 6 — Cook egg hoppers
Follow steps 3 and 4 exactly. After the swirl, crack one egg into the centre of the hopper immediately — before the centre batter sets. The egg white will begin to set on contact with the hot batter underneath. Fit the lid and cook for 2–2½ minutes for a runny yolk, or 3 minutes for a set yolk.
The egg white should be fully set and the edges golden-brown when the lid comes off. If the egg white is still translucent at the edges, give it another 30 seconds.
Serve egg hoppers immediately — they do not hold. The yolk continues to cook from residual heat and will be fully set within 2 minutes of leaving the pan.
What to serve hoppers with
The standard Sri Lankan hopper breakfast is: hoppers, pol sambol, parippu, and a curry. The pol sambol is not optional — the acid and heat from the coconut relish is what the hopper needs to become a meal rather than a snack.
For a simpler version: egg hoppers with pol sambol only. The runny yolk, the crisp edge, and the spiced coconut relish is one of the best combinations in Sri Lankan cooking and requires exactly two components.
Kiri appa — milk hoppers — are a sweeter version where a spoonful of thick sweetened coconut milk is poured into the centre before fitting the lid. The coconut milk sets into a soft, slightly sweet layer in the centre. Serve these alongside the savoury hoppers rather than instead of them.
Troubleshooting
Hoppers won’t release from the pan: The pan was not hot enough before adding the batter, or not enough oil was used. Heat the empty pan for longer before the next hopper and re-oil more generously.
No crispy edges: The batter is too thick or the pan is not hot enough. Thin the batter with a splash of water and ensure the pan is fully preheated before each hopper.
Flat hoppers with no bowl shape: The swirl was too slow or the batter set before it reached the walls. This is a timing issue — you need to swirl faster and more decisively. It improves significantly after the first few hoppers.
Batter tastes too sour: It over-fermented. Use it quickly and reduce fermentation time next time. Slightly over-fermented batter still makes perfectly edible hoppers — the flavour is sharper but not unpleasant.
Centre is raw when edges are done: The lid was not fitted, or there is not enough batter in the centre. Ensure the lid is on for the entire cook time.
Storage
Hopper batter keeps in the refrigerator for 2 days after the thick coconut milk is added. Bring to room temperature for 30 minutes before cooking — cold batter does not swirl and set correctly.
Cooked hoppers do not store well. The crispy edges soften within minutes. Cook and eat immediately.
Substitutions
No dried active yeast: Instant yeast works at the same quantity. The result is similar though the fermentation is slightly less complex. Do not use baking powder — it produces a completely different texture with no sour flavour.
No appachatti: A small wok with a 20–22cm base is the next best option. Avoid non-stick coatings if possible — bare carbon steel or cast iron holds heat more evenly and produces crispier edges.
No rice flour: Ground rice (coarser) can be used but the batter will need longer to become smooth and the texture is slightly grainier. Do not substitute wheat flour — the gluten structure produces a completely different result.
Love Sri Lankan food?
Check out my complete guide to Sri Lankan home cooking, pantry essentials, and techniques.
FAQ
What is the difference between Sri Lankan hoppers and South Indian appam? Sri Lankan appa and South Indian appam are the same dish with regional variations in batter and serving style. Sri Lankan hoppers tend to use a slightly higher ratio of coconut milk and are typically served with pol sambol and curry. South Indian appam is often served with a sweetened coconut milk called thenga paal or with vegetable stew. The fermentation method and pan are identical.
Can you make hoppers without fermentation? You can make a hopper-shaped pancake with baking powder instead of fermented batter. The texture — crispy edges, soft centre — will be similar. The flavour will not. The faint sourness that makes a hopper taste like a hopper comes from fermentation and cannot be replicated with a chemical leavener. If you are short on time, a 4-hour ferment with standard yeast produces an acceptable result. Less than that and the flavour is noticeably flat.
Why does the first hopper always fail? The first hopper of every batch is a calibration hopper. The pan temperature, batter thickness, and swirl timing all need one attempt to settle. Sri Lankan cooks know this and account for it. Eat the first one in the kitchen, adjust if needed — more heat, thinner batter, faster swirl — and the second one onwards will be correct.
What pan do you use for hoppers? A traditional appachatti — a small, curved pan with a diameter of about 20cm and a depth of about 8cm, sold in Sri Lankan and South Asian grocery stores. Carbon steel or bare aluminium produces the best crispy edges. Non-stick works but produces a slightly less crispy result. A small wok is a reasonable substitute.
Sri Lankan Hoppers (Appa) Recipe — Plain and Egg Hoppers
PT20M + 8–18 hrs fermentation
PT30 M
PT14H50M
Nutrition Facts
Ingredients
- 250g (2 cups) rice flour — not glutinous rice flour
- 400ml (1¾ cups) thin coconut milk
- 100ml (scant ½ cup) water, lukewarm
- 1 tsp caster sugar
- ¼ tsp dried active yeast (not instant yeast — see note)
- ½ tsp salt
- 200ml (scant 1 cup) thick coconut milk — added to batter just before cooking
- Coconut oil or neutral oil — for greasing the pan
- 4–6 eggs — 1 per hopper
Instructions
- Step 1 — Make the batter (8–18 hours before cooking)
- Step 2 — Finish the batter before cooking
- Step 3 — Heat the pan
- Step 4 — The swirl
- Step 5 — Cook plain hoppers
- Step 6 — Cook egg hoppers
Did you make this recipe?
Tag @asianfoodsdaily on Instagram or leave a comment below!
About Asha
Half Asian, half African cook raised between two food-obsessed cultures. I've spent 10 years learning Asian cooking traditions through family, friends, and thousands of hours at the stove — testing every dish until it works in a standard home kitchen.
Read my full storyRelated Recipes
Sri Lankan Pol Sambol (Coconut Sambol) Recipe

Sri Lankan Parippu (Dhal Curry) Recipe

How to Make Korean Jangjorim (Easy Soy-Braised Beef & Eggs)

Chinese Tomato Egg Stir Fry

How to Make Korean Steamed Eggs (Gyeran-jjim) Like a Pro

Loading comments...