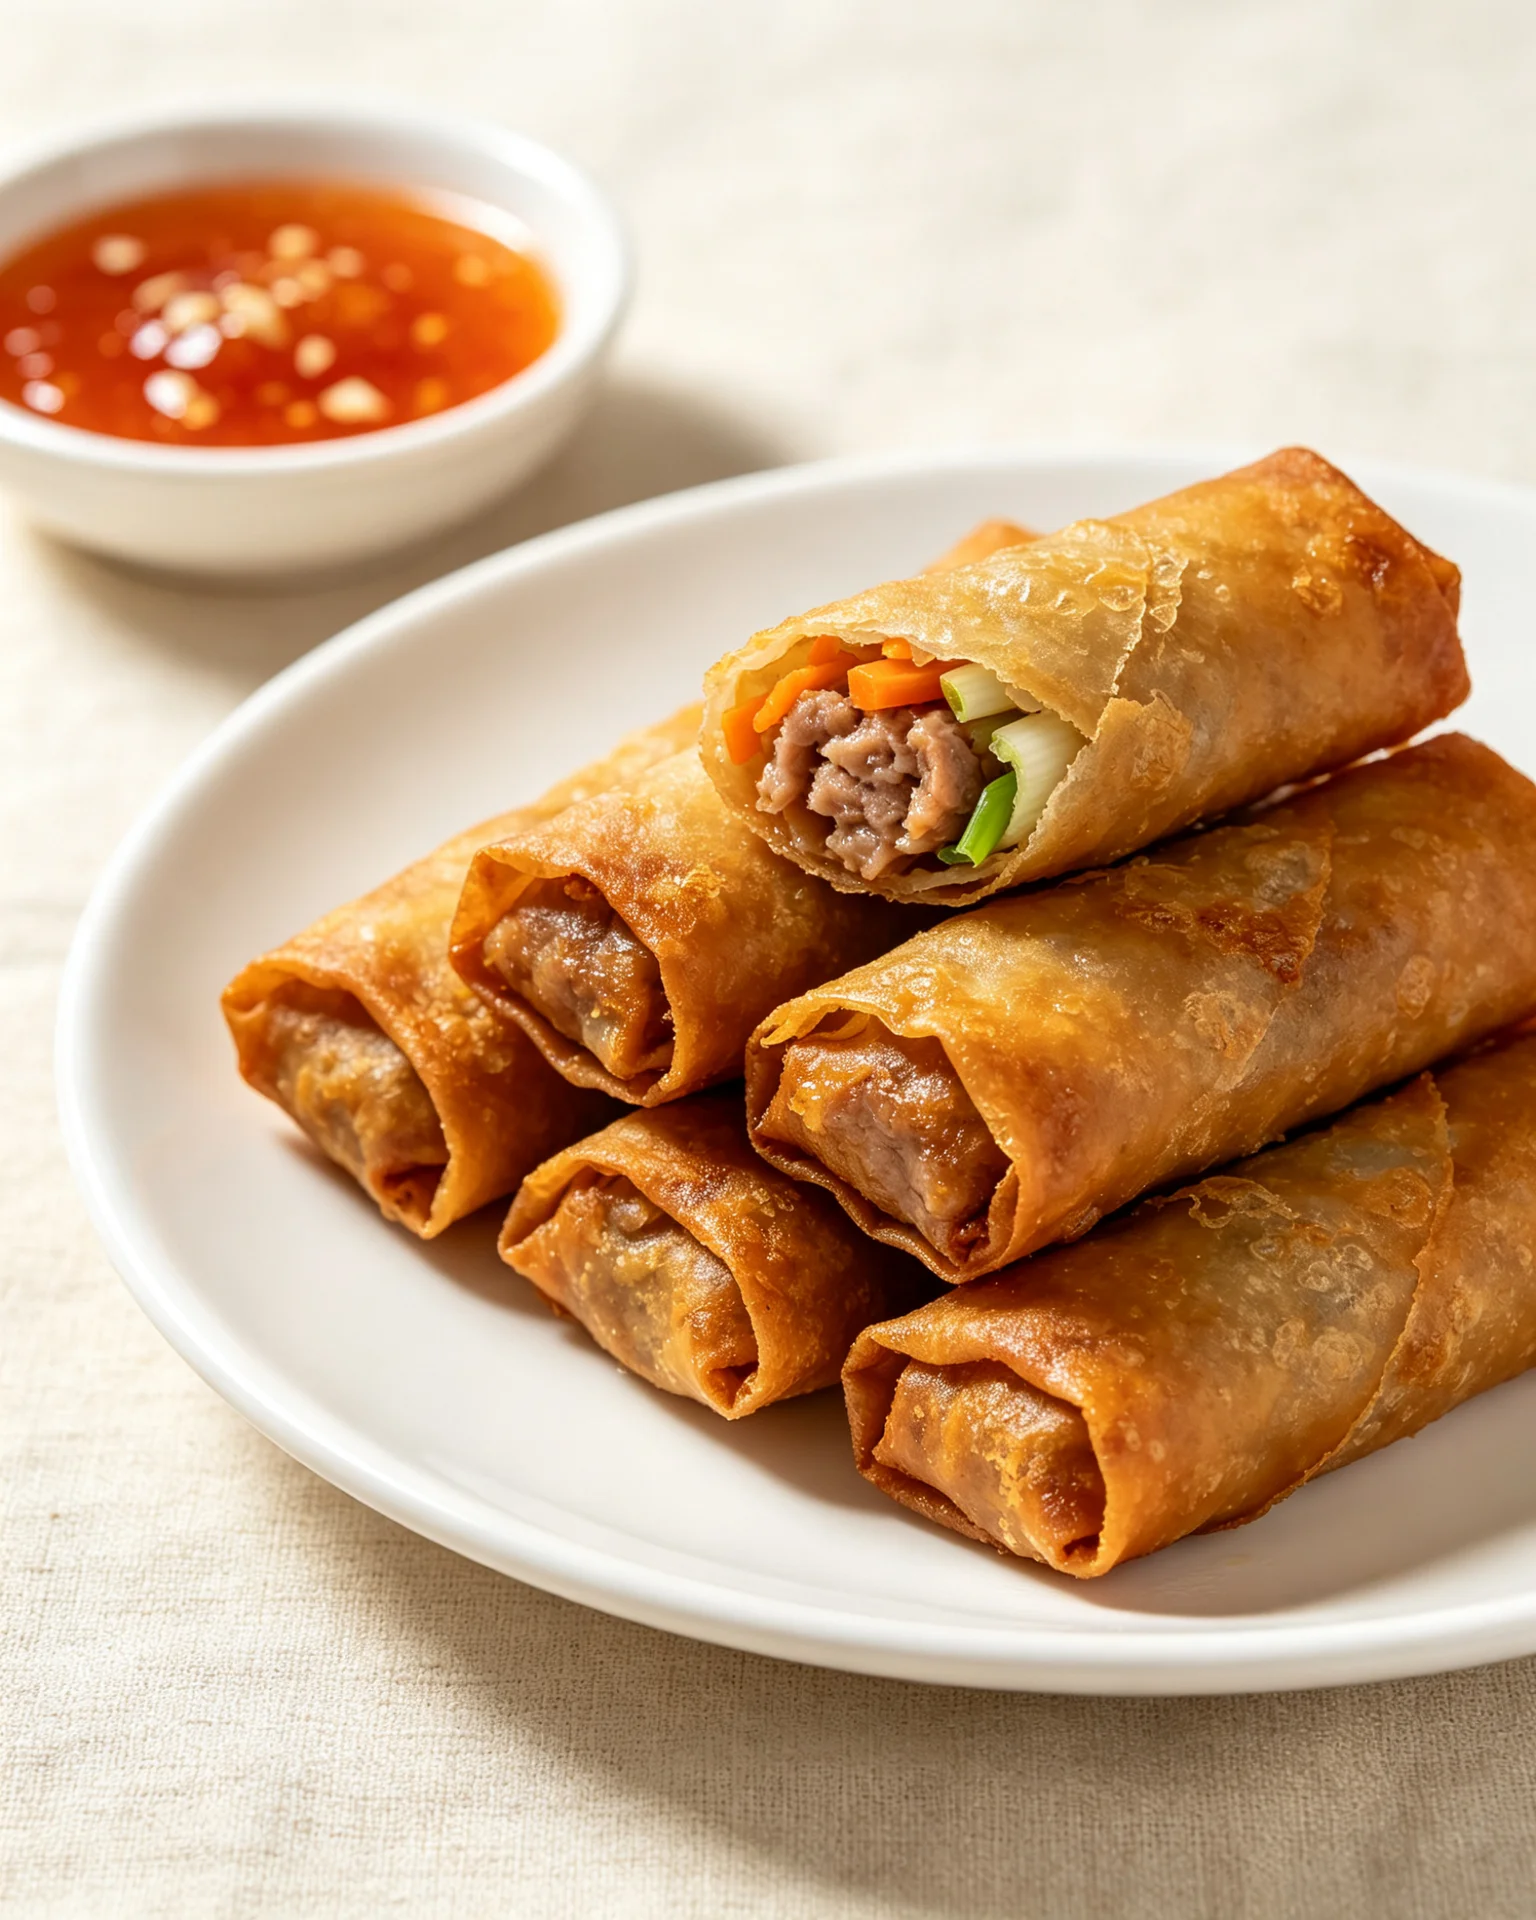
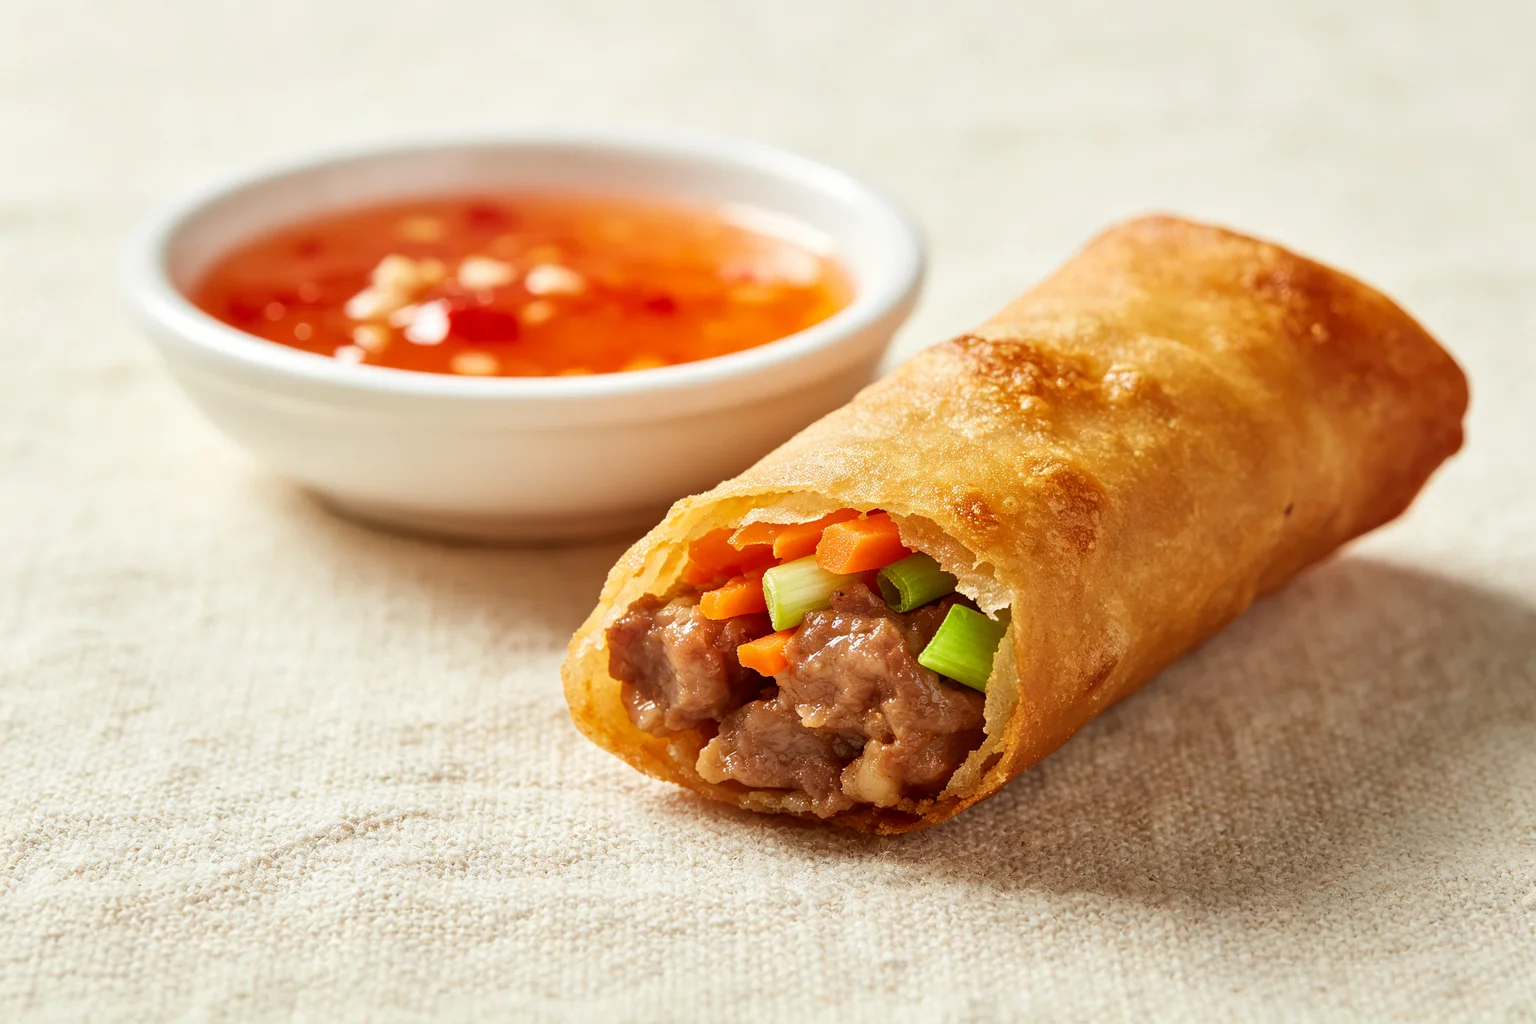
Filipino Lumpia Recipe (Lumpiang Shanghai)
The first batch I fried at home came out soft and slightly greasy. The oil looked hot, it was shimmering, there was some steam, but when the lumpia went in, the wrappers absorbed the oil instead of crisping in it. They flopped rather than shattered. I ate them anyway. They tasted correct but felt completely wrong.
The issue was temperature. The oil was around 160°C rather than 175°C. At 160°C, oil penetrates the wrapper surface before the wheat starch has time to gelatinise and crisp. The wrapper absorbs fat rather than repelling it. At 175°C, the surface moisture evaporates almost instantly on contact and the starch crisps simultaneously. The window is narrow and the result on either side of it is noticeably different. This recipe explains the full temperature logic, the hand-mixing technique that produces the juicy filling, and why the filling goes in raw rather than pre-cooked.
What is lumpiang Shanghai and what makes it different from other lumpia?
Lumpia is the Filipino word for spring roll, borrowed from the Hokkien Chinese word for a similar dish brought to the Philippines by Chinese traders and immigrants. There are many types of lumpia in Filipino cooking, lumpiang sariwa (fresh lumpia in a soft wrapper, not fried), lumpiang ubod (heart of palm filling), turon (sweet banana and jackfruit), lumpiang gulay (vegetable). Lumpiang Shanghai is specifically the thin, tightly rolled, deep-fried version filled with seasoned ground pork and vegetables.
The Shanghai in the name is a point of curiosity. It does not refer to Shanghai, China. The term became attached to this specific style of thin, tightly rolled meat lumpia through the Tsinoy community, Chinese-Filipinos (Tsinoys) whose cooking traditions fused Chinese and Filipino techniques over generations. The exact origin of the name is not definitively documented, but it is consistently Filipino rather than Chinese. In the Philippines, ordering lumpia at a carinderia or a fiesta table means this: small, slender, golden, shatteringly crispy pork rolls.
Compared to Chinese spring rolls: lumpia Shanghai is significantly thinner, rolled tighter, and has a crispier wrapper. The filling is simpler and more pork-forward. Compared to Vietnamese chả giò: lumpia Shanghai has no glass noodles or wood ear mushrooms in the filling. The character is all pork, lightly vegetables, very crispy.
Why do you mix the lumpia filling by hand and not with a spoon?
Ground pork contains myosin, a structural protein that forms elastic networks when worked mechanically. Hand mixing in a circular motion for 2-3 minutes develops this myosin network through the filling. The resulting network produces a slightly springy, cohesive texture in the cooked filling, it holds together when bitten and does not crumble or fall apart inside the wrapper.
A spoon or spatula does not apply sufficient mechanical energy to adequately develop the network. The filling mixed by spoon produces a looser, more crumbly texture after frying. Not unpleasant, but noticeably different from the springy, cohesive filling at a good carinderia.
The test for properly mixed filling: pull a small amount away from the mass. It should stretch slightly rather than breaking cleanly. At that point the myosin network is developed. Two to three minutes of hand mixing is typically enough. Beyond three minutes the filling becomes sticky and slightly gluey, the upper limit matters as well.
Mix with one clean hand, keeping the other free. Use a scooping, circular, folding motion rather than stirring. The goal is to thoroughly combine while developing the protein structure.
Why is the lumpia filling not pre-cooked before wrapping?
Pre-cooking drives moisture out of the ground pork and the vegetables before the lumpia is assembled. A pre-cooked filling inside a fried wrapper produces a dry, slightly dense interior, the moisture that should be in the filling has already been cooked away before the frying even begins.
Raw filling retains all its moisture. When the assembled lumpia goes into hot oil, the water inside the raw filling converts to steam. That steam is trapped inside the sealed wrapper and bastes the filling from the inside as it fries. The pork fat renders into the filling during frying, adding further moisture and richness. The vegetables release their liquid into the filling rather than into the frying oil.
The combined result: a juicy, tender interior within a shatteringly crispy exterior. The contrast between the two textures is the defining quality of a properly made lumpiang Shanghai. Pre-cooking eliminates that contrast.
The concern with raw filling is food safety, the pork must cook through fully during frying. At 175°C for 3-4 minutes, a thin log of raw filling (approximately 1cm in diameter, which is what a tight lumpia roll produces) cooks completely through. The visual check: the wrapper is deep golden and the filling feels firm when the lumpia is pressed gently.
Why do you keep lumpia wrappers under a damp towel?
Lumpia wrappers are sold as pressed stacks of partially dehydrated thin crepe, each wrapper contains enough moisture to be pliable fresh, but they lose that moisture rapidly when exposed to air.
A dehydrated lumpia wrapper is brittle. It cracks when folded, tears at the edges when rolled, and splits along seams during frying. The damp towel slows moisture evaporation, keeping the wrappers pliable throughout the rolling session.
Two additional steps that matter: take the wrapper stack out of the package 20-30 minutes before you start rolling and let it reach room temperature. Cold wrappers from the refrigerator are stiffer and more prone to cracking. Also, separate the wrappers from the pressed stack one by one before you start rolling rather than pulling them from the stack as you go, they are much easier to separate when slightly warmed and relaxed than when cold and compressed together.
Work with one wrapper at a time and keep the rest under the towel.
What oil temperature produces crispy lumpia and what happens on either side of it?
175°C is the target. This is not an approximation, the temperature range matters.
At 175°C, the surface moisture of the lumpia wrapper evaporates almost instantly on contact with the hot oil. The wheat starch in the wrapper simultaneously gelatinises and crisps in the fat. The wrapper produces a thin, shatteringly crispy shell that does not absorb the oil.
Below 165°C: the oil is hot enough to cook but not hot enough for rapid moisture evaporation. The oil penetrates the wrapper before the starch can crisp. The wrapper absorbs fat and turns greasy and soft. The lumpia cooks through but emerges limp.
Above 185°C: the wrapper browns and crisps before the raw filling inside has cooked through. The exterior looks done, deep golden, crispy, but the pork is still raw in the centre.
Temperature test: lower a wooden chopstick vertically into the oil. At 175°C, small steady bubbles form around the chopstick immediately. At 160°C, the bubbles are slow and sparse. At 190°C, the bubbles are aggressive and the chopstick colours within seconds.
Cook in batches of 6-8 pieces maximum. Each piece added to the oil drops the oil temperature. Too many pieces at once drops the temperature below the threshold and the first batch goes greasy before recovery. Between batches, allow the oil to return to 175°C before adding more.
How do you roll lumpia tightly and why does tightness matter?
A loose lumpia has air pockets between the filling and the wrapper. When that air heats up during frying, the wrapper separates from the filling and bubbles out. The wrapper cooks unevenly, some sections bubble and brown faster than others, some areas remain pale. The lumpia looks uneven and some of the wrapper sections taste under-fried.
A tight lumpia has the wrapper in continuous contact with the filling. It fries evenly and the finished roll has a uniform golden colour across its entire surface.
Rolling technique: lay the wrapper as a diamond with one point facing you. Place approximately 1.5-2 teaspoons of filling in a thin log shape across the lower third of the wrapper, approximately 1cm from the bottom edge. Leave about 1.5cm clear at each end of the log. Fold the bottom point up over the filling and press firmly. Fold the left and right points inward over the ends of the filling log. Roll forward firmly, pressing the filling tight as you go. Seal the final point with a small amount of beaten egg or a paste made from flour and water.
The seal is important, unsealed lumpia unwraps in the oil and the filling disperses into the frying fat. Egg wash sets quickly in the hot oil and holds the seal. Press the sealed edge for 3-5 seconds before placing in the oil.
Ingredients
Makes 40-45 pieces
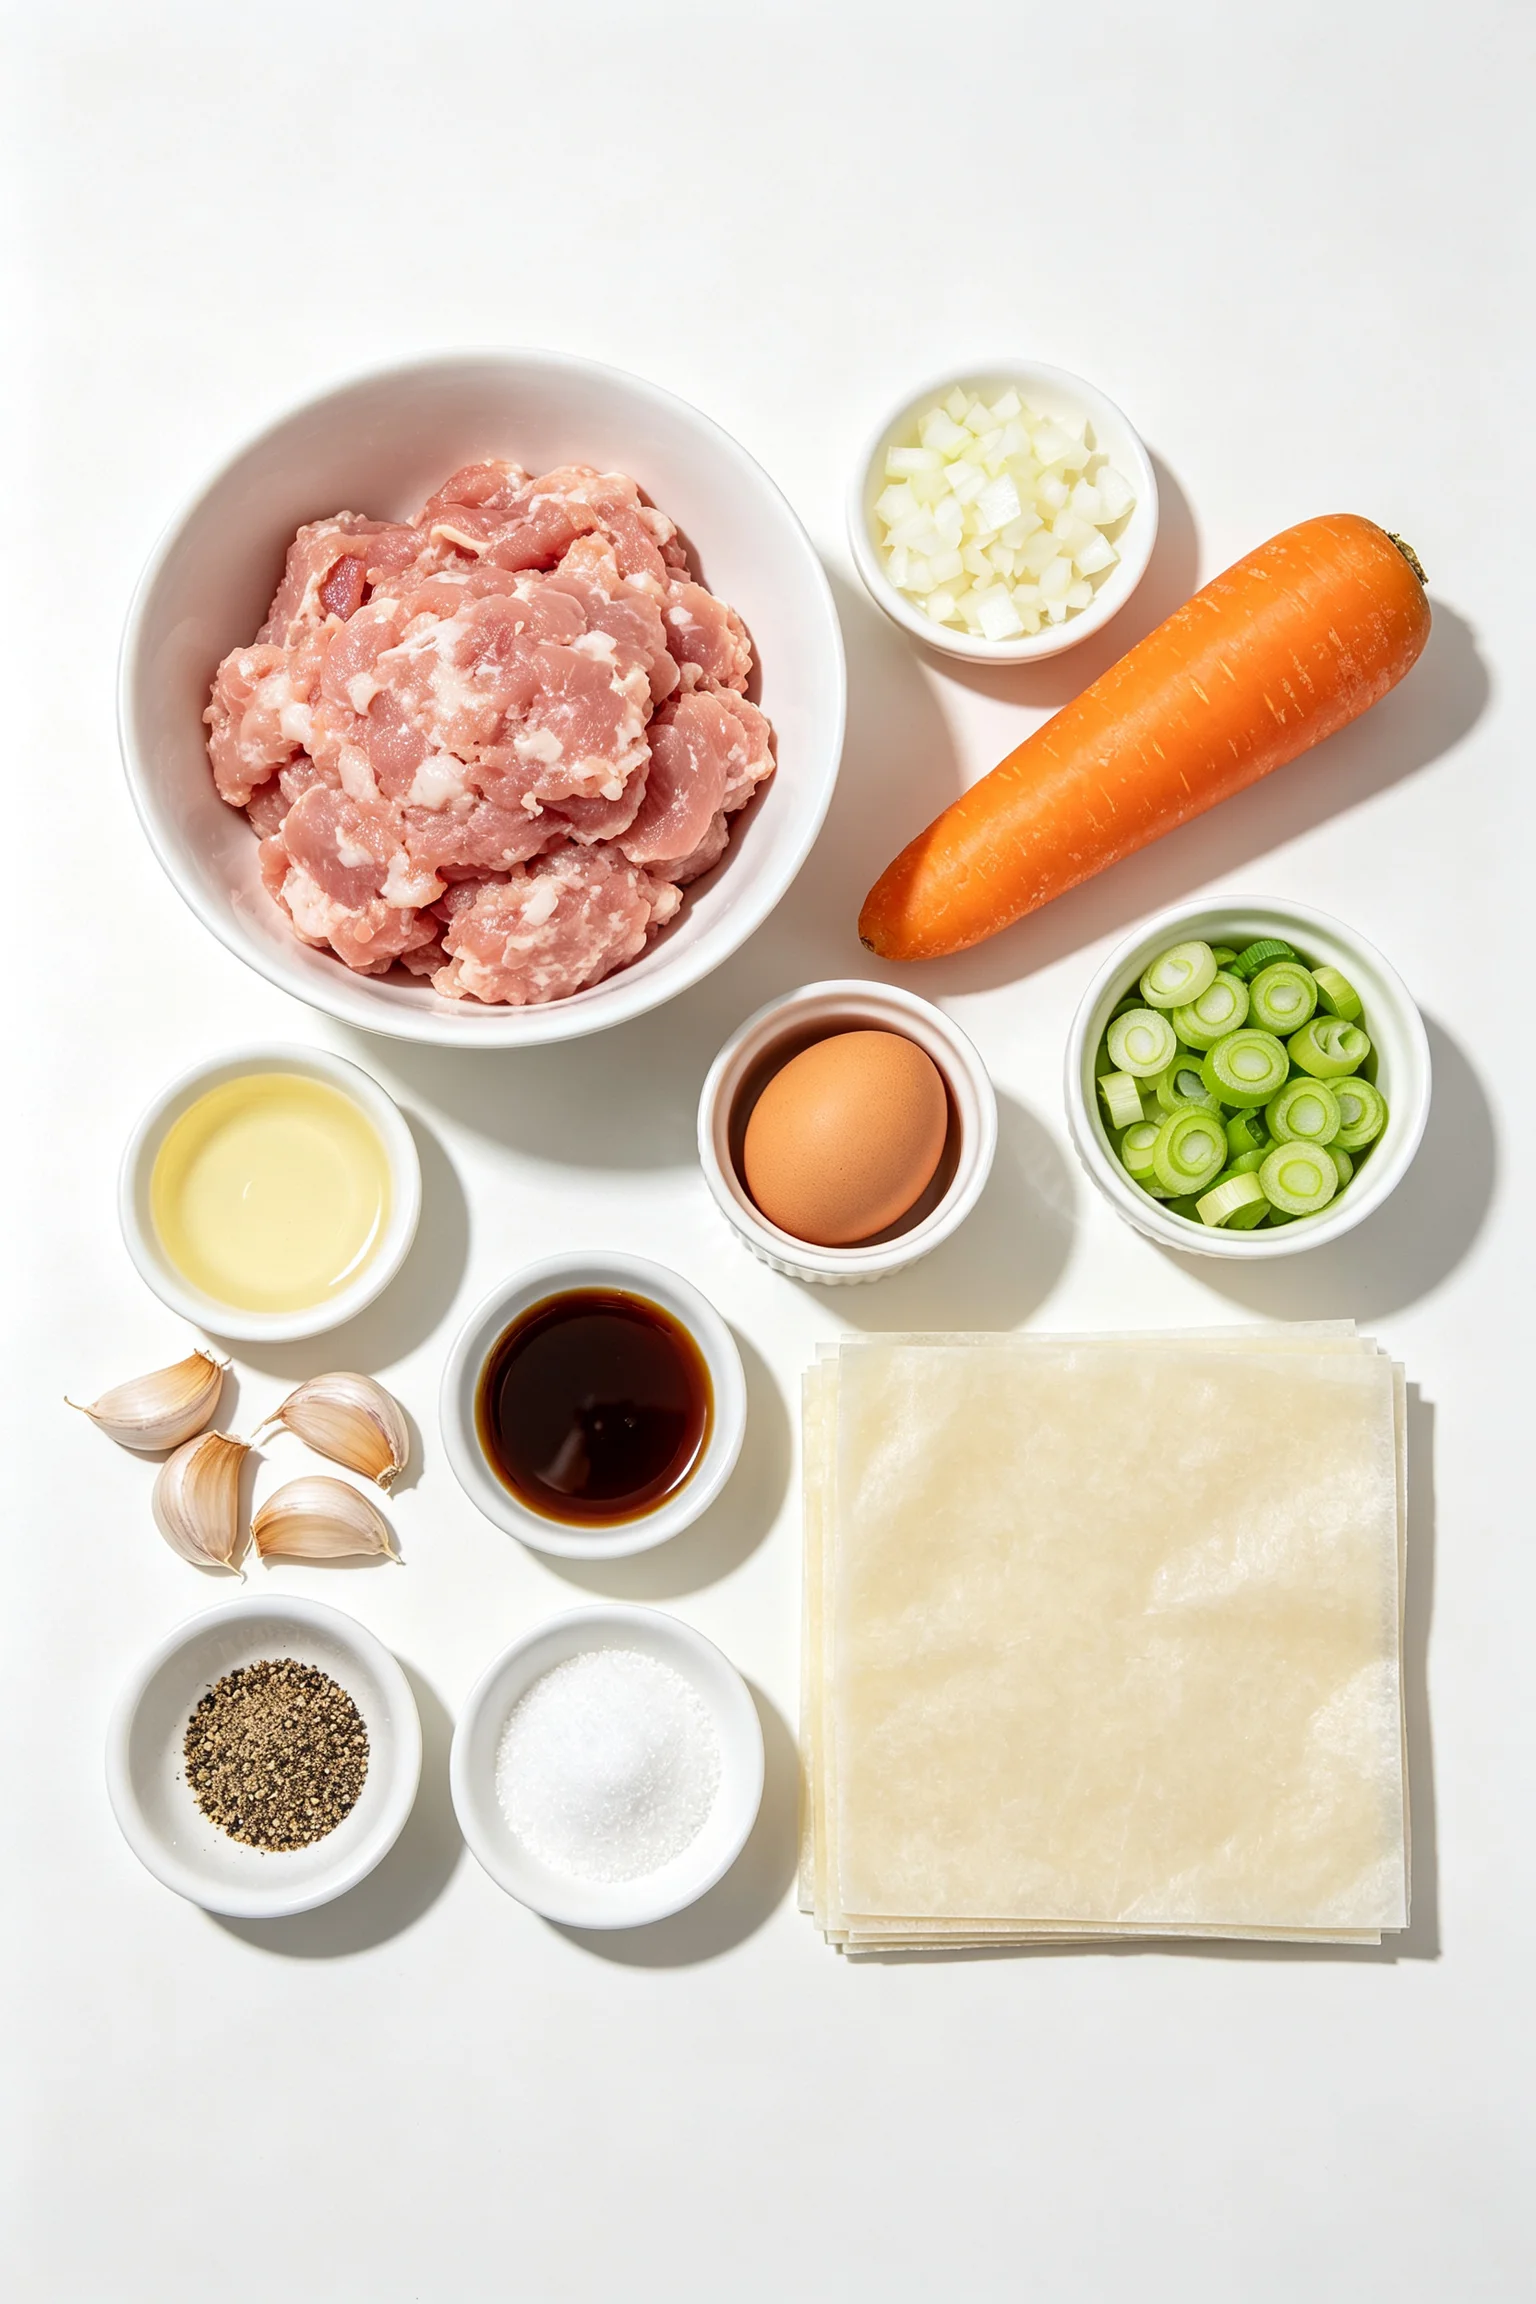
Filling:
- 500g (1lb 2oz) ground pork (80/20 lean to fat, not extra-lean)
- 1 medium carrot, finely grated or minced
- 1 medium onion, finely minced
- 4 garlic cloves, finely minced
- 3 spring onions, thinly sliced
- 1 egg, beaten
- 2 tbsp oyster sauce
- 1 tbsp soy sauce
- 1 tsp fish sauce
- 1 tsp sesame oil
- ½ tsp ground black pepper
- ½ tsp salt
For assembly:
- 40-45 lumpia wrappers (Spring Home brand is widely available and reliable)
- 1 egg beaten with 1 tbsp water (for sealing)
- Neutral oil for frying (approximately 750ml-1 litre depending on pot size)
Sweet-sour dipping sauce:
- 4 tbsp rice vinegar or white vinegar
- 4 tbsp sugar
- 2 tbsp soy sauce
- 1 tbsp ketchup
- 1 tsp cornstarch mixed with 2 tbsp cold water
- 1 garlic clove, finely minced
- 1 bird’s eye chilli, thinly sliced (optional)
Instructions
Start by making the dipping sauce and preparing the filling. Roll and fry in one continuous session.
Step 1: Make the dipping sauce
Combine vinegar, sugar, soy sauce, and ketchup in a small saucepan over medium heat. Stir until sugar dissolves.
Step 2: Mix the filling
Combine all filling ingredients in a large bowl. Mix with one clean hand using a scooping, circular, folding motion for 2-3 minutes until the mixture is uniform and slightly elastic when pulled.
Taste-test the seasoning: fry a small teaspoon of filling in a hot pan for 30 seconds. Taste. Adjust salt, pepper, or soy sauce before rolling the full batch. You cannot adjust seasoning after rolling.
Step 3: Prepare the wrappers
Remove the wrapper stack from the refrigerator 20-30 minutes before rolling. Separate all wrappers from the pressed stack and lay them in a single pile under a barely damp kitchen towel.
Step 4: Roll the lumpia
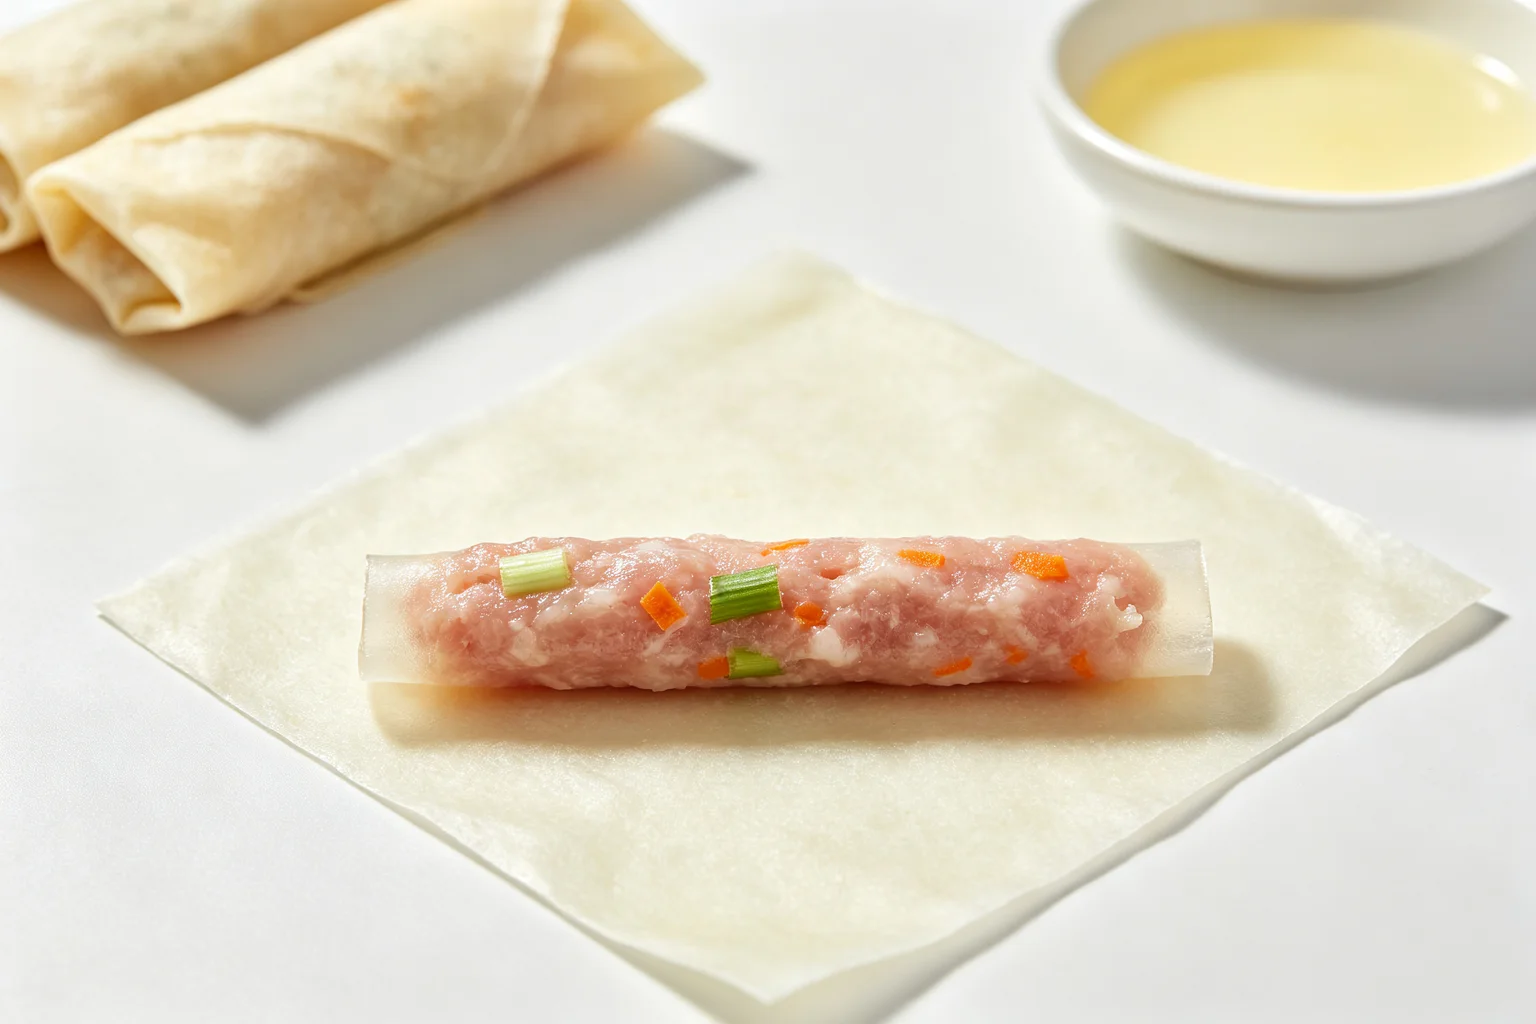
Place one wrapper on the work surface as a diamond. Spoon 1.5-2 teaspoons of filling across the lower third in a thin log, leaving 1.5cm clear at each end.
Keep rolled lumpia covered with the damp towel while rolling the rest to prevent the wrappers from drying.
Step 5: Fry
Heat neutral oil to 175°C in a wok or deep saucepan. The oil should be at least 6cm deep to allow the lumpia to float freely.
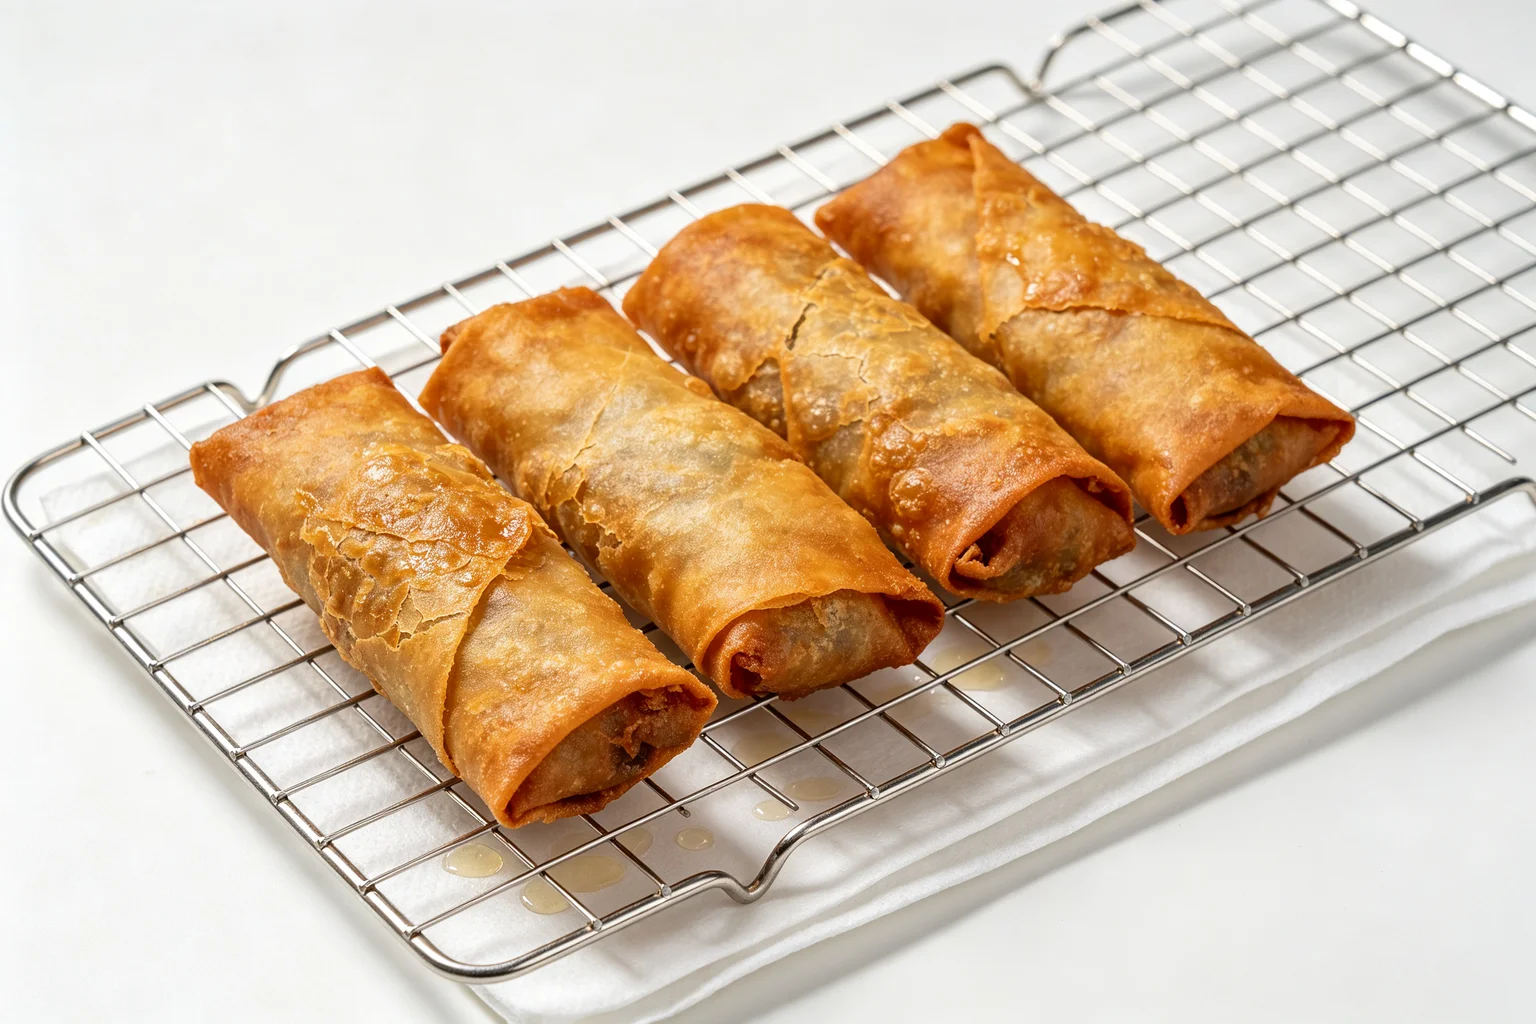
Fry in batches of 6-8 pieces. Lower gently into the oil seam-side down. Fry 3-4 minutes, turning once halfway, until deep golden all over and the filling feels firm when pressed. Remove with tongs or a slotted spoon. Drain on a wire rack rather than kitchen paper, a rack allows air circulation underneath and keeps the bottom crispy. Kitchen paper traps steam and softens the underside.
Allow the oil to return to 175°C between batches.
Step 6: Serve
Serve immediately. Lumpia is best eaten within 5-10 minutes of frying while the wrapper is at maximum crispness.
How do you freeze lumpia properly?
Freeze before frying, not after. Fried lumpia freezes and reheats poorly, the wrapper loses its crispness completely when thawed and reheated.
Roll the lumpia as per the instructions above. Place in a single layer on a parchment-lined tray without the pieces touching each other. Freeze for 2-3 hours until each piece is completely solid. Transfer to a freezer bag. Frozen solid pieces do not stick together, this step is the entire reason for the tray-freeze. Lumpia placed directly into bags before freezing bonds together as surface moisture freezes and links adjacent pieces. Once frozen together they cannot be separated without tearing the wrapper.
Frozen lumpia keeps for 3 months. Fry from frozen at 165°C rather than 175°C, slightly lower than fresh because the frozen filling needs more time to heat through without the wrapper browning too fast. Fry 5-6 minutes rather than 3-4. Do not thaw before frying, condensation from thawing makes the wrapper wet and it will not crisp properly.
What is the dipping sauce for lumpiang Shanghai?
The most common dipping sauce in Filipino homes and carinderias is a sweet-sour sauce built on vinegar, sugar, soy sauce, and sometimes ketchup or banana ketchup. The sweet-sour balance cuts through the richness of the fried pork filling and the fat from the wrapper.
Sawsawan, the Filipino word for dipping sauce, varies by household and region. Some versions use pure coconut vinegar (sukang tuba) which produces a slightly funkier, more complex sourness. Some versions use banana ketchup, which is sweeter and fruitier than tomato ketchup and is specifically Filipino. Bottled Mang Tomas sarsa, the most widely sold Filipino all-purpose sauce, is a common commercial alternative.
For the simplest version: combine equal parts white vinegar and sugar, add a splash of soy sauce and minced garlic, and serve cold. No cooking required. This is the everyday version.
Love Filipino food?
Check out my complete guide to Filipino home cooking, pantry essentials, and techniques.
FAQ
Why is my lumpia greasy and not crispy? The oil temperature was below 175°C when the lumpia went in. Below 165°C, oil penetrates the wrapper before the wheat starch can gelatinise and crisp. Always verify temperature with a wooden chopstick before adding lumpia, steady immediate small bubbles mean 175°C. Also check that you are not overcrowding the pot. Too many pieces drop the oil temperature below the threshold and the first pieces absorb oil during the recovery time.
Can I make lumpia Shanghai in an air fryer? Yes, with results that are close to but not identical to deep-fried. Brush or spray the rolled lumpia lightly with neutral oil. Air fry at 200°C for 10-12 minutes, turning once at 6 minutes. The wrapper crisps from dry heat rather than oil immersion and produces a slightly different texture, less shatteringly crisp, more uniformly crunchy. The filling cooks through correctly. For a party quantity of 40+ pieces, an air fryer is significantly slower than deep frying.
How do I stop lumpia from opening during frying? The seal was insufficient. Apply egg wash to the final point of the wrapper generously and press firmly for 3-5 seconds before placing seam-side down in the oil. The egg proteins set quickly in the hot fat and bond the wrapper closed. A flour-and-water paste works as well. Lower the lumpia seam-side down into the oil so the first contact seals the seam before the roll can open.
What is the difference between lumpia wrappers and egg roll wrappers? Lumpia wrappers are significantly thinner, approximately 0.5-1mm compared to egg roll wrappers at 2-3mm. Lumpia wrappers produce a lighter, crispier, more delicate shell after frying. Egg roll wrappers produce a thicker, chewier exterior with more visible layers. The two are not interchangeable in this recipe, egg roll wrappers produce a completely different eating experience and require longer frying time. Spring roll wrappers from Chinese cooking are the closest substitute to lumpia wrappers if the Filipino-specific product is unavailable.
You might also like: Check out our complete Filipino cooking guide for more essential ingredients and techniques.
Filipino Lumpia Recipe (Lumpiang Shanghai)
lumpia, Filipino recipes, spring rolls
PT30M
PT20M
PT50M
Nutrition Facts
Ingredients
- 500g (1lb 2oz) ground pork (80/20 lean to fat, not extra-lean)
- 1 medium carrot, finely grated or minced
- 1 medium onion, finely minced
- 4 garlic cloves, finely minced
- 3 spring onions, thinly sliced
- 1 egg, beaten
- 2 tbsp oyster sauce
- 1 tbsp soy sauce
- 1 tsp fish sauce
- 1 tsp sesame oil
- ½ tsp ground black pepper
- ½ tsp salt
- 40-45 lumpia wrappers (Spring Home brand is widely available and reliable)
- 1 egg beaten with 1 tbsp water (for sealing)
- Neutral oil for frying (approximately 750ml-1 litre depending on pot size)
- 4 tbsp rice vinegar or white vinegar
- 4 tbsp sugar
- 2 tbsp soy sauce
- 1 tbsp ketchup
- 1 tsp cornstarch mixed with 2 tbsp cold water
- 1 garlic clove, finely minced
- 1 bird's eye chilli, thinly sliced (optional)
Instructions
- Step 1: Make the dipping sauce - Combine vinegar, sugar, soy sauce, and ketchup in a small saucepan over medium heat. Stir until sugar dissolves. Add the cornstarch slurry and stir continuously until the sauce thickens and turns glossy, approximately 2-3 minutes. Add garlic and chilli if using. Remove from heat. Cool before serving.
- Step 2: Mix the filling - Combine all filling ingredients in a large bowl. Mix with one clean hand using a scooping, circular, folding motion for 2-3 minutes until the mixture is uniform and slightly elastic when pulled. Do not over-mix. Cover and refrigerate for 30 minutes, this resting time allows the flavours to develop and firms the filling slightly, making it easier to roll. Taste-test the seasoning: fry a small teaspoon of filling in a hot pan for 30 seconds. Taste. Adjust salt, pepper, or soy sauce before rolling the full batch. You cannot adjust seasoning after rolling.
- Step 3: Prepare the wrappers - Remove the wrapper stack from the refrigerator 20-30 minutes before rolling. Separate all wrappers from the pressed stack and lay them in a single pile under a barely damp kitchen towel. They should be pliable and not stiff.
- Step 4: Roll the lumpia - Place one wrapper on the work surface as a diamond. Spoon 1.5-2 teaspoons of filling across the lower third in a thin log, leaving 1.5cm clear at each end. Fold the bottom point firmly over the filling. Fold both side points inward over the log ends. Roll forward tightly, pressing the filling snug with each roll. Seal the top point with egg wash and press for 3-5 seconds. Place seam-side down on a tray. Keep rolled lumpia covered with the damp towel while rolling the rest to prevent the wrappers from drying.
- Step 5: Fry - Heat neutral oil to 175°C in a wok or deep saucepan. The oil should be at least 6cm deep to allow the lumpia to float freely. Test with a wooden chopstick, steady immediate bubbles at the base. Fry in batches of 6-8 pieces. Lower gently into the oil seam-side down. Fry 3-4 minutes, turning once halfway, until deep golden all over and the filling feels firm when pressed. Remove with tongs or a slotted spoon. Drain on a wire rack rather than kitchen paper, a rack allows air circulation underneath and keeps the bottom crispy. Kitchen paper traps steam and softens the underside. Allow the oil to return to 175°C between batches.
- Step 6: Serve - Serve immediately. Lumpia is best eaten within 5-10 minutes of frying while the wrapper is at maximum crispness. The dipping sauce alongside.
Did you make this recipe?
Tag @asianfoodsdaily on Instagram or leave a comment below!
About Asha
Half Asian, half African cook raised between two food-obsessed cultures. I've spent 10 years learning Asian cooking traditions through family, friends, and thousands of hours at the stove — testing every dish until it works in a standard home kitchen.
Read my full storyRelated Recipes

Easy Filipino Pork Adobo Recipe
Pancit Bihon Recipe (Filipino Noodles)

Sinigang na Baboy – Authentic Filipino Tamarind Soup

Filipino Chicken Adobo Recipe

How to Make Quick and Delicious Pork Sisig

Loading comments...